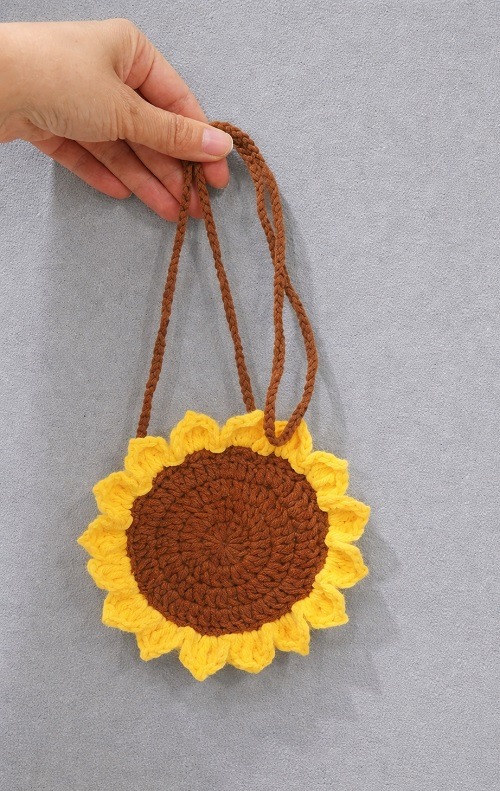
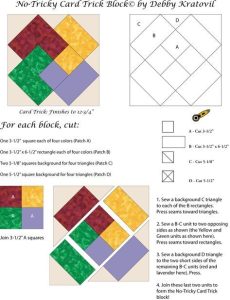
String Bag With Floral Motif - Tutorial

The Crochet Chicken Coaster – Pattern is a delightful project that will bring a fun and whimsical touch to your kitchen or dining room.
Whether you’re an experienced crocheter or a beginner, this pattern is perfect for anyone looking to create something charming and practical.
Coasters are a must-have in any home, and adding a cute chicken design will make them even more enjoyable to use.
In this article, we will walk you through the steps to create your very own Crochet Chicken Coaster – Pattern, providing you with detailed instructions, helpful tips, and creative suggestions to personalize your coasters.
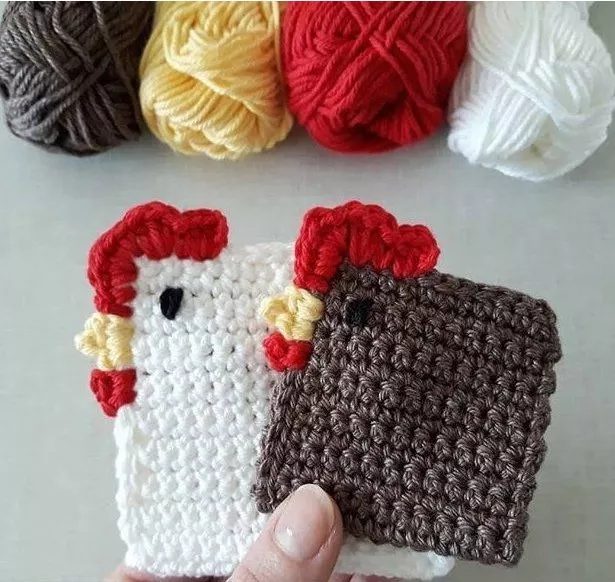
Image From Pinterest
Coasters are not only functional, protecting your furniture from moisture and stains, but they can also be a great way to showcase your creativity. The Crochet Chicken Coaster – Pattern offers a playful design that can easily be customized to suit your style. Whether you prefer a traditional chicken look or want to add your own flair with bright colors, this project can be as simple or as intricate as you want it to be. The best part is that the pattern is quick to make, allowing you to craft a set of chicken-themed coasters in no time.
Before diving into the pattern itself, it’s important to gather the materials you’ll need. The Crochet Chicken Coaster – Pattern is relatively simple to create, requiring only basic crochet skills. With the right materials and a little bit of practice, you’ll have a set of adorable chicken coasters ready to use in no time. Let’s explore the materials and tools you’ll need to get started.
To make your Crochet Chicken Coaster – Pattern, you’ll need a few basic materials. These supplies are easy to find, and many of them you may already have on hand if you’re familiar with crochet projects.
With these materials on hand, you’ll be ready to start crocheting your Crochet Chicken Coaster – Pattern!
The first step in the Crochet Chicken Coaster – Pattern is creating the basic shape of the chicken. This step involves crocheting in the round, which allows you to create the circular shape of the coaster. Starting with a magic ring, you’ll work in rounds, gradually increasing stitches to form the body of the chicken.
Begin by making a magic ring and crocheting a few single crochet stitches into the ring. As you continue, you’ll increase the number of stitches in each round to create the circular shape. This technique is commonly used in crochet patterns for creating flat, round pieces like coasters. Keep working in rounds until you reach the desired size for your coaster. The chicken’s body should be big enough to comfortably hold a cup or glass without being too large.
After completing the body, you will add more details to the chicken, such as the head and tail. These details help transform the basic round shape into a more recognizable chicken figure. Don’t worry if your initial rounds don’t look perfect – they’ll come together as you add the finishing touches later on.
The most important thing is to keep your tension consistent, which will help the coaster maintain its shape. A tight tension will ensure that your coaster lies flat, making it functional and sturdy.
Once you have the basic shape of your chicken coaster, it’s time to add the details that bring your design to life. The Crochet Chicken Coaster – Pattern includes several fun features that will make your chicken coaster stand out, such as the beak, eyes, comb, and wattle.
These features are what make the Crochet Chicken Coaster – Pattern so charming and fun. You can use any colors you prefer for the details, and you can even get creative with different textures for added interest. Once these features are attached, your chicken coaster will begin to take shape as an adorable, functional item.
After completing the main body and features of your chicken coaster, it’s time to finish up your project. The last steps are about ensuring that the coaster is properly shaped and adding any personal touches to make it uniquely yours.
Once you’ve completed these finishing touches, your Crochet Chicken Coaster – Pattern will be ready to use or gift!
1. How long does it take to crochet a chicken coaster? Depending on your crochet skill level and the complexity of the design, a single chicken coaster can take anywhere from 30 minutes to an hour to complete.
2. Can I use any yarn for the chicken coaster? While any yarn can be used, it’s best to choose medium-weight cotton or acrylic yarn to ensure that the coaster is sturdy and absorbent.
3. Can I make different animals using this pattern? Yes! You can adapt the basic principles of the Crochet Chicken Coaster – Pattern to create coasters with other animal designs. Just modify the features and shapes to suit different animals, such as rabbits, cats, or frogs.
4. Do I need advanced crochet skills to make this coaster? No, this pattern is beginner-friendly and uses basic crochet stitches such as single crochet, slip stitch, and chain stitch. It’s a great project for those new to crochet.
5. How do I keep my crochet coaster from curling? To prevent curling, make sure you are working in even rounds and maintaining consistent tension. If necessary, block your coaster to ensure it lies flat.
6. Can I wash my crochet coasters? Yes, crochet coasters made from cotton yarn can be gently washed by hand or machine washed on a delicate cycle. Just be sure to allow them to air dry to maintain their shape.
In this article, we’ve covered everything you need to know to create your own Crochet Chicken Coaster – Pattern, from gathering materials to adding finishing touches. This fun and creative project is perfect for anyone looking to add a bit of whimsy to their home or make a thoughtful gift. With easy-to-follow instructions and a variety of customization options, you can create a set of coasters that are both practical and charming.
We hope you enjoyed this crochet project! Please share your thoughts and suggestions in the comments below. We’d love to hear how your chicken coasters turned out! Happy crocheting!

