If you are a fan of both crochet and Pokémon, making a Pikachu Amigurumi Crochet is a fun and rewarding project.
Pikachu, one of the most iconic and beloved Pokémon, is sure to be a hit with anyone who sees it.
This guide will walk you through creating your very own Pikachu amigurumi, from gathering the necessary materials to assembling the final adorable creation.
Whether you are a beginner or an experienced crocheter, this pattern will allow you to bring the cheerful Pikachu to life in your own home!
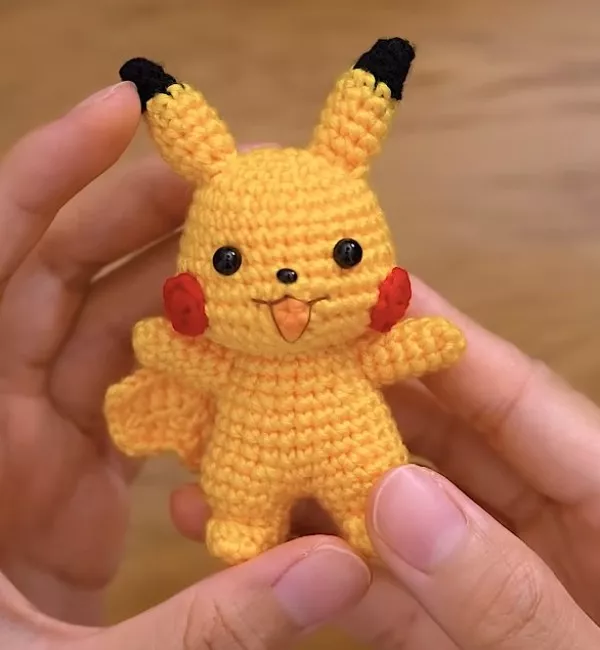
Image From Pinterest
Amigurumi is the Japanese art of crocheting small, stuffed toys, and it’s become increasingly popular worldwide. The simplicity of the technique combined with the ability to create adorable, tiny creatures makes it perfect for crocheters looking for a fun and creative project. Pikachu Amigurumi Crochet projects are especially popular because of Pikachu’s joyful character, instantly recognizable appearance, and cute design.
OTHER CROCHET PATTERNS HERE!
Making Pikachu as an amigurumi doll gives you a chance to experiment with different colors and techniques while enjoying the satisfying process of creating something cute from scratch. By the end of this tutorial, you’ll have your very own handmade Pikachu to display, gift, or keep as a collectible. Let’s get started!
1. Materials Needed
Before you begin working on your Pikachu Amigurumi Crochet, it’s important to gather all the materials. Having everything ready will help you work through the pattern with ease. Here’s a list of what you will need:
- Yarn: Choose yarn in yellow for Pikachu’s body, black for the ears and stripes, red for the cheeks, and brown for the eyes. A medium-weight yarn (worsted weight) is perfect for amigurumi.
- Crochet Hook: For this project, a 3.5mm to 4mm crochet hook is ideal. The hook size should correspond to the thickness of the yarn to ensure tight stitches and a firm texture.
- Safety Eyes: You’ll need 2 safety eyes (8mm to 10mm) for Pikachu’s face. Safety eyes are a great way to give your amigurumi a professional look while ensuring safety for children if the doll is intended for them.
- Polyester Stuffing: For stuffing Pikachu and giving him the right shape, you’ll need soft polyester stuffing. Don’t overstuff the doll—keep it plush but not too firm.
- Yarn Needle: A yarn needle will be useful for sewing the pieces together and weaving in any loose ends as you finish the doll.
- Scissors: A good pair of scissors will help you trim any excess yarn neatly and cleanly.
Once you’ve collected all the materials, you’re ready to start crocheting your Pikachu Amigurumi Crochet!
2. Basic Crochet Techniques
Before we get into the step-by-step instructions, it’s a good idea to familiarize yourself with the basic techniques used in amigurumi. These will help you create the different parts of Pikachu’s body and features. Here are the essential techniques:
- Magic Ring: The magic ring is used to start your amigurumi in the round. It creates a tight, adjustable loop that closes the hole in the center of your first round. Simply wrap your yarn around your fingers, crochet into the loop, and pull the ring tight to secure your stitches.
- Single Crochet (SC): This is the most common stitch used in amigurumi. It creates a dense fabric that holds stuffing well. To make a single crochet, insert your hook into the stitch, yarn over, and pull through both loops.
- Increase and Decrease: To shape Pikachu’s head, body, and other features, you’ll use increases and decreases. To increase, work two single crochets into the same stitch. To decrease, work two stitches together to reduce the size of the piece.
- Working in Rounds: Amigurumi is typically worked in continuous rounds, which means you don’t join each round with a slip stitch. Instead, you keep going in a spiral. Use a stitch marker to mark the beginning of each round to keep track.
- Attaching Parts: Once you’ve crocheted all the pieces, you’ll use a yarn needle to attach the pieces, such as the ears, arms, and legs, to the body. Be sure to secure them tightly.
With these basic techniques under your belt, you’ll be able to follow the Pikachu Amigurumi Crochet pattern with ease.
3. Step-by-Step Instructions
Let’s get started with the step-by-step guide to making your Pikachu Amigurumi Crochet. We will begin with the head and work our way down to the tail and accessories.
Head:
- Start with a magic ring, and work 6 single crochets into the ring. (6)
- Increase in each stitch around to make 12 single crochets. (12)
- Work one single crochet in the next stitch, then increase in the next stitch. Repeat around. (18)
- Work one single crochet in the next two stitches, then increase in the next stitch. Repeat around. (24)
- Continue working evenly (no increases or decreases) until the head reaches the desired size.
- Stuff the head lightly with polyester filling.
- Start decreasing by crocheting one single crochet in the next two stitches, then crocheting two stitches together. Repeat around. Continue decreasing until the hole is closed.
- Attach safety eyes securely to the head, and embroider a small mouth with black thread or yarn.
Body:
- Start with a magic ring, and work 6 single crochets into the ring. (6)
- Increase in each stitch around to make 12 single crochets. (12)
- Continue increasing by working one single crochet in the next stitch, then increasing in the next stitch, until the body reaches the desired width.
- Work evenly for several rounds, then begin decreasing to form the bottom of the body.
- Stuff the body lightly with fiberfill.
- Attach the head to the body, sewing them securely together.
Ears (Make 2):
- Start with a magic ring, and work 6 single crochets into the ring. (6)
- Increase in each stitch around to make 12 single crochets. (12)
- Work even for a few rounds to form a tube.
- Work decreases to shape the point of the ear.
- Attach the ears to the top of Pikachu’s head using a yarn needle.
Arms and Legs (Make 2 each):
- Start with a magic ring, and work 6 single crochets into the ring. (6)
- Continue working evenly for several rounds to form a tube.
- Stuff the arms and legs lightly with fiberfill.
- Attach the arms and legs to the body.
Tail:
- Ch 6, then work 5 single crochets into the second chain from the hook.
- Work in the round, continuing with single crochets, and shape the tail with gradual decreases.
- Attach the tail to the back of the body.
Once you’ve assembled all the parts, your Pikachu Amigurumi Crochet will be ready!
4. Customization Tips
Here are some ideas for personalizing and enhancing your Pikachu Amigurumi Crochet:
- Different Yarn Colors: While yellow is the classic color for Pikachu, you can use different shades of yellow to give it a unique look. Try using darker yellow for the body and lighter yellow for the cheeks and tail.
- Embroidered Details: If you don’t want to use safety eyes, you can embroider the eyes and mouth for a more delicate look. You can also add extra details like a small blush or other facial expressions.
- Adding Cheeks: Pikachu’s iconic red cheeks can be added by crocheting small circles and attaching them to the sides of the face.
- Make Pikachu a Friend: Use the same pattern to create other Pokémon characters and have Pikachu interact with them!
- Accessories: Consider adding small accessories like a tiny hat or a scarf to personalize your Pikachu further.
- Larger or Smaller Size: Adjust the pattern’s size by using thinner or thicker yarn, or by increasing or decreasing the stitch count as needed.
FAQ
1. Can I use different yarn for this pattern? Yes! You can use any yarn, but medium-weight yarn (worsted weight) is recommended for the best results. Thicker yarn will make a larger Pikachu, while thinner yarn will make a smaller one.
2. How do I attach safety eyes? Insert the safety eyes through the head and secure them tightly with the back fastener. Ensure they are symmetrically placed to create a balanced look.
3. Can I make Pikachu bigger or smaller? Yes! To make Pikachu larger or smaller, simply adjust the yarn thickness or the crochet hook size.
4. Can I customize Pikachu’s colors? Absolutely! You can experiment with different shades of yellow, or even create a unique color scheme for Pikachu, such as a pastel version or a multi-colored one.
5. How do I add Pikachu’s cheeks? To add Pikachu’s cheeks, crochet two small red circles and attach them to either side of Pikachu’s face. You can use felt for a more realistic touch.
6. How long will this project take? The time required to finish your Pikachu Amigurumi Crochet will depend on your experience level, but it typically takes 4 to 6 hours to complete.
PATTERN HERE
Conclusion
Now you know how to create your very own Pikachu Amigurumi Crochet! We hope this guide has helped you bring Pikachu to life in crochet form. By following the step-by-step instructions and using your creativity, you can customize your Pikachu to fit your style. Whether you’re making this as a gift, a decoration, or just for fun, we hope you enjoy the process. Let us know how your Pikachu turns out and share any tips you have for customizing! Happy crocheting!
