If you’re a crochet enthusiast looking to add a splash of color to your wardrobe, the Rainbow Dip Bucket Hat – Crochet Pattern is the perfect project for you.
This vibrant and stylish hat not only protects you from the sun but also makes a bold fashion statement.
With its unique dip-dye design, it’s a must-have accessory for anyone who loves playful and creative crochet projects.
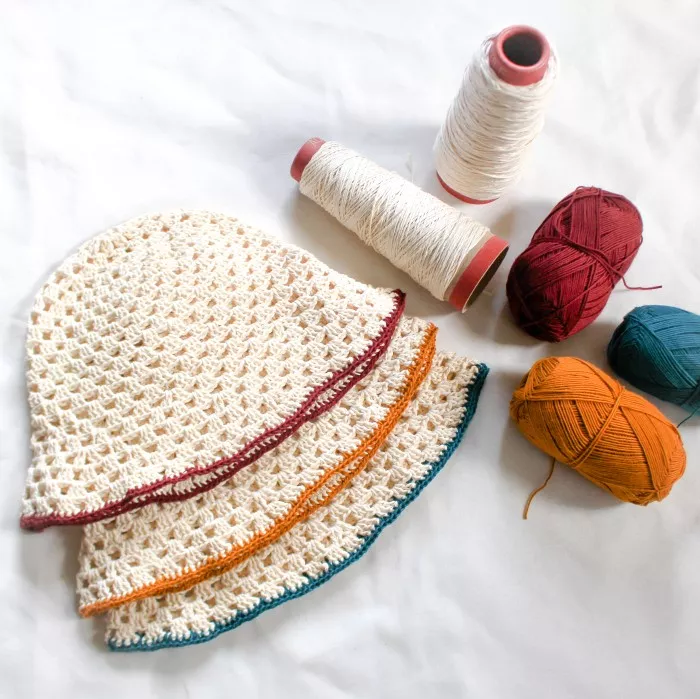
Image From Pinterest
The Rainbow Dip Bucket Hat – Crochet Pattern is all about combining colorful yarns to create a fun, multicolored design. It’s suitable for all skill levels, and whether you’re new to crochet or an experienced crafter, you’ll enjoy the process of making this eye-catching accessory. The beauty of this pattern lies in its versatility—you can personalize it with your favorite colors, adjusting the hues to match your own style.
OTHER CROCHET PATTERNS HERE!
In this article, we’ll guide you through the steps to create your very own Rainbow Dip Bucket Hat. We’ll cover everything from yarn selection and necessary supplies to detailed crochet techniques. By the end, you’ll be able to crochet a stunning, custom-fit hat that radiates color and joy.
1. Understanding the Rainbow Dip Bucket Hat Crochet Pattern
The Rainbow Dip Bucket Hat – Crochet Pattern is designed with a fun, dip-dye effect, which is achieved by crocheting in multiple colors, giving it a bold, gradient look. The pattern typically begins with a simple crochet base and gradually introduces different shades of yarn to create a smooth transition between colors. This effect mimics the appearance of a dip-dye design, where the colors blend seamlessly from one to the next.
One of the reasons the Rainbow Dip Bucket Hat – Crochet Pattern is so popular is its versatility. You can customize the gradient effect by choosing your preferred color palette, whether you opt for soft pastels, vibrant hues, or even earth tones. The gradual change in color not only enhances the hat’s visual appeal but also adds a fun element to the crafting process.
The crochet stitches used in the Rainbow Dip Bucket Hat – Crochet Pattern are relatively simple, making it an accessible project for beginners. However, the dip-dye effect requires some attention to detail, as you need to ensure the color transitions are smooth and even. Once you’ve mastered the technique, the project becomes a rewarding and enjoyable experience.
2. Choosing the Right Yarn for Your Rainbow Dip Bucket Hat
Selecting the right yarn for your Rainbow Dip Bucket Hat – Crochet Pattern is crucial to achieving the desired look and feel of the finished product. There are several factors to consider, including yarn weight, texture, and color choices. Here’s a breakdown of how to choose the best yarn for your project:
- Yarn Weight: For a classic bucket hat, a medium weight yarn (such as worsted weight) is ideal. This type of yarn provides the right balance of structure and flexibility, ensuring the hat maintains its shape while remaining comfortable to wear. A worsted weight yarn also works well with most crochet hooks, making it easy to achieve the right tension.
- Texture: The texture of the yarn affects both the look and the feel of the finished hat. Opt for yarns with a soft and smooth texture, such as cotton or acrylic blends, to ensure comfort when wearing the hat. Cotton yarn is particularly great for warm weather as it’s breathable and lightweight, while acrylic yarn provides durability and ease of care.
- Color Selection: The beauty of the Rainbow Dip Bucket Hat – Crochet Pattern lies in its color transitions. Choose yarns in multiple shades that complement each other and create a seamless gradient effect. You can pick a classic rainbow pattern with red, orange, yellow, green, blue, and purple, or go for a more subtle color scheme with pastels or neutrals.
- Colorfastness: When working with vibrant colors, it’s important to choose yarns that won’t fade easily with washing. Look for yarns labeled as colorfast, ensuring that the colors stay vibrant for a long time, even after multiple washes.
- Amount of Yarn: Since the Rainbow Dip Bucket Hat involves multiple colors, make sure to purchase enough yarn in each shade. You’ll need more yarn for the base color (the initial rows of the hat) and less yarn for the gradient colors that follow. It’s always a good idea to buy extra yarn to avoid running out in the middle of the project.
- Yarn Recommendations: Some popular yarns for crochet bucket hats include Red Heart Super Saver, Lion Brand Cotton-Ease, and Bernat Softee Chunky. These yarns offer a wide range of colors, making them perfect for the vibrant design of the Rainbow Dip Bucket Hat.
3. Step-by-Step Guide to Crochet the Rainbow Dip Bucket Hat
Crocheting your own Rainbow Dip Bucket Hat is a rewarding and enjoyable process. Follow this step-by-step guide to create your own custom hat that is both stylish and functional:
- Gather Your Supplies: Before starting, make sure you have all the necessary supplies: a crochet hook (usually size H-8 or 5mm), yarn in multiple colors, a yarn needle, scissors, and a stitch marker.
- Create the Base of the Hat: Begin by crocheting a magic ring to form the base of the hat. From here, work in a continuous spiral, making single crochet (sc) stitches and increasing in each round to create the desired width. The base should be large enough to fit your head comfortably.
- Add the Gradient Effect: Once the base is complete, it’s time to begin the dip-dye effect. Start by crocheting with your first color for several rounds. When it’s time to change colors, gradually introduce the next shade by crocheting over the old yarn and pulling through the new color. Repeat this process, changing colors every few rounds, until you’ve reached your desired gradient.
- Shape the Sides of the Hat: After completing the color transitions, it’s time to work on the sides of the hat. Continue crocheting in the round without increasing until the hat reaches your desired height. You can also incorporate a few rows of single crochet stitches to add texture to the sides.
- Finish the Hat with a Brim: To complete the Rainbow Dip Bucket Hat, add a brim by working several rounds of single crochet stitches. You can choose to make the brim as wide or as narrow as you like, depending on your preference.
- Final Touches: Once the hat is finished, use a yarn needle to weave in any loose ends. If desired, add a decorative touch such as a pom-pom or a small crochet flower to the brim. Now you’re ready to wear your colorful, one-of-a-kind hat!
4. Personalizing Your Rainbow Dip Bucket Hat
The Rainbow Dip Bucket Hat – Crochet Pattern is a great project to showcase your creativity. Here are some ways to make your hat truly unique:
- Play with Color Combinations: While a rainbow palette is the classic choice, don’t hesitate to experiment with other color schemes. You can use shades that match your wardrobe, such as earth tones, or try a bold, neon color combo for a fun and trendy look.
- Add Decorative Elements: Personalize your hat by adding accessories like a crocheted flower, a button, or even a fringe around the brim. These small details can elevate the design and give your hat a custom touch.
- Experiment with Stitches: For a more textured look, try incorporating different crochet stitches into your hat. You could use a half double crochet (hdc) or a double crochet (dc) stitch in some sections to add variety and interest to the fabric.
- Size Adjustments: If you’re making the hat for someone else, adjust the size by changing the number of base rounds or adding or subtracting rows to fit their head circumference. You can also make a child-sized version by reducing the number of stitches.
- Add a Lining: For extra comfort, consider adding a fabric lining to the inside of the hat. This will help to smooth out the texture of the crochet stitches and prevent the yarn from rubbing against your skin.
- Try Different Yarn Types: While cotton and acrylic are the most common yarns for bucket hats, you can also experiment with other yarns such as wool or bamboo for a unique feel and look.
FAQ (Frequently Asked Questions)
1. How do I choose the right yarn for the Rainbow Dip Bucket Hat? When choosing yarn, opt for medium-weight yarns like worsted weight, which provide structure and comfort. Cotton yarn is ideal for warm weather, while acrylic is durable and easy to care for.
2. Can I make a Rainbow Dip Bucket Hat for a child? Yes, you can adjust the size of the hat by reducing the number of base stitches and rounds to fit a smaller head. Follow the same pattern, just make the necessary size adjustments.
3. What stitches should I use for the Rainbow Dip Bucket Hat? The basic stitch used for this pattern is the single crochet (sc), but you can experiment with half double crochet (hdc) or double crochet (dc) for added texture.
4. How do I make the color transitions smooth? To ensure smooth color transitions, crochet over the previous yarn until the new color is fully introduced. This technique will prevent abrupt color changes and help create a seamless gradient effect.
5. Can I make the brim wider or narrower? Yes, you can adjust the width of the brim by adding more or fewer rounds of single crochet stitches, depending on your preference.
PATTERN HERE
Conclusion
The Rainbow Dip Bucket Hat – Crochet Pattern is a fun, creative, and colorful project that adds a personal touch to your wardrobe. By following the steps outlined in this article, you’ll be able to crochet a stylish hat that reflects your individual taste. Whether you’re a beginner or an experienced crocheter, this pattern provides plenty of opportunities for customization and creativity.
We’d love to hear your thoughts on the Rainbow Dip Bucket Hat! Feel free to leave your feedback, suggestions, or any questions in the comments below. Happy crocheting!


