
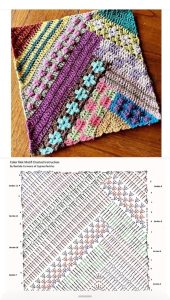
Log Cabin Quilt Block - Tutorial

The Improv Flower Block – Pattern is a wonderful and versatile quilting pattern that adds a creative, playful touch to any quilt project.
This pattern is perfect for quilters of all skill levels, from beginners to advanced crafters, offering endless possibilities for color combinations, fabric choices, and design variations.
Whether you’re looking to make a small decorative piece or a larger quilt, the Improv Flower Block offers an exciting way to experiment with fabric and sewing techniques.
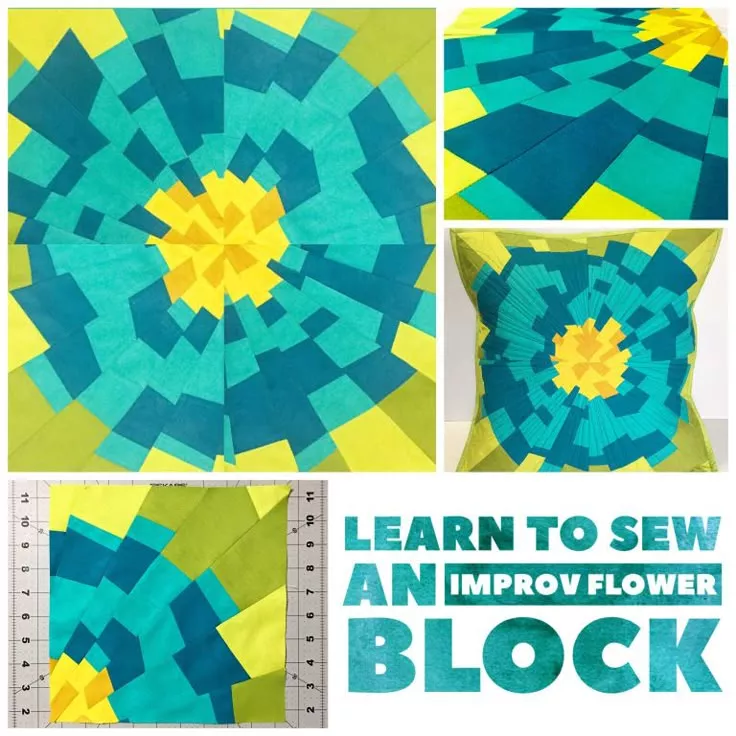
Image From Pinterest
In this article, we will guide you through the steps of creating the Improv Flower Block pattern, explaining the materials you will need, the process of piecing the blocks together, and some tips for personalizing the design. With simple instructions and creative freedom, you’ll be able to make beautiful floral blocks that will transform your quilt into a stunning work of art.
The Improv Flower Block design is also known for its casual, free-form approach to quilting. Unlike more traditional patterns, it doesn’t require precise measurements or symmetrical shapes, allowing quilters to embrace their creativity and enjoy the process. In this guide, we’ll walk you through each step and provide some helpful suggestions for making your quilt uniquely yours.
Before you start quilting the Improv Flower Block, gather all the necessary materials to ensure you have everything you need for a smooth crafting experience. The beauty of this pattern is its simplicity, so you won’t need many specialized tools or supplies. Here’s what you will need:
Fabric: Choose your fabric colors carefully, as this will greatly influence the final look of your quilt. You’ll need fabric for the flower petals, the center of the flower, and the background of the block. Cotton fabric is a popular choice because it’s easy to work with, holds its shape well, and is widely available in various colors and patterns. Don’t be afraid to experiment with bold prints, solids, and patterns to create a dynamic effect.
Quilting Thread: For stitching your blocks together, use a quality quilting thread that matches or contrasts with your fabric. You can choose a neutral color for subtle stitching or a vibrant thread to add some pop to the seams.
Rotary Cutter and Cutting Mat: These tools are essential for cutting fabric accurately and quickly. A rotary cutter will allow you to cut precise strips, while a cutting mat will protect your work surface and ensure clean cuts.
Ruler: A quilter’s ruler will help you measure and cut your fabric strips and squares for the flower petals and background. A 6×24 inch ruler is commonly used for cutting larger pieces.
Sewing Machine: While hand-piecing is an option, a sewing machine makes the process faster and more efficient. Ensure your machine is set up with the right stitch length and needle for quilting.
Pins and Needle: These are necessary for holding the fabric pieces together as you sew. Use straight pins to keep the pieces in place, and a universal needle for machine sewing.
With these materials at hand, you’re ready to start creating your Improv Flower Blocks.
The first step in piecing the Improv Flower Block is to create the petals of the flower. The petals are the focal point of the design, so it’s important to make them visually interesting and balanced. The beauty of the Improv Flower Block lies in its relaxed, free-form approach, so don’t worry about making perfect shapes. Here’s how to create the flower petals:
Step 1: Cutting the Petal Shapes
Start by cutting fabric strips in varying widths, ranging from 1 inch to 3 inches wide. The length of the strips will depend on how large you want the petals to be, but a typical length of 6 to 8 inches works well. You can also cut some triangular shapes or irregular forms to add more variety to the petals.
Step 2: Arranging the Petals
Lay out the fabric strips on your work surface in a rough circular or fan-like pattern. The petals don’t need to be perfectly symmetrical—mixing different angles and sizes of fabric pieces will create a lively, dynamic look. You can arrange the petals in a simple circle or experiment with a more improvisational layout.
Step 3: Sewing the Petals Together
Once you are happy with the arrangement, start stitching the pieces together. You can use a quarter-inch seam allowance for a neat finish, or if you prefer a more free-flowing look, don’t worry too much about exact seam widths. Let your creativity guide you as you sew the pieces together to form the flower petals.
Step 4: Attaching the Petals to the Flower Center
After sewing the petals, attach them to the center of the flower. The center can be a small square or circle of fabric. This is the perfect place to use a contrasting fabric that pops against the petals, creating a focal point in the middle of the flower.
Step 5: Pressing the Petals
Once the petals are sewn into place, press them gently with an iron. This will help the fabric lie flat and give your flower a crisp, clean look. Be careful not to stretch the fabric too much during pressing, as this can distort the shapes.
Step 6: Final Adjustments
Take a step back and admire your petals. If any sections look uneven or need more stitching, feel free to make adjustments. This step is all about embracing the improvisational style, so don’t worry about making everything perfect.
With the flower petals complete, it’s time to move on to the next step: assembling the full flower block.
Once the flower petals are ready, the next step is to put the entire Improv Flower Block together. This stage involves sewing the flower into a square or rectangular block, depending on your quilt design. Here’s how to do it:
Step 1: Cutting the Background Fabric
Cut a piece of background fabric to match the size of your flower block. You can use a solid color for the background or a print that complements the flower design. The background should be slightly larger than the flower itself, allowing room for the petals to “breathe” around the edges.
Step 2: Attaching the Flower to the Background
Position the flower on top of the background fabric, making sure the petals are centered. Pin the flower in place, ensuring the fabric edges are aligned. Stitch the flower to the background, using a straight stitch or zigzag stitch depending on your desired finish. Be careful to catch all edges without distorting the petals.
Step 3: Adding Border Strips
If you want to add a border to your block, cut fabric strips and sew them along the edges of the background fabric. The border can be a solid color or a coordinating print, depending on the look you want to achieve.
Step 4: Pressing the Entire Block
Once the block is assembled, press it carefully with an iron to ensure the seams are flat and the fabric lies smoothly. Pressing will help set the stitches and give your block a polished appearance.
Step 5: Trim and Square the Block
Trim any excess fabric from the edges to square up the block. This will ensure that your Improv Flower Block is the correct size for your quilt layout.
Step 6: Repeat for Multiple Blocks
To create a larger quilt, repeat the process to make as many flower blocks as you need. You can mix and match different colors and fabrics to create a dynamic quilt with a variety of flowers.
Now that your flower block is complete, you can use it as part of a larger design or as a standalone piece.
The Improv Flower Block is a highly customizable pattern, and there are plenty of ways to make it your own. Here are some tips for adding personal touches and enhancing your quilt:
Color Choices
Experiment with different color palettes to create a mood or theme for your quilt. Soft, pastel colors create a delicate and calming effect, while bright, bold colors give a modern, vibrant feel.
Fabric Combinations
Use a mix of vintage fabrics, modern prints, or even scrap fabrics to give your flowers a unique texture and look. Don’t be afraid to combine patterns and textures for a more eclectic design.
Play with Scale
Try making some flowers larger and others smaller for a playful, varied design. Larger flowers can act as the focal points, while smaller ones can fill in the background.
Add Embellishments
To make your quilt even more special, consider adding hand-embroidery, beading, or appliqué to some of the flowers. These small details can give your quilt extra texture and personality.
Use Different Backgrounds
Instead of using a plain background for each flower, experiment with printed fabrics or pieced backgrounds. This adds depth and dimension to your quilt, making each flower block stand out.
Quilt-as-You-Go
If you’re making a larger quilt, consider using the quilt-as-you-go method. This allows you to quilt each flower block individually before joining them together, making the process more manageable and ensuring a clean finish.
1. What is an Improv Flower Block?
An Improv Flower Block is a quilt block pattern that features a free-form, improvisational approach to creating flower designs. It allows for creativity and flexibility in choosing fabric and layout, without strict rules or measurements.
2. How do I create the flower petals?
The flower petals are created by cutting fabric strips or shapes in various sizes and angles, then sewing them together in an improvisational arrangement. Once the petals are formed, they are attached to a central flower core.
3. Can I use different fabrics for the petals and background?
Yes! The beauty of the Improv Flower Block is its versatility. You can mix and match different fabrics, patterns, and colors for the petals, background, and borders to create a quilt that reflects your style.
4. Is the Improv Flower Block suitable for beginners?
Yes! The Improv Flower Block is great for beginners because it doesn’t require precise measurements or advanced quilting techniques. It’s a fun and relaxing way to practice basic quilting skills while allowing for creative freedom.
5. How can I add personal touches to my Improv Flower Block?
You can personalize your Improv Flower Block by choosing fabrics that reflect your style, adding embroidery or appliqué to the flowers, or experimenting with different color combinations and layouts.
In this article, we have explored the process of creating the Improv Flower Block – Pattern, from gathering materials to customizing the design. We covered everything from cutting fabric and assembling the flower petals to adding personal touches and creating a quilt with these charming blocks. Whether you’re a seasoned quilter or just starting out, the Improv Flower Block offers a fun and creative way to make unique, beautiful quilts. We’d love to hear your thoughts! Leave a comment with your suggestions or experiences with this pattern.


