
Crochet Triangle Shawl Stitch - Pattern

The Paw Print Granny Square Crochet – Pattern is an exciting and charming crochet project that blends traditional crochet techniques with a fun, animal-inspired design.
If you’re a crochet enthusiast looking to try something new, or a beginner wanting to make your first project with a unique twist, this pattern is perfect for you.
The Paw Print Granny Square Crochet – Pattern features a classic granny square with a delightful paw print motif in the center, making it an adorable addition to any crochet collection.
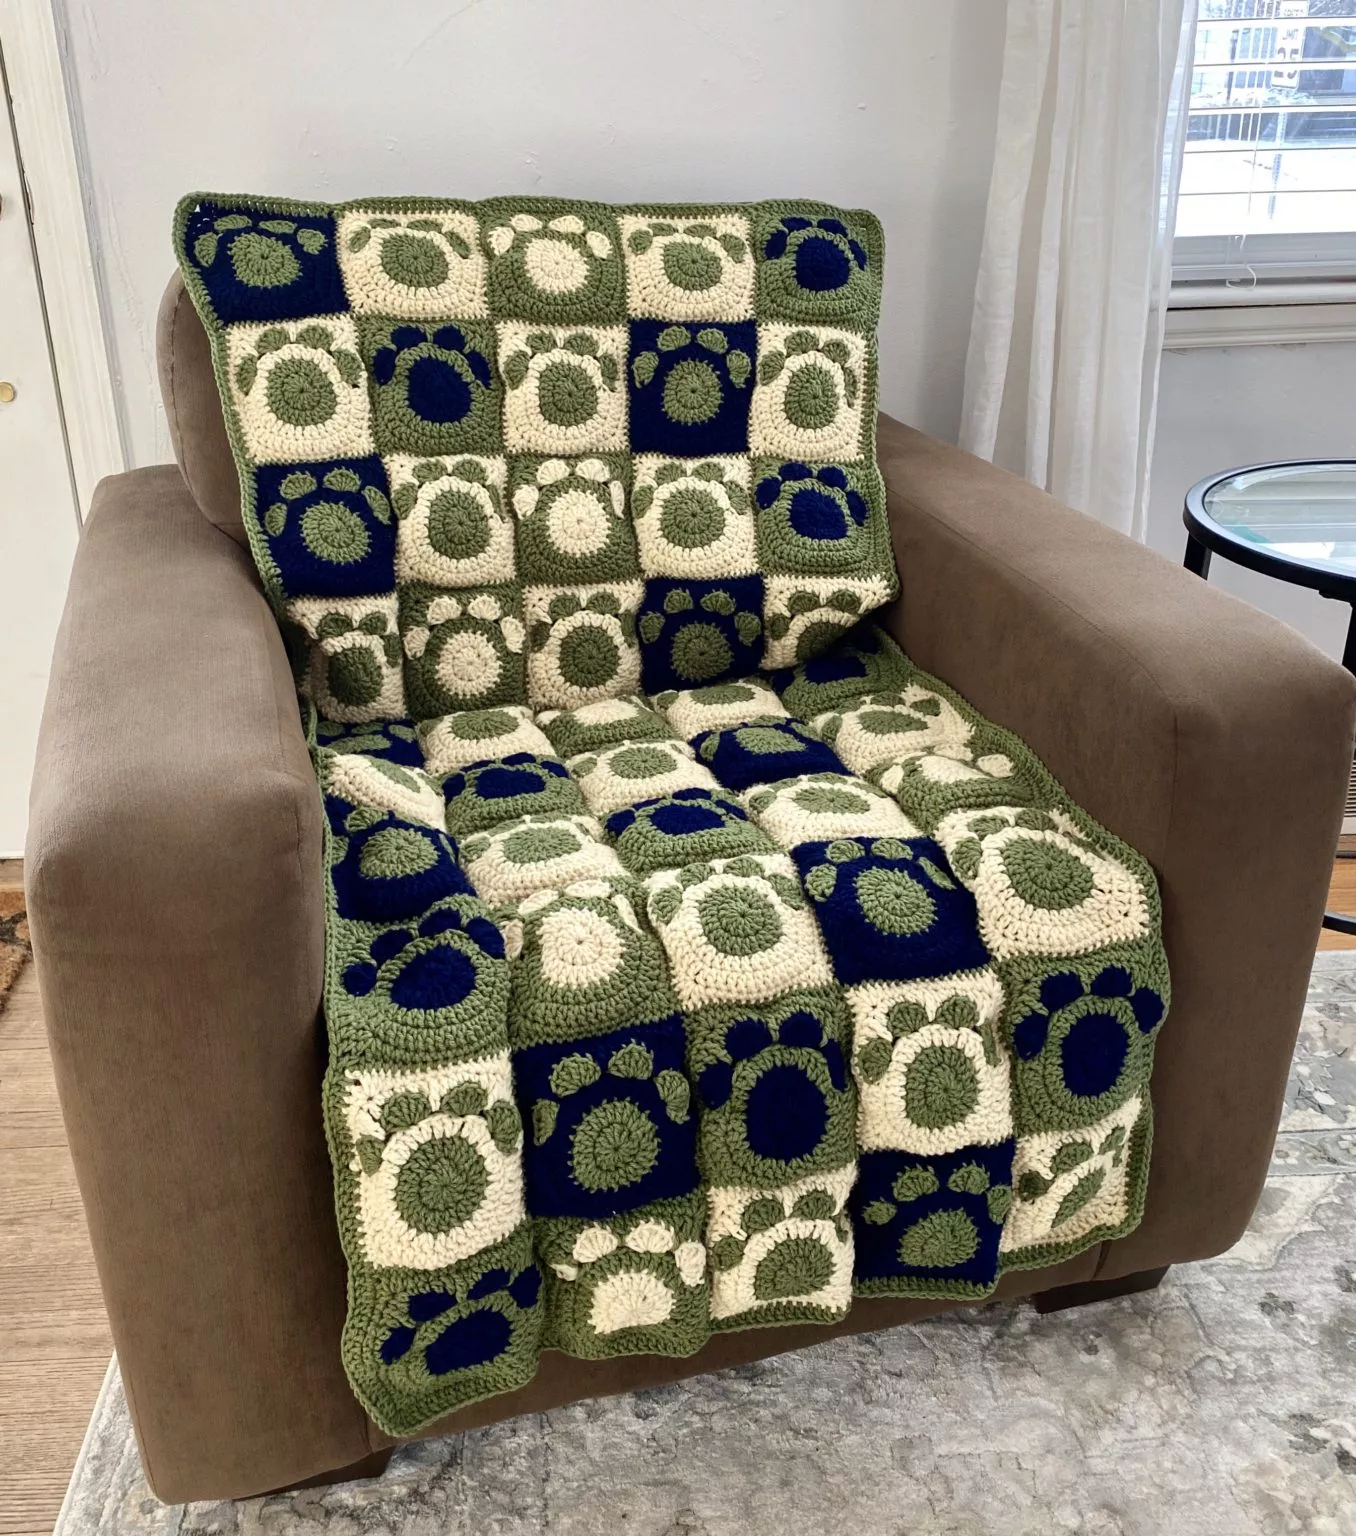
Image From Pinterest
This pattern is not only ideal for making blankets or throws but can also be used for accessories like bags, cushions, and even as decorative pieces for your home. Whether you are crafting a gift for a pet lover or creating a special piece for yourself, the Paw Print Granny Square Crochet – Pattern allows for endless creative possibilities. Throughout this article, we’ll guide you through everything you need to know, from materials to step-by-step instructions on how to make your own paw print granny squares.
Crocheting granny squares is a beloved tradition in the world of crafting. The repetitive nature of making granny squares allows for relaxation and creativity. With the added fun of paw prints, this pattern adds an extra layer of excitement and cuteness. Let’s dive into the process of creating these adorable squares, and discover why they have become a favorite among crochet enthusiasts everywhere.
The Paw Print Granny Square Crochet – Pattern is a variation of the classic granny square that incorporates a paw print design in the center of the square. The paw print motif is typically made using simple crochet stitches like double crochet, slip stitch, and single crochet. These stitches are combined in a way that they form the outline of a paw print, creating an eye-catching and fun element within the square.
The main appeal of this pattern is the flexibility it offers. You can adjust the color scheme to match your personal preferences or the theme you’re working with. Some crocheters opt for vibrant and playful colors, while others may choose neutral tones to complement a specific décor. The Paw Print Granny Square Crochet – Pattern is easy to follow, making it a great project for both beginners and experienced crafters alike.
Another reason why this pattern is so popular is its versatility. The paw print design adds a charming, personalized touch to whatever you’re making. Whether you’re crafting a blanket for a pet lover, creating a throw for your living room, or making a set of coasters, the Paw Print Granny Square Crochet – Pattern can be adapted to suit a wide range of projects. It’s also a great way to experiment with different crochet techniques, as you can use a variety of stitches and techniques to enhance the look of your paw prints.
Before starting your Paw Print Granny Square Crochet – Pattern, it’s essential to gather the right materials. The quality of your yarn and tools will greatly influence the outcome of your project. Here’s what you’ll need to get started:
The most common yarn type for granny squares is a medium-weight yarn, often referred to as worsted weight. Choose a yarn that feels comfortable to work with and fits the texture you want for your project. For the Paw Print Granny Square Crochet – Pattern, consider using yarn in multiple colors, such as a neutral color for the background and contrasting colors for the paw print design.
Select a crochet hook that is suitable for the yarn you’ve chosen. For worsted weight yarn, a 5mm (H-8) crochet hook is typically the best choice, but always check the yarn label for recommended hook sizes.
Having a good pair of scissors will make it easy to cut yarn at the ends after you finish each square or piece of the project.
A yarn needle will help you weave in the ends of your yarn once you finish crocheting your squares. This tool ensures that your finished project looks neat and polished.
Stitch markers are helpful for marking the beginning or end of each round. While optional, they can help keep track of your stitches and ensure you stay on track while working on your granny square.
If you’re making multiple squares, you may want to ensure they are the same size. A measuring tape is useful for checking the dimensions of each square to maintain consistency.
Now that you have your materials ready, it’s time to dive into making your very own Paw Print Granny Square Crochet – Pattern. Follow these simple steps to create the perfect paw print design within your granny square:
Begin by creating a magic ring with your yarn. This is the starting point of your granny square. Once you have the ring, crochet several double crochet stitches (usually about 6) into the ring, joining the last stitch with a slip stitch to form a circle. This will be the foundation of your paw print square.
To create the paw print in the center, you will crochet a series of single crochet stitches to form the pads of the paw. Use a contrasting yarn color to make the paw stand out. The paw print typically consists of a central pad with four smaller pads around it, resembling the shape of a paw. After finishing the paw print, you will then crochet the next few rounds around the paw print design.
Once the paw print is in place, begin working the traditional granny square pattern around it. This involves crocheting several rounds of double crochet stitches, separated by chain stitches to create the open spaces between the stitches. Continue until your square reaches the desired size.
Once your granny square reaches the appropriate size, it’s time to add a border. You can create a simple single crochet border or add a decorative edge for a more intricate finish. Use a contrasting color for the border to highlight the paw print design.
Once you finish the square, fasten off the yarn by cutting it and pulling the yarn through the final loop. Use a yarn needle to weave in any loose ends from the yarn to ensure your square stays intact and looks neat.
Now that you’ve completed one paw print granny square, you can repeat the process to create as many squares as needed for your project. Once you have all your squares ready, sew them together using a whip stitch or slip stitch to assemble your final piece.
As with any crochet project, creating the perfect Paw Print Granny Square Crochet – Pattern can take practice. Here are a few tips to ensure your squares come out beautifully:
Make sure you maintain consistent tension throughout your work. Too tight of a stitch can make your square smaller and more difficult to work with, while too loose can lead to uneven shapes and gaps.
It’s important to count your stitches as you go to avoid any mistakes. This is especially important when creating the paw print design to ensure all the pads are evenly placed.
While the traditional Paw Print Granny Square Crochet – Pattern is often made with neutral backgrounds and colorful paw prints, feel free to experiment with different color combinations to suit your style.
Try experimenting with different yarn textures to give your squares a unique look. Soft and fluffy yarns can add texture, while smooth cotton yarns may give your square a cleaner finish.
Choosing the right size crochet hook for your yarn is essential to ensure your squares are the correct size. A too-small hook can make the square too tight, while a too-large hook can result in a loose and floppy square.
After finishing your squares, consider blocking them. Blocking helps to even out the stitches and gives the squares a more professional, polished look.
A Paw Print Granny Square Crochet – Pattern is a crochet design where the central motif is a paw print, surrounded by traditional granny square stitches. It’s perfect for pet lovers or anyone who enjoys fun, creative crochet projects.
Absolutely! While the Paw Print Granny Square Crochet – Pattern is perfect for blankets, you can use it to create various items such as pillows, bags, coasters, or even decorative wall hangings.
You can choose any color for the paw print, but it’s often recommended to use contrasting colors to make the paw stand out. Experiment with different combinations that match your project’s overall theme.
Yes, the Paw Print Granny Square Crochet – Pattern is suitable for beginners, especially those familiar with basic crochet stitches like double crochet and single crochet. The instructions are straightforward and easy to follow.
The number of squares you need will depend on the size of the blanket you want to make. Typically, you’ll need anywhere from 20 to 50 squares for a small to medium-sized blanket.
You can join the squares together using a whip stitch, slip stitch, or the join-as-you-go method, depending on your preference. Each method has its own benefits, so choose the one that works best for you.
In conclusion, the Paw Print Granny Square Crochet – Pattern is a fun and versatile project that combines traditional crochet techniques with a cute and personalized touch. Whether you’re a seasoned crocheter or just starting out, this pattern offers something for everyone. From choosing the right materials to mastering the paw print design, we’ve covered everything you need to create your own beautiful granny squares. We’d love to hear your thoughts and suggestions—please leave a comment below and share your experiences with the Paw Print Granny Square Crochet – Pattern!

