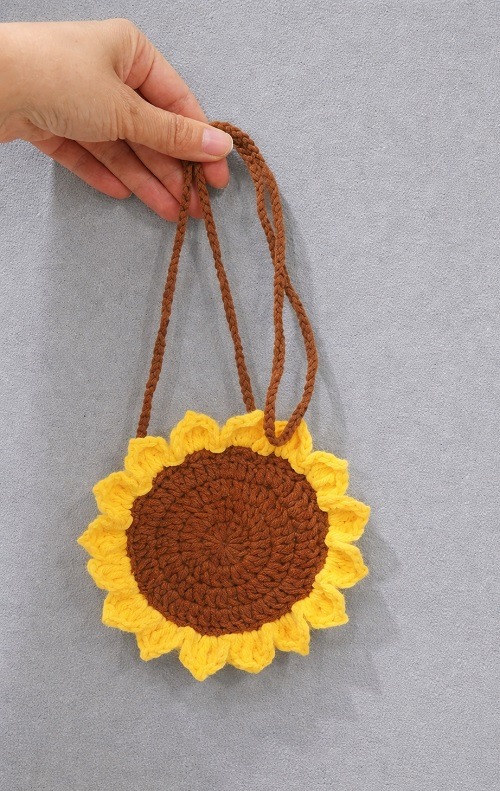
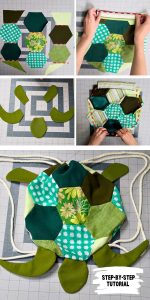
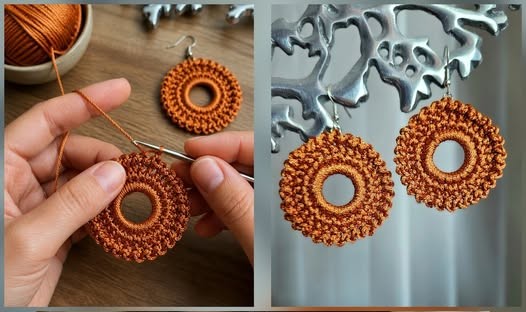
String Bag With Floral Motif - Tutorial

If you’re a crochet lover searching for a clear and detailed Crochet Circle Tutorial – Pattern, you’ve come to the right place. Whether you’re aiming to make a coaster, mandala, rug, or even the start of a hat or bag, mastering the perfect circle is a must in your crochet journey. The beauty of this shape lies in its simplicity, symmetry, and endless versatility.
Many crafters, especially beginners, find crocheting a neat, flat circle to be more challenging than it seems. If your projects often curl, wave, or end up looking more like hexagons than circles, don’t worry—you’re not alone. The key to a flawless Crochet Circle Tutorial – Pattern lies in understanding the math behind increases, the right stitch choice, and maintaining a consistent tension.
In this article, we’ll walk you through everything you need to know to create perfect crochet circles. From materials and stitch types to increasing techniques and troubleshooting tips, we’re covering it all. Whether you’re brand new to crochet or want to refine your circular technique, this guide has you covered.
Before diving into the actual steps, it’s important to understand the anatomy of a crochet circle and what makes it work. The foundational rule of crocheting a flat circle is about increasing stitches evenly as the rounds grow.
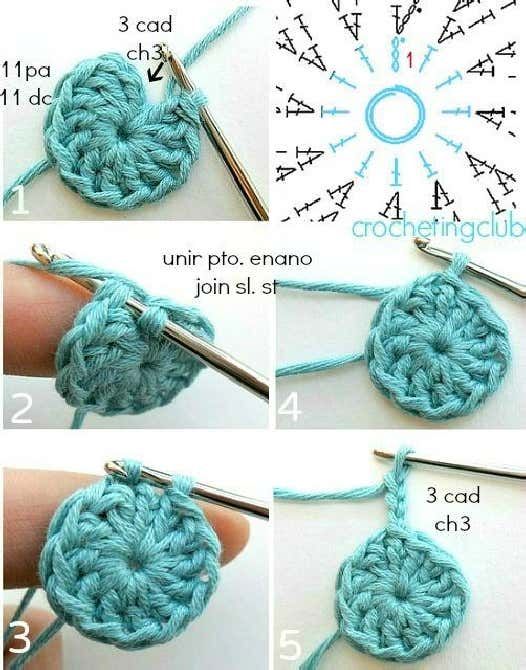
The most common way to begin a circle is with a magic ring (also known as the magic loop). This method allows you to tighten the center of your circle completely, avoiding the small hole that sometimes appears when starting with chain stitches. The magic ring is beginner-friendly once you get the hang of it and gives your project a clean, professional finish.
Next, the increase pattern is crucial. In most basic circle patterns, you start with a certain number of stitches (usually 6 or 12) and then increase by the same amount in each round. For example, if you start with 6 single crochets, you increase by 6 each round: 12, 18, 24, and so on. This steady increase keeps your circle flat and even.
The type of stitch you choose also affects the final result. Single crochet (sc) is tighter and makes smaller, firmer circles, while double crochet (dc) creates larger, looser circles. For coasters or motifs, single crochet is ideal. For hats, rugs, or mandalas, double crochet is more commonly used.
It’s also important to place a stitch marker in your first stitch of the round, especially if you’re not joining rounds with slip stitches. This helps track your progress and ensures symmetrical results. Overlooking this step often leads to spirals or uneven edges.
Lastly, consistency in tension can make or break your circle. Too tight, and it may cup; too loose, and it can ripple. Practice makes perfect, and gentle adjustments to your yarn handling can significantly improve your outcome.
Now that you know the basics, let’s go through a practical Crochet Circle Tutorial – Pattern using double crochet stitches. This method works for a variety of projects and is beginner-friendly.
Start with a magic ring. Wrap your yarn around two fingers, insert your hook under the front loop, yarn over, and pull through. Chain 3 (this counts as your first dc), then crochet 11 more dc into the ring. Pull the tail tightly to close the ring and join with a slip stitch to the top of your chain 3 (12 dc total).
Round 2: Chain 3 (counts as dc), make 1 dc in the same stitch. Then crochet 2 dc in each stitch around. You’ll end with 24 stitches. Slip stitch to join. Your circle should be flat and even at this point.
Round 3: Chain 3, dc in same stitch, dc in next stitch, 2 dc in next, repeat from * around. This will give you 36 stitches. Join with a slip stitch. Notice the subtle shaping forming as the circle expands.
Round 4: Chain 3, dc in same stitch, dc in next 2 stitches, 2 dc in next, repeat around. You’re now increasing by placing two dc in every fourth stitch. You should have 48 stitches.
Continue this pattern with each round. Essentially, you’re adding one more dc between increases per round. So Round 5 would be dc in 3 stitches, 2 dc in next, and so on. This method ensures your circle stays flat and symmetrical.
As you go, keep checking your circle. Lay it on a flat surface to make sure it’s not curling up or rippling. Adjust your tension or increase rate slightly if needed to maintain the shape. This is the core skill in any Crochet Circle Tutorial – Pattern.
Even experienced crocheters can run into problems when working with circles. Let’s go over some of the most common issues and how to fix them.
One issue is a circle that curls up like a bowl. This usually means you’re not increasing enough. Go back and check your round counts—did you forget a few increases? Add an extra round of increases to flatten it out.
If your circle starts to ruffle or wave, that’s a sign of too many increases or stitches that are too loose. You can fix this by either skipping the next increase round or adjusting your hook size for a tighter tension.
Uneven edges can happen when you forget to mark your first stitch or if your stitch height is inconsistent. Always use a stitch marker when working in the round to keep your placement accurate.
Another problem is a hexagon instead of a circle. This happens when increases fall in the same place each round. You can avoid this by offsetting your increases in each new round. For example, instead of starting with an increase, begin with a few regular stitches before your first increase.
If your center hole is too large, you might not be pulling your magic ring tight enough, or you may have used chain stitches instead of a magic ring. Reinforce the center with extra stitches if needed, or try a tighter magic loop.
Lastly, your circle may grow unevenly if you’re accidentally adding extra stitches. Count your stitches at the end of each round and double-check your pattern to stay on track. These tips will make your Crochet Circle Tutorial – Pattern much smoother.
Once you’ve mastered the basics of the Crochet Circle Tutorial – Pattern, the real fun begins. Circles are one of the most versatile shapes in crochet and can be used in countless creative projects.
Turn your circles into coasters or table mats by simply adding a border or decorative edging. Use cotton yarn for absorbency and structure. These make wonderful handmade gifts or additions to your home décor.
Make crochet mandalas by incorporating color changes and intricate stitches. These decorative pieces can be framed, hung on the wall, or used as colorful doilies. The circle shape is perfect for exploring color theory and stitch combinations.
Larger circles can become the base for crochet rugs. Use thick yarn or double strands for durability, and follow the same increasing pattern to scale up your project. Great for living rooms, nurseries, or outdoor spaces.
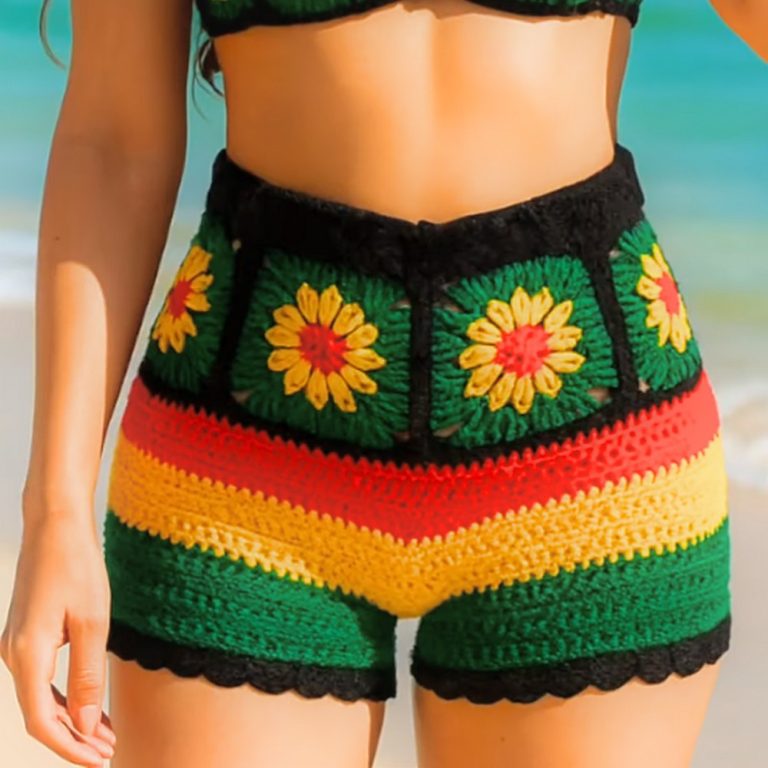
Crochet circles can also serve as the starting point for hats or be used to create the bottom of bags and baskets. Once the base is complete, simply stop increasing and begin working up the sides.
Experiment with joining multiple circles to create patchwork blankets or artistic wall hangings. Mix colors and textures to create a modern, mosaic-like piece. This is a great way to use leftover yarn and practice your skills.
Lastly, add circles as embellishments to scarves, cardigans, or baby clothes. You can appliqué them onto other projects to add a pop of color or design detail. The possibilities are endless when working with a flexible pattern like this.
Q1: Why is my crochet circle curling up like a bowl?
A: This usually happens when you’re not increasing enough stitches per round. Make sure you’re following a consistent increase pattern and consider loosening your tension.
Q2: How do I fix a wavy or ruffled crochet circle?
A: Too many increases or loose tension can cause ruffles. Try reducing your stitch count or switching to a smaller hook to tighten the work.
Q3: Can I use different stitches in my circle besides double crochet?
A: Absolutely! You can use single, half-double, or even treble crochet. Just adjust your starting count and increase rate to keep it flat.
Q4: What yarn is best for making crochet circles?
A: It depends on your project. Cotton is best for coasters and decor, while acrylic or wool blends are great for wearables and rugs. Choose based on function.
Q5: How do I keep my circle from turning into a hexagon?
A: Offset your increases each round to prevent sharp edges. Instead of increasing in the same spot, move the increase forward a stitch or two.
Q6: Can I start a circle with a chain instead of a magic ring?
A: Yes, but a magic ring gives a neater finish. If using chains, chain 4 and join to form a loop, then crochet
into that circle.
Mastering the Crochet Circle Tutorial – Pattern opens up endless creative opportunities in the world of crochet. From understanding basic increases to troubleshooting common problems and applying your skills to various projects, this guide is your go-to reference for circular crochet.
We’ve explored the steps to make a perfect circle, how to fix mistakes, and some creative ideas to take your crochet even further. Whether you’re crafting home items or wearable accessories, this simple shape is both functional and beautiful.
Have you tried making a crochet circle before? Share your experience in the comments below! We’d love to hear your tips, see your projects, and know what kind of tutorials you’d like next. Your honest opinion and suggestions help this community grow stronger.

