String Bag With Floral Motif - Tutorial

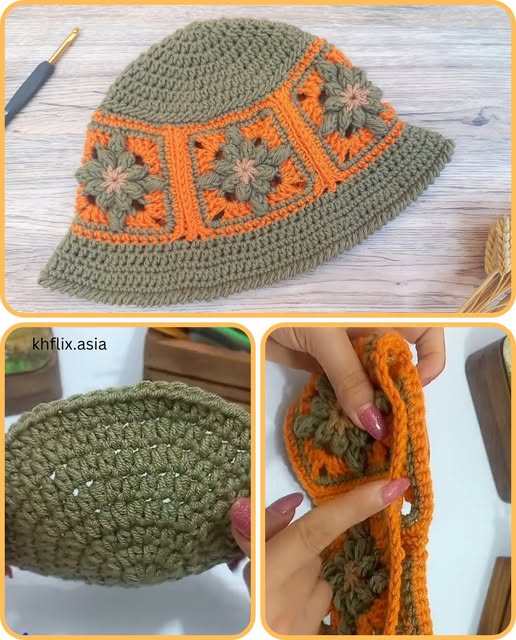
If you’re looking to create something stylish, retro, and handmade, the Crochet Bobble Granny Square Bucket Hat – Pattern is the perfect project to explore. Combining texture-rich bobble stitches with the classic granny square technique, this hat is more than just a fashion statement—it’s a celebration of craft, color, and creativity.
In recent years, bucket hats have made a major comeback in fashion circles. Adding a handmade twist like bobble stitches and granny squares brings charm, personality, and a touch of nostalgia to the trend. Whether you’re a seasoned crocheter or new to the art, this project is fun, beginner-friendly, and completely customizable.
Throughout this guide, you’ll learn how to make a Crochet Bobble Granny Square Bucket Hat – Pattern from start to finish. We’ll walk you through choosing the right materials, creating granny squares with bobbles, joining the pieces together, and shaping the brim. Let’s dive into this colorful and creative crochet adventure!
Before you begin working on your Crochet Bobble Granny Square Bucket Hat – Pattern, it’s important to gather the right tools and materials. The success of your project depends not only on your stitch work but also on the quality and type of yarn you choose.
Start with a soft yet structured worsted weight (category 4) yarn. Cotton is an excellent choice for hats, especially if you’re planning to wear your bucket hat in warmer weather. It holds its shape well and adds a clean finish to your stitches, especially the bobbles.
You’ll also need a crochet hook that matches your yarn weight—typically a 5.0 mm (H-8) hook works perfectly with worsted cotton. Make sure to check your gauge if you want your hat to fit snugly and uniformly.
A pair of scissors, a yarn needle for weaving in ends, and stitch markers (optional) will also come in handy. If you’re creating a multi-colored design, prepare 3 to 5 different yarn colors to make the granny squares pop.
Choose colors that contrast well to make the bobbles stand out. For a modern aesthetic, use neutral shades with one bold accent. Or go full retro with vibrant rainbow tones and black borders around each square.
Lastly, print or sketch your layout so you know how many squares you’ll need. The typical bucket hat made with granny squares uses around 8–10 squares for the crown and sides, with additional stitches crocheted in for the brim.
The heart of the Crochet Bobble Granny Square Bucket Hat – Pattern is, of course, the bobble granny square. These textured motifs add fun dimension and structure, making your bucket hat truly stand out.
Begin your square with a magic ring or chain 4 and slip stitch to form a ring. Chain 3 (counts as your first dc), then work your first round with double crochets and spaces, as you would for a traditional granny square. The key difference comes in the second or third round when you start adding bobble stitches.
A bobble stitch is made by partially completing 5 double crochets into the same stitch (leaving the last loop of each on the hook), then yarn over and pull through all loops. This forms a puffed “bobble” that pushes outward from the fabric, giving your square that signature look.
Alternate bobble stitches and regular double crochets to create texture without overcrowding. Some crafters prefer placing bobbles only in the center round or at the corners to create a starburst effect.
As you complete your rounds, finish each square with a border of single or double crochets, depending on the size you want. Most squares for this project should be around 4 x 4 inches.
Once you’ve made enough granny squares (usually 5 for the sides, 1 for the top, and 4 for the brim connection), block them if needed. This will ensure clean edges and uniform size, making assembly easier.
Feel free to get creative with color placement. You can use a uniform background color with different bobble shades or switch things up for a patchwork vibe. The goal is to make each square a little masterpiece.
Now that you’ve created your bobble granny squares, it’s time to put them together into the recognizable shape of the Crochet Bobble Granny Square Bucket Hat – Pattern. Assembly is where your vision begins to take form!
Start by laying out your squares in the desired order. Typically, one square is used as the top or crown of the hat. Surround it with four to five squares, forming the sides. These are joined edge-to-edge using slip stitch or whip stitch, depending on your preference for visible seams.
Once the crown and sides are connected, try the hat on to check fit. This will give you an idea of how many rows you’ll need for the brim. Adjust the number of side squares if needed to fit your head circumference.
To begin the brim, attach your yarn to the bottom edge of the hat. Work single crochet or half-double crochet stitches evenly around, then start increasing by adding extra stitches every 6–8 stitches to create the flare.
You can adjust the width of your brim depending on your desired style. A narrow brim gives a classic bucket hat look, while a wider brim offers more sun coverage and a playful feel. Keep the increases even for a neat, ripple-free finish.
For a final round, consider adding a row of slip stitches or crab stitch (reverse single crochet) for added structure and a polished edge. This finishing touch helps prevent curling and gives your hat that professional handmade quality.
After assembly, weave in all ends securely. Give your hat a light steam block to smooth out seams and shape the brim, and you’re ready to wear or gift your stunning Crochet Bobble Granny Square Bucket Hat – Pattern creation!
The beauty of a Crochet Bobble Granny Square Bucket Hat – Pattern is its versatility. Whether you’re making one for yourself, a friend, or to sell, there are endless ways to personalize and style this accessory.
This hat is perfect for festival wear, beach days, market strolls, or just elevating a casual outfit. The bobble texture and patchwork design make it eye-catching and full of personality. Pair it with denim, sundresses, or even a matching crochet bag.
Experiment with different color schemes to match your wardrobe or the season. Earth tones for fall, bright florals for spring, and black-and-white contrasts for a chic modern look.
If gifting the hat, consider adding a handmade tag or placing it in a recyclable kraft box with a ribbon. Handmade gifts always carry a touch of love and effort that recipients truly appreciate.
To keep your hat looking fresh, handwash it in cold water with mild detergent. Lay flat to dry and reshape the brim while damp. Avoid machine washing or tumble drying, as it can distort the bobble stitches and square shapes.
Over time, if the brim starts to lose its shape, a light steam or press with a damp cloth can revive it. Crochet items are durable when properly cared for, and this hat is no exception.
Lastly, don’t forget to take photos of your finished hat and share it online. The crochet community loves to celebrate handmade pieces, and your work could inspire someone else’s next project.
Q1: Is this pattern suitable for beginners?
Yes! If you’re comfortable with basic stitches like double crochet and slip stitch, you can easily follow this pattern. The bobble stitch may require practice, but it’s beginner-friendly.
Q2: How many granny squares do I need for the hat?
Most designs use 6–10 granny squares, depending on the size and layout. One for the crown, four to five for the sides, and some partial or full squares to connect the brim.
Q3: What is the best yarn for this project?
Worsted weight cotton yarn is ideal. It holds shape well, is breathable, and offers great stitch definition for both bobbles and granny patterns.
Q4: Can I use other stitches for the brim?
Yes! You can use single crochet, half-double, or even shell stitches. Just remember to increase evenly to create the flare needed for a true bucket hat shape.
Q5: How do I prevent my hat from being too stiff or too floppy?
Stiffness depends on your yarn and tension. Use a medium-weight yarn and test your gauge. If it’s too floppy, add a final row of crab stitch for structure.
Q6: Can I sell hats made from this pattern?
Absolutely, especially if you designed the pattern yourself. If you used someone else’s pattern, check their terms. Many allow limited commercial use with credit.
The Crochet Bobble Granny Square Bucket Hat – Pattern is the perfect blend of creativity, fashion, and function. With just a handful of materials and a bit of patience, you can create a trendy accessory that reflects your unique style and craftsmanship.
We’ve covered how to select your materials, make textured granny squares with bobbles, assemble your hat, and even style and care for it. Whether you’re new to crochet or a seasoned pro, this project is sure to bring you joy and lots of compliments.
We’d love to hear your thoughts
! Share your experience making your own Crochet Bobble Granny Square Bucket Hat in the comments. If you have tips, favorite yarns, or pattern variations, don’t hesitate to drop them below. Your honest opinion and suggestions help us make even better guides. Happy crocheting! 🧶✨

