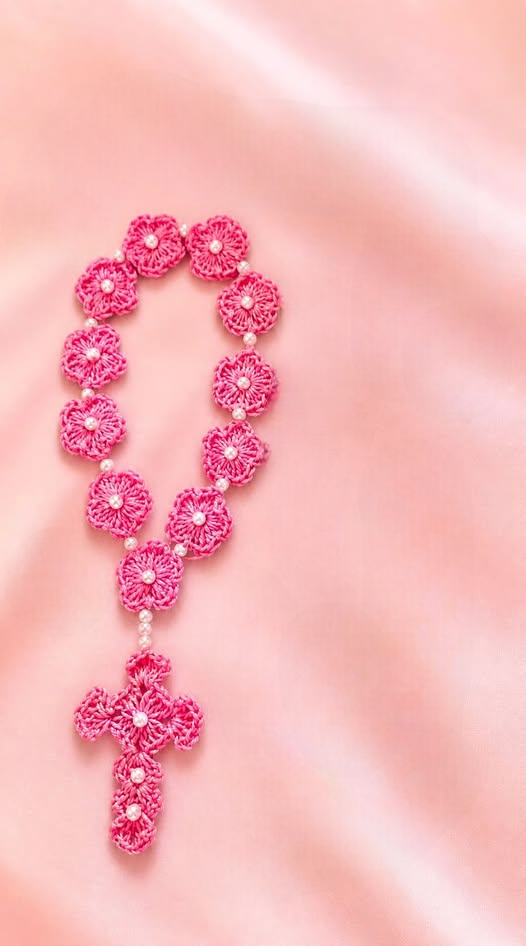
Crochet Rosary - Tutorial

If you’re looking to begin your next cozy handmade creation, the CROCHET PATTERN FOR BLANKET – PATTERN is a perfect place to start. Blankets are among the most loved and versatile crochet projects out there. Whether you’re a beginner or an advanced crocheter, creating a blanket offers relaxation, creativity, and a rewarding finished piece that brings warmth to any home.
One of the reasons the crochet pattern for blanket projects are so popular is their adaptability. You can personalize the size, color, stitch style, and texture to fit your space or recipient. A crochet blanket can be a thoughtful baby shower gift, a wedding present, a seasonal decoration, or simply a comforting throw for your living room.
In this article, we’ll walk through everything you need to know to confidently follow a CROCHET PATTERN FOR BLANKET – PATTERN. From choosing materials and planning your design to finishing techniques and care, this tutorial will guide you step by step while optimizing for ease and inspiration.

Before diving into the pattern itself, let’s talk about what materials you’ll need for your CROCHET PATTERN FOR BLANKET – PATTERN. The yarn and hook you select will greatly influence the look, feel, and durability of your blanket.
First, select a yarn weight that matches the level of warmth and softness you want. Worsted weight (category 4) yarn is a classic and versatile choice, great for medium-weight blankets. For something cozier and chunkier, go for bulky yarn (category 5 or 6). For baby blankets or lighter throws, DK (category 3) or even sport weight (category 2) yarn works beautifully.
Cotton yarn is breathable and easy to clean, making it ideal for summer throws or baby blankets. Acrylic yarn is affordable, soft, and machine washable, while wool provides extra warmth—perfect for winter blankets.
Next, choose a crochet hook that suits your yarn. Most yarn labels recommend a specific hook size, but you can go slightly larger or smaller depending on your desired texture. A larger hook gives your blanket a looser, more open feel; a smaller hook results in tighter stitches and a firmer fabric.
Other helpful tools include a pair of sharp scissors, a tapestry needle for weaving in ends, and stitch markers to help you keep track of your rows or color changes. A measuring tape is also useful for ensuring your blanket stays the intended size.
If you’re planning to use multiple colors, be sure to map out your palette in advance. Use a color wheel or inspiration photos to create combinations that feel cohesive and intentional.
Lastly, consider whether you want a repeating stitch pattern or something more complex like squares, stripes, or textured motifs. Knowing this ahead of time will make the crocheting process smoother and more enjoyable.
The stitch pattern you choose will define the overall look and feel of your CROCHET PATTERN FOR BLANKET – PATTERN. The good news is that blankets can be as simple or as intricate as you like, depending on your skill level and time commitment.
One of the most beginner-friendly options is the single crochet stitch. It creates a dense, firm fabric that’s great for warmth. To make it more interesting, you can alternate colors every few rows or use a variegated yarn.
Another popular choice is the granny square technique. It involves making several small squares and joining them together. This method allows for easier portability and opens up endless creative design possibilities. You can stick with traditional clusters or explore more modern variations like the sunburst or solid granny square.
For a more textured and elegant look, try using shell stitches, puff stitches, or bobble stitches. These stitches create visual interest and add volume, making the blanket feel plush and cozy.
Corner-to-corner (C2C) is another trendy technique that lets you crochet diagonally. It’s perfect for making graphic designs, pixel art, or personalized messages within your blanket.
If you’re aiming for a lightweight, lacy design, consider stitches like the v-stitch, moss stitch, or filet crochet. These stitches incorporate chain spaces to create an open weave, which is great for spring and summer.
Once you’ve chosen your stitch, work a small swatch first to ensure you like the texture and gauge. This step helps avoid surprises later in the project and ensures you’re on track for the correct size.
One of the most important steps in following a CROCHET PATTERN FOR BLANKET – PATTERN is planning your layout and dimensions. Blankets come in many standard sizes, but part of the joy of crochet is making something tailored to your needs.
Here’s a quick guide to standard blanket sizes:
Decide early whether you’re following a written pattern or making a custom design. If working with squares or motifs, calculate how many you’ll need across and down to meet your size goal.
If your pattern uses continuous rows, you can chain a starting length equal to your desired width, and work rows until your preferred length is achieved. Don’t forget to add border rows to your measurements if you plan to include them.
Color placement matters, especially for striped blankets or those made with motifs. Sketch your design or use an online crochet planner to visualize your layout and keep track of progress.
Consider where and how the blanket will be used. A baby blanket needs to be lightweight, breathable, and washable, while a throw blanket for the couch might focus more on aesthetic and comfort.
Lastly, if your blanket will be a gift, think about the recipient’s style. Soft pastels for babies, bold modern colors for teens, or rich neutrals for home decor all add a personalized touch.
Once the crocheting is done, there are several finishing techniques that will elevate your CROCHET PATTERN FOR BLANKET – PATTERN from handmade to heirloom quality. Taking your time at this stage is well worth it.
Start by weaving in all the ends securely with a tapestry needle. For multicolored blankets, this may take a little time, but it’s crucial for durability and appearance. Always weave into several stitches to prevent unraveling.
Adding a border is a popular way to finish a blanket. A simple single or double crochet border frames the piece nicely. You can also try a shell, picot, or reverse single crochet (crab stitch) border for added texture and flair.
Blocking your blanket may not always be necessary, but it’s especially helpful for lacy designs or motif-based blankets. Wet block or steam block gently to even out edges and smooth any curling.
Labeling your blanket is a sweet touch if you’re gifting it. You can sew on a fabric or leather tag with your name, the date, or a special message. This makes your blanket feel extra thoughtful and memorable.
For care, most acrylic and cotton yarns are machine washable, but always check your yarn label. When in doubt, handwash in cool water with a gentle detergent, lay flat to dry, and avoid harsh heat or agitation.
Store your blanket in a clean, dry place. Avoid vacuum-sealed storage for long-term keeping, especially for natural fibers. With proper care, your blanket will remain soft, vibrant, and loved for years.
Q1: Is this pattern suitable for beginners?
Absolutely. There are many simple crochet blanket patterns that use only basic stitches like single and double crochet. Choose an easy pattern to get started.
Q2: How long does it take to crochet a blanket?
It depends on the size and stitch complexity. A baby blanket may take a few evenings, while a full-size bedspread could take several weeks.
Q3: What yarn is best for blankets?
Cotton, acrylic, and wool blends are common. Acrylic is budget-friendly and easy to care for. Cotton is breathable, and wool is extra warm.
Q4: How do I keep the blanket edges from curling?
Check your tension, use a border, and block the blanket after finishing. Curling is often caused by tight tension or skipped stitches.
Q5: Can I customize the size of the blanket?
Yes! Simply adjust your starting chain or motif count to fit your desired dimensions. Always measure your swatch first.
Q6: Can I sell blankets made from this pattern?
Yes, especially if it’s your own pattern. If you’re using someone else’s design, check their terms. Most allow finished items to be sold with credit given.
The CROCHET PATTERN FOR BLANKET – PATTERN is a rewarding project that offers warmth, beauty, and personalization in every stitch. Whether you’re crafting a cozy throw for your own home or creating a heartfelt gift, this timeless pattern allows you to showcase your creativity and skill.
We’ve covered everything from materials and stitch techniques to sizing
and finishing touches. With the right approach, you can turn simple yarn into something truly meaningful.
We’d love to hear from you! Share your experience, ask questions, or leave your honest opinion and suggestions in the comments. Your input helps others and inspires new crocheters to pick up their hooks and begin creating something beautiful.

