
Log Cabin Quilt Block - Tutorial

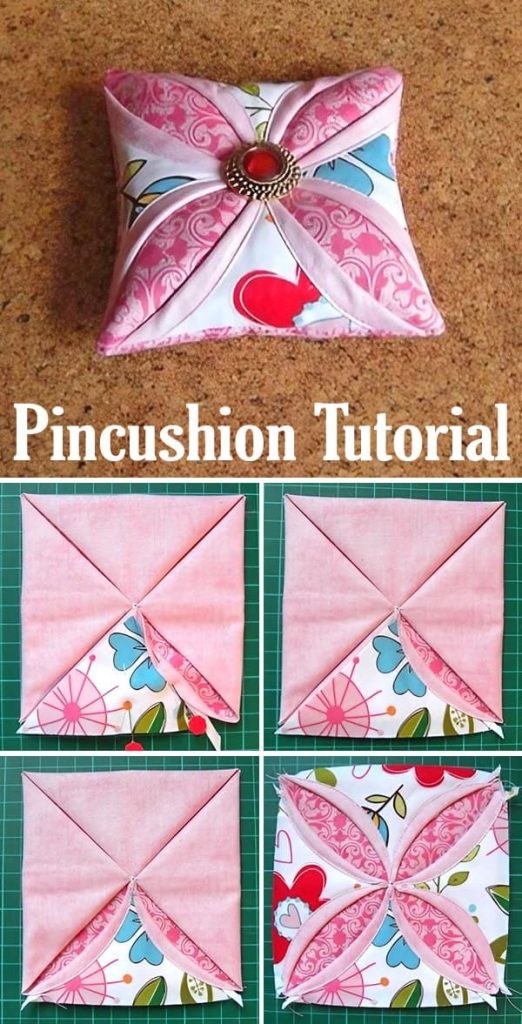
The Cathedral Window Pincushion Tutorial – Pattern is a delightful combination of classic quilting design and practical function. By transforming a traditional block into a small yet stunning pincushion, crafters can enjoy the elegance of cathedral windows in a project that is quick, satisfying, and beginner-friendly. This pattern is perfect for scrap busting, handmade gifts, or simply adding beauty to your sewing space.
What makes the Cathedral Window Pincushion Tutorial – Pattern especially charming is its ability to merge form with function. These pincushions are not only eye-catching with their folded fabric technique and layered design, but they are also sturdy enough to be used every day in the sewing room. Each tiny “window” can frame a pop of color or a favorite print, turning your pincushion into a mini gallery of fabric art.
Even if you’ve never tried cathedral window quilting before, this tutorial breaks the process down into manageable steps. You’ll be surprised how accessible this traditional technique becomes when scaled to a small project. Whether you’re an experienced quilter or new to sewing, this pattern will leave you with something beautiful and useful.
The Cathedral Window Pincushion Tutorial – Pattern is rooted in a historic quilting technique that mimics stained-glass windows. The original design involves folding and tucking fabric to create raised frames that reveal a contrasting fabric in the center, giving the illusion of light shining through a window.
This effect is typically achieved using a method known as “origami quilting,” where squares of fabric are folded and layered in a specific order before being topstitched. While the full-size version of this block is often used in bed quilts and wall hangings, this pincushion version captures all the charm in a fraction of the space.
Each pincushion starts with a base layer—usually made from a high-quality cotton fabric—that serves as the window “frame.” Contrasting fabric squares are then added as the inner “glass,” providing a great opportunity to showcase favorite prints, fussy cuts, or bold colors.
This pattern is often admired for its three-dimensional texture. The folds and curves created during the process give depth to the pincushion, and when stuffed properly, it results in a soft, tactile object that’s as satisfying to hold as it is to look at.
Many quilters also enjoy adding embellishments such as buttons, decorative stitching, or embroidery to personalize their Cathedral Window pincushion. These details can elevate a simple pattern into a cherished handmade keepsake.
Whether made for practical use or as a decorative accent, this pincushion pattern holds a timeless appeal. It’s also a great entry point for exploring the larger world of cathedral window quilting without committing to a large-scale project.
Before you begin your Cathedral Window Pincushion Tutorial – Pattern, gather your materials. One of the best parts of this project is that it doesn’t require much fabric or equipment. Most quilters already have everything needed in their stash.
You’ll need two types of fabric: one for the outer “window” frame and another for the inner “glass.” Choose a solid or lightly patterned fabric for the frame to make the inner colors stand out. For the windows, pick vibrant prints or coordinated colors that pop against the background.
Cut four 5” x 5” squares of the frame fabric and four 2” x 2” squares of the window fabric. You’ll also need a backing square, some polyester fiberfill or crushed walnut shells for stuffing, thread that matches your frame fabric, and a needle for hand or machine sewing.
Press all your fabric pieces before you start sewing. Neatly pressed fabric helps ensure crisp folds and clean lines, which is crucial for this pattern’s visual effect. If you’re using directional fabric, make sure it’s aligned properly before you begin folding.
You may also want to prepare a cardboard template or use a ruler to help fold your base squares into perfect quarters. Accuracy at this stage will help your windows line up properly when assembled.
Have your sewing machine set to a straight stitch with a medium stitch length. If you prefer hand sewing, a small running stitch or whipstitch can be used to secure the windows. Either method works well depending on your comfort and desired finish.
Now that your materials are ready, let’s dive into the step-by-step process of the Cathedral Window Pincushion Tutorial – Pattern. Each fold and stitch brings you closer to a beautiful result.
Start by folding each 5” square of frame fabric in half, right sides together, and sew along one short edge. Then turn the fabric right side out to form a tube, press the seam to the center back, and flatten into a square shape. Repeat for all four squares.
Fold each square diagonally in both directions to form creases. Then bring each corner to the center to form a smaller square, similar to origami. Press these folds well. This creates the base for your “window.”
Arrange the four folded squares in a 2×2 grid. Pin or baste the edges where they meet, making sure the seams align neatly. Sew them together using a small seam allowance or whipstitch by hand. You should now have a single block with four folded units.
Place one 2” fabric square in the center of each folded unit. Gently pull back the fabric corners over the square and pin in place to form the window effect. Sew down the curved edges using a straight or decorative stitch, securing the inner fabric and forming the signature cathedral window look.
After all four windows are stitched, place your backing fabric right sides together with your block. Sew around the edges, leaving a small gap for turning. Turn the piece right side out, push out the corners, and press the seams flat.
Stuff your pincushion with fiberfill or crushed walnut shells to your desired firmness. Then sew the opening closed using a ladder stitch or your preferred finishing method. Optional: add a button to the center for extra detail and dimension.
Once you’ve mastered the basic Cathedral Window Pincushion Tutorial – Pattern, try experimenting with design variations. You can change the size of the blocks, add more windows, or embellish your project in creative ways.
For a more dramatic look, increase the number of window blocks in your pincushion. A 3×3 layout (nine total units) creates a larger pincushion or a mini pillow. Use coordinated fabrics for a more sophisticated look or go scrappy for something whimsical.
Try reversing the color scheme—use bold fabrics for the frame and subtle tones for the window fabric. This flips the traditional look and gives your pincushion a modern edge.
Embellishments like embroidery, hand quilting, or beads can add charm and personality. Stitching vines, initials, or floral patterns around the windows can turn a simple project into a treasured gift.
Another variation is to add a loop at one corner, allowing the pincushion to be hung near your sewing machine or workspace. This is especially useful if you like to keep pins within easy reach while working.
You can also play with textures. Use linen or denim for the base and silky or metallic fabric for the windows. The contrast between rough and smooth materials creates an eye-catching effect.
Finally, consider using this pattern for non-pincushion projects like sachets, ornaments, or mini wall hangings. The design is versatile enough to adapt to a variety of small handmade crafts.
Q1: Is the Cathedral Window Pincushion suitable for beginners?
A: Yes! While it looks intricate, the folding and stitching are manageable with basic sewing skills. It’s a great introduction to cathedral window quilting.
Q2: What fabric works best for this project?
A: Cotton works best for both the frame and window. Lightweight fabrics are easier to fold, and high-contrast prints enhance the window effect.
Q3: Can I sew this project entirely by hand?
A: Absolutely. Many crafters enjoy hand sewing this project. It allows for greater control over curves and folds and can be quite relaxing.
Q4: How do I make my pincushion firmer?
A: Use crushed walnut shells or tightly packed fiberfill. This gives the pincushion weight and firmness, ideal for holding pins securely.
Q5: Can I scale this pattern up?
A: Yes! You can increase the block size or add more units to make a mini pillow, sachet, or decorative accent piece.
Q6: How do I clean my pincushion?
A: Spot cleaning is best, especially if you used decorative fabrics or embellishments. Avoid soaking, as it may distort the shape.
The Cathedral Window Pincushion Tutorial – Pattern brings elegance and creativity into a small, accessible project. It captures the timeless beauty of a classic quilting technique while offering a fun, hands-on experience that results in something both beautiful and useful.
We’ve explored the origins, construction steps, variations, and tips to help you confidently create your own cathedral window pincushion. Whether you’re gifting it or keeping it for yourself, this project adds a special touch to any sewing room.
Have you tried this pattern yet? We’d love to
hear your thoughts, suggestions, or even see photos of your finished pincushions. Leave a sincere comment below and share your creative journey with fellow crafters!


