
Log Cabin Quilt Block - Tutorial

If you love combining beauty and function in your sewing projects, the Wild Flowers Tote Bag Tutorial – Pattern offers the perfect opportunity. This cheerful, versatile bag showcases floral-inspired creativity while serving as a practical everyday accessory. Whether you’re heading to the market, the beach, or just need something stylish to carry your essentials, this pattern blends charm and craftsmanship beautifully.
The great thing about the Wild Flowers Tote Bag Tutorial – Pattern is how approachable it is. With basic sewing tools and a little time, even a beginner can create something that feels custom and luxurious. The design typically features applique or printed floral motifs, structured handles, and plenty of room for personalization with fabric choices, linings, or added pockets.
This tutorial not only walks you through the construction process but also offers tips on how to make your tote bag truly unique. From choosing your materials to stitching details that make a difference, you’ll learn how to bring this nature-inspired project to life. Let’s dive in and explore how to turn a simple idea into a functional piece of wearable art.
Before you begin the Wild Flowers Tote Bag Tutorial – Pattern, you’ll want to gather the right materials and get clear on your design vision. The best part about sewing your own tote bag is the ability to personalize it—from bold floral panels to delicate hand embroidery, there are endless ways to make it yours.
Start with a durable outer fabric. Cotton canvas, denim, or home decor fabrics work well for the exterior, especially if you plan on using the bag frequently. For the floral element, you can choose printed fabrics with wildflower designs or create your own using appliqué or fabric painting techniques.
You’ll also need lining fabric (quilter’s cotton or lightweight cotton works beautifully), fusible interfacing for structure, coordinating thread, and sturdy handles or webbing. If you’d like to add interior pockets, magnetic snaps, or other features, now is the time to plan those as well.
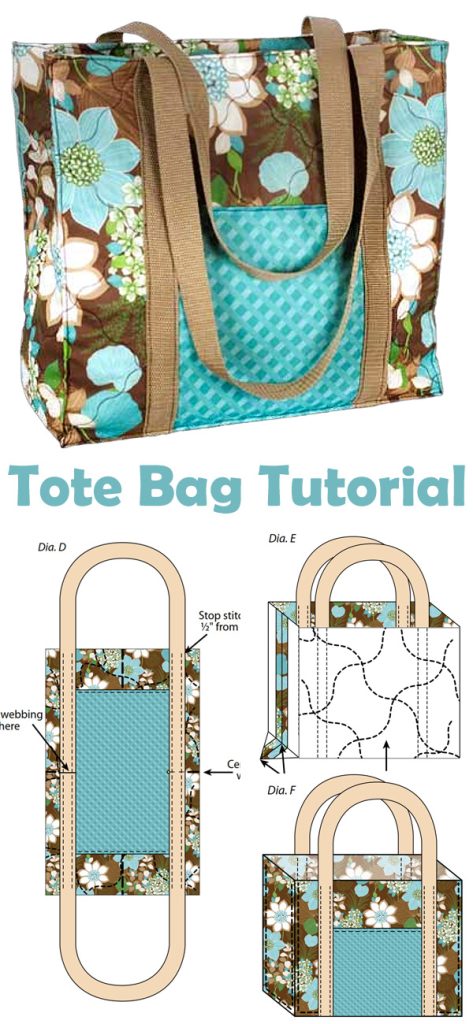
Cutting your pieces accurately is key to a well-constructed tote bag. Use a rotary cutter and ruler for precision. Typical tote bag measurements are about 16” wide x 14” tall with a 4” gusset, but you can adjust to suit your needs.
Iron your fabric thoroughly before beginning. This will make it easier to handle and help the interfacing adhere smoothly if you’re using it. Take time to pre-wash your fabrics if they are prone to shrinkage—especially if you’re using quilting cottons or natural fibers.
Finally, lay out your floral elements. If you’re going with appliqué, fuse your pieces in place or pin them before stitching. If you’re using printed fabric, decide which parts of the design you want to feature prominently on the front and back panels.
Now that your materials are prepared, it’s time to begin constructing your Wild Flowers Tote Bag Tutorial – Pattern. The steps are easy to follow, and even if you’ve never sewn a bag before, this pattern provides a clear and fun experience.
Begin by attaching any floral appliqué or embroidery to the outer panels. Use a tight zigzag or satin stitch to secure edges, or go for raw-edge appliqué for a more rustic, handmade look. You can also add free-motion stitching or embellishments like buttons or beads for dimension.
Next, attach the interfacing to the wrong side of each outer panel. This adds stability and helps your bag keep its shape. Press with a hot iron, following the interfacing instructions, and make sure it adheres evenly across the surface.
Sew the front and back outer panels together, right sides facing. Begin by stitching along the bottom and then both sides using a ½-inch seam allowance. If your design includes a boxed bottom or gusset, mark and cut out 2-inch squares at the lower corners before sewing, then match the seams and sew across the gap.
Repeat the same process with your lining fabric, but leave a 4-inch gap at the bottom to turn the bag right-side out later. If you want interior pockets, sew them onto the lining before assembling the side seams.
Now insert the lining into the outer bag, right sides facing. Match up the side seams and pin around the top edge. Sew all the way around the top opening of the bag, securing the lining and outer fabric together in one continuous seam.
Turn the bag right side out through the hole in the lining. Carefully push out the corners and press everything flat. Sew the lining opening closed with a ladder stitch or a small topstitch. Give the entire bag one final press to smooth seams.
With the bag assembled, the next step in the Wild Flowers Tote Bag Tutorial – Pattern is to add handles and finish your design. This is where the project really comes to life—and becomes functional.
If you’re using pre-made webbing or leather straps, position them evenly on each side of the bag, about 3 inches from each side seam. Sew them securely to the outer fabric using a box and X stitch pattern to reinforce the stress points.
To make your own handles, cut two long fabric strips, fold them lengthwise, add interfacing inside, and topstitch for strength. These can be matched to your lining, exterior, or a contrasting fabric for visual interest.
Topstitching around the top edge of the bag is optional but recommended. It helps keep the lining in place and gives the bag a finished, professional look. Use matching or decorative thread depending on the vibe you’re going for.
Want to add a closure? A magnetic snap, button loop, or zipper panel can be added at the top for extra security. Be sure to plan this early in the process if your pattern includes a flap or zipper extension.
Decorative details like tassels, charms, or ribbon trims can add a playful or elegant touch. Feel free to express your creativity with extra elements that reflect your personality.
Lastly, inspect the bag for loose threads, ensure all seams are secure, and give it one final press. Your Wild Flowers Tote Bag is now complete and ready for use or gifting!
One of the best aspects of the Wild Flowers Tote Bag Tutorial – Pattern is how easily it can be personalized. This is where you get to play and make the bag truly your own.
Try using a patchwork method for the outer panels, combining floral scraps into a wild garden design. This is a great way to use up leftover fabric and create a unique aesthetic for your tote.
Add hand embroidery. Simple stitches like backstitch, satin stitch, and French knots can be used to embellish the flowers or stems. It adds a special handmade touch and elevates the design beyond basic machine sewing.
Consider different sizes. You can scale the pattern down to make a small handbag or scale it up to create a weekender bag or reusable market tote. Adjust handle length and panel size accordingly.
Seasonal themes work beautifully. Use fall-colored wildflower prints for an autumn tote, or go bright and bold with summer florals. Winter whites and icy blues can transform your tote into a holiday gift with elegance.
For an eco-conscious twist, line your tote with waterproof fabric and use it as a shopping bag. Add interior compartments to carry produce or groceries securely while keeping everything in place.
Lastly, don’t forget gift potential. These totes make beautiful, thoughtful presents. Add a personalized label inside or include a small matching zipper pouch to make your gift even more special.
Q1: Is this project beginner-friendly?
A: Yes! The Wild Flowers Tote Bag Tutorial – Pattern is great for beginners. It uses basic straight stitching and simple techniques that are easy to follow.
Q2: What’s the best fabric to use?
A: Cotton canvas, duck cloth, or denim for the exterior; quilting cotton for the lining. Floral prints or appliqué fabrics work great for the decorative elements.
Q3: Can I make this tote bag without a sewing machine?
A: While it’s possible to sew it by hand, it will take significantly longer and require strong stitches, especially on the straps.
Q4: How can I wash the tote bag?
A: Most cotton-based bags are machine washable on gentle cycle. If you used leather or embellishments, spot cleaning is recommended.
Q5: How can I add structure to my tote bag?
A: Use fusible interfacing or add a layer of fusible fleece for a padded look and better shape retention.
Q6: Can I sell bags made from this pattern?
A: If the pattern is original or your own variation, yes. If you’re using a purchased pattern, check the designer’s terms for commercial use.
The Wild Flowers Tote Bag Tutorial – Pattern is a perfect blend of practicality and creative expression. Whether you’re making one for yourself or as a gift, this project allows you to explore fabric combinations, floral themes, and custom embellishments in a functional form.
From selecting the right fabrics and assembling the panels to adding the final finishing touches, this guide walked you through every step of creating a beautiful tote bag that celebrates the joy of handmade craft.
Have you tried making this pattern? We’d love to hear about your experience! Leave a sincere comment below with your thoughts, suggestions, or questions. Your feedback could inspire others to start their own creative journey with this lovely tutorial.


