
Log Cabin Quilt Block - Tutorial

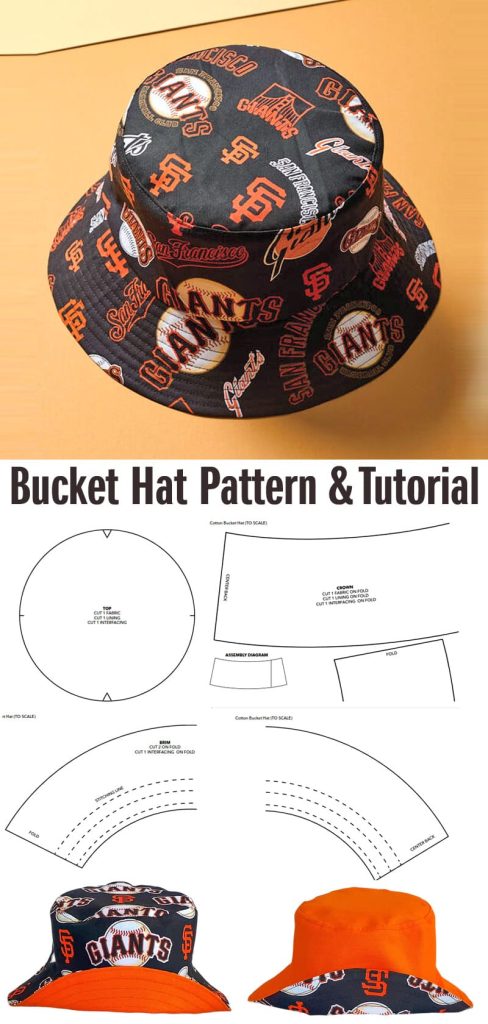
If you’re looking for a fun, functional, and fashionable DIY project, the Bucket Hat Pattern & Tutorial – Pattern is the perfect choice. This classic accessory is back in trend and is ideal for every season. Whether you’re shielding yourself from the sun or simply making a style statement, a handmade bucket hat adds a personal and creative touch to your wardrobe.
Creating a bucket hat from scratch might sound challenging, but with the right Bucket Hat Pattern & Tutorial – Pattern, it’s completely achievable—even for beginners. This sewing project allows you to explore your creativity with different fabrics, textures, and finishes. Plus, it’s a great way to upcycle fabric scraps or repurpose old clothing items.
Throughout this article, we’ll guide you step-by-step through the entire process, from gathering materials to stitching the final brim. You’ll also find customization tips, variations for different sizes, and answers to common questions. So, dust off your sewing machine and get ready to craft a stylish bucket hat that you’ll be proud to wear—or gift!
Before diving into your Bucket Hat Pattern & Tutorial – Pattern, it’s important to gather all the necessary materials. Preparation makes the entire process smoother and more enjoyable.
To begin, select a medium-weight cotton or canvas fabric for the outer layer. These materials hold shape well and are comfortable to wear. For the lining, choose a lighter cotton to keep the hat breathable and soft on the inside.
You’ll need a Bucket Hat Pattern & Tutorial – Pattern template, which you can download online or draw yourself. Most patterns include three main pieces: the crown (top), side (band), and brim. Be sure to print or trace them at the correct size for your head.
Essential tools include a sewing machine, fabric scissors, pins or clips, measuring tape, an iron, and matching thread. If you’re new to sewing, it’s best to use a simple straight stitch. You can later explore zigzag stitching for added strength.
Interfacing may be added to the brim or band for extra stiffness, especially if you want your hat to hold a more structured shape. This is optional, depending on your desired look.
Wash and press your fabric before cutting. Pre-washing prevents shrinkage and ensures your bucket hat will maintain its size and form after future washes.
Now that your materials are ready, it’s time to start constructing your Bucket Hat Pattern & Tutorial – Pattern. This step focuses on cutting, pinning, and preparing your pieces for sewing.
Using your printed or drawn pattern, trace each shape onto the fabric and cut carefully. You’ll need two of each piece: two crowns, two side bands, and two brims—one set for the outer fabric and one for the lining.
If using interfacing, cut it to match the brim and fuse it to the wrong side of the brim pieces using your iron. This will add support and help the brim keep its shape.
Start by sewing the short ends of the side bands together (right sides facing) to form a circle. Do this for both the outer fabric and lining. Press the seams open with your iron for a clean finish.
Next, pin the crown to the top edge of the band, matching notches or center points. Carefully sew around the circle, then repeat for the lining pieces. You now have two dome-shaped hat bodies—one for the outside and one for the inside.
Repeat the process with the brim. Sew the short ends of each brim piece together to form two rings. Attach one brim to the outer hat and the other to the lining, right sides facing the bands. Now your Bucket Hat Pattern & Tutorial – Pattern is taking real shape.
With your outer and inner hats completed, the next phase of the Bucket Hat Pattern & Tutorial – Pattern is to join them and finish the project cleanly. This is where the magic happens.
Turn the outer hat right side out. Keep the lining inside out and place it over the outer hat, right sides facing. Align the seams and pin around the bottom edge of the brim where they meet.
Sew all around the brim, leaving a 2–3 inch gap for turning. Clip curves and trim excess seam allowances if needed. This will reduce bulk and allow for a smooth finish.
Turn the hat right side out through the opening. Use a blunt tool (like a chopstick or pencil) to push out all the corners and curves gently. Give the entire hat a good press with the iron to flatten seams.
Topstitch around the edge of the brim to close the opening and add a professional touch. You can also add multiple rows of topstitching along the brim for style and stability.
Try the hat on to check the fit. If necessary, you can adjust the seams slightly or add a drawstring band inside for a snugger fit, especially if you’re sewing for children or different sizes.
Finish your Bucket Hat Pattern & Tutorial – Pattern by adding embellishments if desired. Try decorative patches, embroidered initials, or fabric paint to personalize your creation.
One of the best parts about working with the Bucket Hat Pattern & Tutorial – Pattern is how easily it can be adapted for different styles, sizes, and functions. Here’s how to take your bucket hat to the next level.
To create a reversible hat, use two complementary fabrics and skip the interfacing. When assembling, treat the inner and outer layers as equals, and topstitch around the brim to allow flipping it inside-out whenever you like.
For kids, scale down the pattern to match their head circumference. Always measure ahead of time. Most tutorials include measurements for different ages—infants, toddlers, and teens.
Want extra sun protection? Widen the brim by adding 1–2 inches to the pattern piece. A wider brim offers more shade and adds a dramatic flair to your finished piece.
Try water-resistant fabrics like nylon or PUL if you’re creating a rain-ready hat. This makes the hat ideal for wet or unpredictable weather, especially if you’re crafting for outdoor adventures.
If you’re upcycling, consider using old denim jeans or canvas tote bags. These materials give the bucket hat a rugged, eco-conscious look and reduce waste in your fabric stash.
Add features like chin straps, decorative buttons, or ventilation eyelets for a unique and functional finish. These small touches make your Bucket Hat Pattern & Tutorial – Pattern stand out as a customized fashion statement.
Q1: Can I sew a bucket hat without a sewing machine?
A: Yes! You can hand sew a bucket hat using backstitches, but it will take more time. Use strong thread and small, tight stitches for durability.
Q2: How do I choose the right fabric?
A: Lightweight cotton or canvas is ideal. For a structured look, use interfacing. For a soft, floppy hat, skip the interfacing and use light cotton or linen.
Q3: How can I make my bucket hat waterproof?
A: Use water-resistant materials like oilcloth, ripstop nylon, or treat your finished hat with a waterproofing spray.
Q4: Is this project suitable for beginners?
A: Absolutely. The Bucket Hat Pattern & Tutorial – Pattern is beginner-friendly, with only a few basic sewing techniques required.
Q5: Can I sell bucket hats I make from this tutorial?
A: Yes, you can sell them, especially if you use your own pattern or a free-to-sell template. Be sure to credit the original designer if required by their terms.
Q6: How long does it take to complete one hat?
A: On average, it takes 1–2 hours, depending on your sewing skill level and whether you’re adding custom features or embellishments.
The Bucket Hat Pattern & Tutorial – Pattern opens the door to a fun and rewarding sewing experience. You’ve now learned how to choose the right materials, follow step-by-step construction, explore creative variations, and make a hat that’s truly your own.
This timeless accessory is not only stylish and practical, but also an excellent beginner sewing project. With endless ways to customize it, you’ll never run out of ideas or inspiration. Whether for personal use, gifts, or even selling, bucket hats are always in fashion.
We’d love to hear your thoughts! Have you tried this tutorial? What fabrics and patterns did you use? Leave a sincere opinion in the comments and share your experience, suggestions, or photos of your final product. Let’s inspire each other with creativity and craftsmanship!


