
Log Cabin Quilt Block - Tutorial

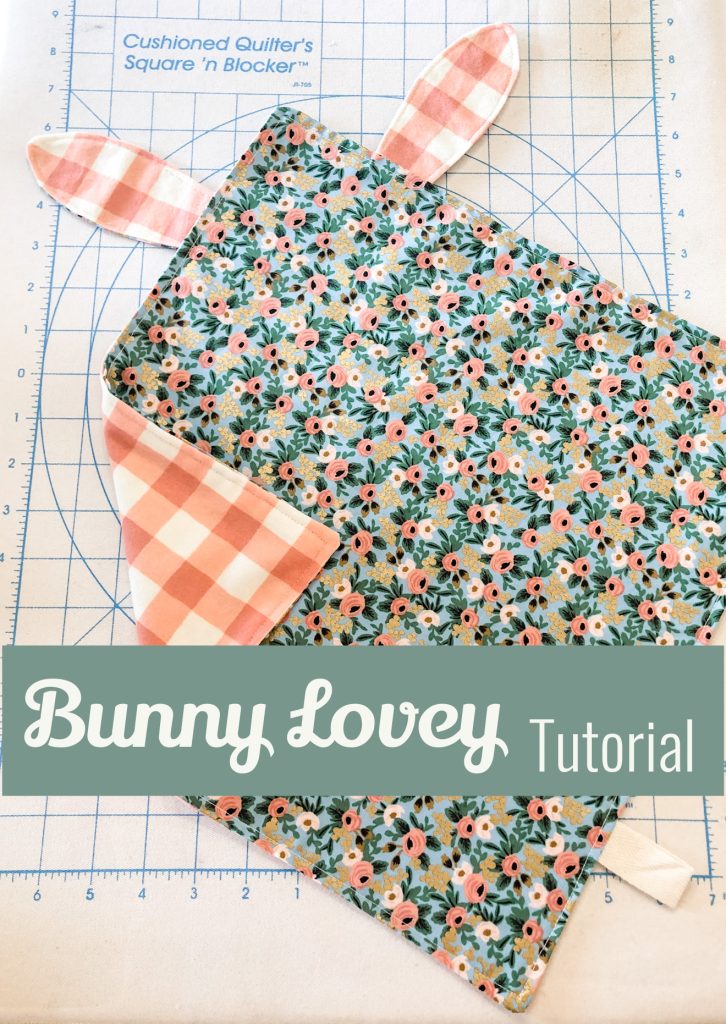
If you’re searching for a heartwarming handmade project to create a thoughtful baby gift, look no further than this Tutorial: Bunny Lovey – Pattern. A bunny lovey, also known as a comfort blanket or security toy, is the perfect blend of soft plush and cuddly fabric, often cherished by babies and toddlers alike. In this tutorial, you’ll learn how to sew an adorable bunny lovey from start to finish—even if you’re a beginner.
The beauty of the Tutorial: Bunny Lovey – Pattern is in its simplicity and versatility. With just a few supplies, a little time, and some creativity, you can create a unique keepsake that offers comfort, promotes sensory development, and becomes a favorite snuggle buddy for years. You’ll also have the freedom to customize the design with colors and textures that suit the baby or occasion.
This guide is easy to follow, beginner-friendly, and fully detailed to ensure you’re never lost along the way. Whether you’re sewing as a personal project or planning handmade gifts for a baby shower, this Tutorial: Bunny Lovey – Pattern will walk you through each step with clarity and care. Let’s get started.
Before beginning your Tutorial: Bunny Lovey – Pattern, you’ll need to gather the right materials. Choosing quality fabrics and safe components ensures the finished product is both durable and baby-friendly.
First, select soft fabrics for the body of the lovey. Popular choices include minky fabric, fleece, or organic cotton. These are gentle on a baby’s skin and provide a soft texture for cuddling.
For the bunny head, you’ll want to use a slightly firmer material to hold the shape. Felt or high-quality cotton can work well. If you’re making the entire project from one type of fabric, ensure it’s tightly woven and doesn’t fray easily.
You’ll also need polyfill stuffing for the bunny’s head. Make sure it’s hypoallergenic and washable. You’ll use a small amount, but it makes a big difference in shaping and softness.
Additional tools include a sewing machine, thread, scissors, pins, and a needle for hand stitching. If you’d like to embroider the bunny’s facial features, make sure to have embroidery floss and a small hoop.
Don’t forget to download or create your Bunny Lovey pattern. Many free templates are available online, or you can draw your own. A standard pattern will include pieces for the head, ears, and the square or triangle-shaped body.
Lastly, if safety is a concern (as it always should be with baby items), avoid using buttons or plastic eyes. Instead, sew or embroider all details to avoid any choking hazards.
The most charming part of the Tutorial: Bunny Lovey – Pattern is the bunny’s head, which brings personality to the lovey. This part requires some careful sewing but is very manageable even for a beginner.
Start by cutting two head pieces from your selected fabric. These pieces will form the front and back of the bunny’s head. Place them right sides together and sew along the edge, leaving an opening at the bottom for stuffing.
Next, cut out four ear pieces (two for each ear). Sew each pair of ear pieces right sides together, leaving the base open. Turn the ears right side out and press gently with a warm iron if your fabric allows.
To attach the ears to the head, insert them into the top seam before sewing the head closed. Pin the ears in place between the two head pieces, making sure they’re aligned and facing inward.
After sewing, turn the head right side out and gently stuff with polyfill. Take care not to overstuff; you want the head to be soft and cuddly, not rigid. Once filled, stitch the opening at the base of the head closed using a ladder stitch for a seamless finish.
Now it’s time to embroider the bunny’s face. Simple eyes, a nose, and a little smile can be added using backstitch or satin stitch. Avoid adding any parts that could come loose and pose a choking risk.
Once complete, set the bunny head aside while you prepare the lovey body. The hard part is done—and your bunny already looks adorable!
Now that the head is finished, the next step in your Tutorial: Bunny Lovey – Pattern is assembling the blanket body. This is the part the baby will cuddle, hold, and carry around—so softness is key.
Cut two squares or triangles of your chosen soft fabric—typically 12×12 inches or larger for a square, or a similarly sized triangle. You can even use satin or cotton on one side and fleece on the other for a sensory-rich experience.
Place the two pieces right sides together and pin or clip them in place. If you want to add tags or ribbons for a sensory toy effect, pin those between the layers at this stage, facing inward.
Sew around the perimeter, leaving a 2-inch gap on one side to turn the fabric right side out. Once sewn, clip the corners if working with a square, turn right side out, and press flat.
Topstitch around the edges, which helps the fabric lay flat and secures the opening. This step gives your project a more finished, professional appearance and ensures durability after repeated washing.
Now, take the completed bunny head and place it in the center of the blanket. Hand sew it securely in place using a ladder stitch or whip stitch, making sure it’s very tight and secure for safety.
You’ve now completed the main parts of the Bunny Lovey pattern! It’s ready to be gifted, loved, and snuggled.
The wonderful thing about the Tutorial: Bunny Lovey – Pattern is that it allows endless customization. Whether you’re sewing for a baby boy, girl, or keeping it gender-neutral, you can create a unique lovey every time.
Start with color schemes. Pastels are a common choice for babies, but you can also go bold or use patterns like stars, polka dots, or floral prints. Consider matching it to a nursery theme or baby shower décor.
Personalize the lovey by embroidering the baby’s name or initials on the body or ear. This makes your gift even more special and memorable for parents.
Play with textures by combining fabrics—like using minky for the front and satin or waffle cotton for the back. Babies love to explore different surfaces, so this enhances their sensory development.
Make seasonal variations. For example, use bunny-printed fabric for Easter gifts or snowflake patterns for winter babies. These small details add a thoughtful touch.
If you’re gifting the lovey as part of a set, consider sewing matching items like bibs, burp cloths, or a small blanket using the same fabrics and color scheme.
Lastly, you can scale the pattern up or down. Create mini versions for travel or larger ones for more cuddling. The Tutorial: Bunny Lovey – Pattern is very flexible, making it a go-to project for all occasions.
Q1: What age is a bunny lovey appropriate for?
A bunny lovey is suitable for babies 6 months and older. For younger infants, it’s best used under supervision. Always follow safety guidelines.
Q2: What fabric is best for making a bunny lovey?
Soft, baby-safe fabrics like minky, fleece, and organic cotton are ideal. Always choose materials that are washable and gentle on delicate skin.
Q3: Can I make this without a sewing machine?
Yes, but it will take more time. Hand stitching is possible, especially for smaller parts like the bunny’s head and facial features.
Q4: How do I wash the bunny lovey?
Use a gentle machine cycle with cold water and baby-safe detergent. Air dry or tumble dry on low. Avoid bleach and fabric softeners.
Q5: Is it safe to use buttons for eyes?
No, it’s not recommended. Always use embroidery or securely stitched felt to avoid any choking hazards.
Q6: Can I sell bunny loveys made from this tutorial?
Yes, if the pattern allows it and you follow safety standards. Always check copyright terms of the pattern source and ensure the product is labeled for handmade use.
Creating a bunny lovey with this Tutorial: Bunny Lovey – Pattern is a rewarding and heartfelt project. You’ve learned how to gather materials, sew the bunny head, assemble the lovey body, and add custom touches to make each piece one-of-a-kind. This project is beginner-friendly yet meaningful enough to become a cherished baby gift.
We hope you found this tutorial helpful and inspiring. If you’ve made a bunny lovey following this guide, we’d love to hear from you! Please leave your honest opinion in the comments, and feel free to share suggestions or ideas for future tutorials. Happy sewing!


