
Log Cabin Quilt Block - Tutorial

If you’re looking for a visually striking quilting technique that’s easier to make than it looks, learning how to Create a Hidden Wells Quilt Block – Pattern is a great place to start. This popular quilting method uses simple strip piecing and clever cutting to form stunning, woven-looking blocks that give the illusion of intricate design. The best part? It’s beginner-friendly and an excellent scrap-busting project!
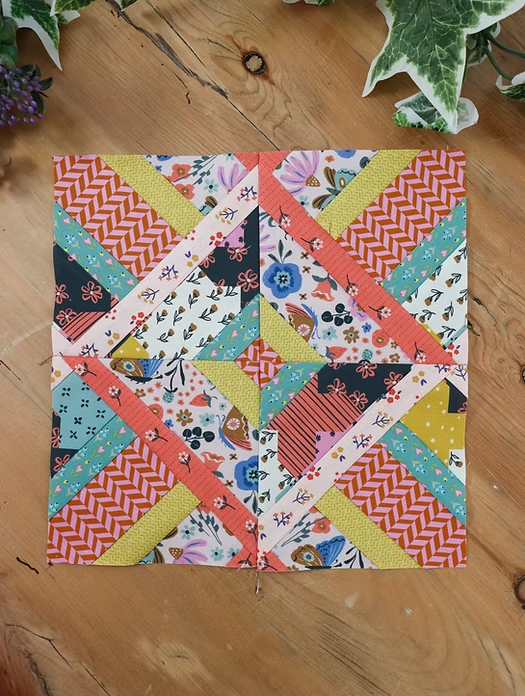
The beauty of the Hidden Wells Quilt Block lies in its surprising construction. At first glance, it appears to be a highly complex pattern with multiple layers and intersecting lines. However, with a few strips of fabric and a bit of rotating magic, you’ll end up with a block that is as rewarding to sew as it is to look at.
In this step-by-step tutorial, we’ll walk through everything you need to know to Create a Hidden Wells Quilt Block – Pattern. From fabric selection and strip piecing to the final assembly, you’ll learn how to craft this unique quilt block in a way that suits your style and skill level.
Choosing the right fabric is the foundation of a successful Hidden Wells Quilt Block. Whether you want bold contrasts or soft gradients, your fabric selection will determine how visually dynamic your final quilt block turns out.
Start by selecting four to seven strips of fabric. These strips should be cut the same width—typically 2.5 inches for a standard block. You can use pre-cut jelly rolls or cut your own from yardage. Solid colors or small prints work best to keep the design crisp and defined.
Lay out your fabric strips in the order you’d like them to appear. Try alternating dark and light fabrics for maximum contrast. The arrangement of these strips will directly affect how the pattern appears when the block is rotated and sewn.
Before sewing, press all your fabric strips with an iron to remove wrinkles. Starching your fabric lightly can help reduce stretching when you cut the block into diagonal sections later.
Next, sew your strips together lengthwise using a ¼-inch seam allowance. Press the seams all in one direction or open, depending on your personal preference. You now have one long strip-set, ready to be transformed.
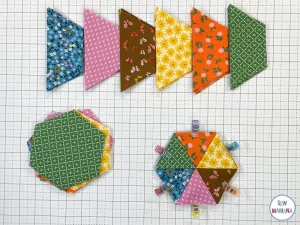
Once your strip-set is complete, trim the edges to square them off. Then, cut the strip-set into equal square units. For example, a 16″ long strip-set can be cut into 4″ square blocks.
This is the stage where the magic begins. Now that you have your strip-pieced squares, the next step is to create the illusion of woven complexity by cutting and rotating.
Take one of the strip-pieced square blocks and cut it on both diagonals—first from corner to corner one way, then the other way—creating four triangles. These triangles are the building blocks of your Hidden Wells Quilt Block.
Carefully handle the triangles, as they now have bias edges that can stretch easily. It helps to press each triangle gently and use a bit of spray starch to maintain their shape.
Begin experimenting with layout. Rotate the triangles so that the strip patterns intersect and create the “hidden wells” illusion. You’ll see star-like shapes or crisscross patterns emerge depending on the original order of the strips.
Once you’ve found a pleasing arrangement, begin sewing the triangles together in pairs. Match the points carefully to keep the center of the block clean and aligned.
After joining pairs, sew the halves together to form a complete square again. Take care to press the seams well so the block lays flat and retains its shape.
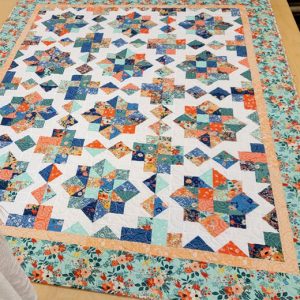
Now that you’ve learned how to Create a Hidden Wells Quilt Block – Pattern, you might be wondering how to turn a few blocks into a full quilt. The assembly phase is where your creativity can really shine.
To start, make several blocks using the same or different strip arrangements. Using the same fabrics can create a consistent, repeating pattern, while varying the fabrics results in a scrappy, more eclectic quilt top.
Once your blocks are done, decide how to arrange them. You can rotate every other block, line them up in rows, or place sashing between them to break up the design. There’s no wrong answer—it’s all about what appeals to your eye.
Sew the blocks together using a consistent seam allowance and press the rows as you go. Be sure to square up each block before assembly for the cleanest finish.
Add borders if desired. A simple border can frame the quilt nicely, while a pieced border can add more dimension and interest.
When your quilt top is complete, layer it with batting and a backing fabric. Then quilt as desired. Simple straight-line quilting works beautifully with the structured nature of the Hidden Wells Quilt Block.
The final stage in your journey to Create a Hidden Wells Quilt Block – Pattern is finishing the quilt and exploring creative ways to make it your own.
Start by trimming the quilt sandwich and binding it with coordinating fabric. A solid binding works well to contain the busy patterns of the blocks, but you can also go bold with a patterned edge.
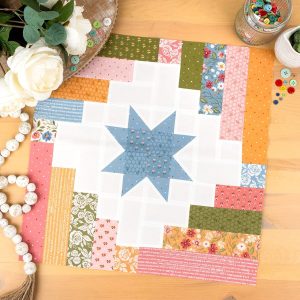
Think beyond just quilts. These blocks can also be used for pillow covers, table runners, tote bags, or wall hangings. The design is versatile and scales beautifully across many fabric crafts.
You can also vary the number of strips. Using seven or even nine strips in your initial piecing creates more intricate patterns. Just be sure to maintain equal widths and consistent seam allowances.
Try using seasonal fabrics to create holiday-themed versions of the quilt block. Halloween, Christmas, or spring florals can give your quilt a fun, festive feel.
Experiment with contrast. High-contrast black-and-white strips create a dramatic effect, while tonal or low-contrast colors result in a softer, more subtle look.
Lastly, document your process and share it! The quilting community is always excited to see how others interpret classic patterns in new ways.
Q1: Is the Hidden Wells Quilt Block good for beginners?
Yes! Despite its complex appearance, the block is simple enough for beginners. It relies on basic strip piecing and diagonal cutting—no tricky curves or complicated math.
Q2: How many fabrics should I use for the pattern?
Typically, four to seven fabrics are used. Four gives a cleaner look, while seven adds more variety and visual interest. The more fabrics you use, the more complex the pattern becomes.
Q3: Can I use pre-cut fabric like jelly rolls?
Absolutely! Jelly rolls are perfect for this project since they are already cut into 2.5-inch strips—the ideal size for creating your strip-set.
Q4: What size should each strip be?
Most quilters use 2.5-inch-wide strips, but you can adjust based on your design. Just make sure all strips in the same block are the same width for consistency.
Q5: How do I prevent the triangles from stretching?
Use spray starch and handle the triangles carefully, especially after cutting on the bias. Press gently and avoid tugging to keep your shapes true.
Q6: Can I chain piece these blocks for faster assembly?
Yes, chain piecing is a great time-saving method when making multiple blocks. Just stay organized and label your layouts to avoid confusion.
The Create a Hidden Wells Quilt Block – Pattern technique offers the perfect combination of simplicity and impact. By using basic strip piecing, strategic cuts, and a touch of creativity, you can craft a quilt that looks intricate without being intimidating.
In this tutorial, we covered everything from choosing fabrics and piecing strips to assembling full blocks and finishing your quilt. Whether you’re making a single block for a pillow or creating an entire quilt top, the Hidden Wells method is a joy to sew and always impresses.


