
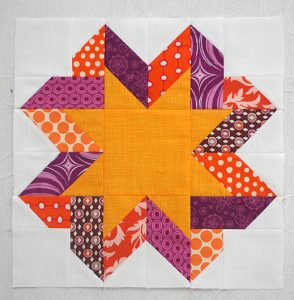
Log Cabin Quilt Block - Tutorial

If you’re looking for a simple way to add personality and charm to your dining or coffee table, then a handmade table runner – pattern might be just what you need. Table runners are one of the most versatile and rewarding projects in the world of sewing and quilting. Not only are they functional and decorative, but they also serve as the perfect canvas to practice new techniques, color palettes, and patchwork styles.
The beauty of a table runner – pattern is that it can be adapted for any season, occasion, or style. Whether you want a floral-themed runner for spring, a rustic one for autumn, or a festive piece for the holidays, your creativity has no limits. A well-crafted table runner brings warmth and a handmade touch to your home, making every meal feel a bit more special.
In this article, we’ll walk you through the steps to create your own table runner – pattern, offering guidance on fabric selection, construction techniques, layout ideas, and finishing touches. By the end of this tutorial, you’ll be equipped with everything you need to stitch a piece that reflects your personal style.
When starting your table runner – pattern, the first step is deciding what look you’re aiming for. Consider the colors and textures already present in your kitchen or dining room. Think about whether you want the runner to be the focal point or a subtle accent.
Cotton is the most popular choice for table runners, especially quilting cotton. It’s durable, easy to sew, and available in endless patterns and solids. For a more elevated or seasonal touch, consider using linen, canvas, or even repurposed fabric from old garments or tablecloths.
Your choice of batting or interfacing will also affect the final look. If you want a soft, quilted finish, opt for low-loft cotton batting. For a thinner, flatter design, fusible fleece or heavy interfacing might be better. These will add structure without bulk.
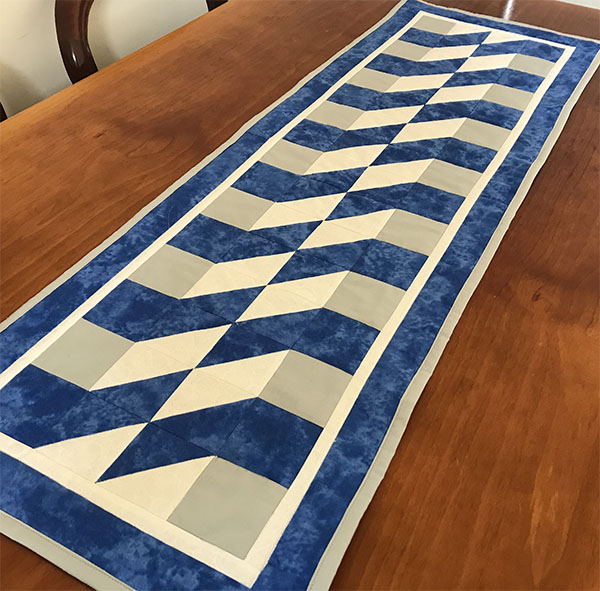
Design-wise, the table runner – pattern can be as simple or complex as you’d like. A basic strip-pieced runner is great for beginners, while more experienced sewers might want to try half-square triangles, log cabin blocks, or appliqué.
Before cutting anything, sketch your idea or use a digital design tool to visualize your layout. Consider repeating elements or central motifs, and leave enough seam allowance in your measurements. A standard size for a table runner is about 14″ x 40″, but it can be customized to fit your space.
Keep in mind the practicality of the design. If the table runner will be used under hot dishes or near candles, avoid embellishments like beads or buttons. Opt for washable fabrics and thread colors that won’t easily show stains.
Once you’ve chosen your fabric and finalized your design, it’s time to start the real work. Begin by pressing your fabric thoroughly to remove wrinkles. This ensures precise cutting and accurate seam alignment during assembly.
Measure your table to decide on the final dimensions of your table runner – pattern. Remember to add seam allowance (usually ¼”) on all sides of each fabric piece. Use a rotary cutter and quilting ruler for sharp, clean cuts.
If your pattern includes patchwork or quilting blocks, start piecing them together in rows. Lay out your pieces on a flat surface or design wall before sewing. This helps you see how the colors and shapes interact and make adjustments if needed.
Sew your pieces together using a ¼” seam allowance. Consistency is key—uneven seams can cause warping or unevenness in the final runner. Press seams open or to one side depending on your pattern’s instructions or your personal preference.
Once your top is pieced, you’ll create a quilt sandwich: top layer (your pieced fabric), middle layer (batting or interfacing), and backing fabric. Pin or baste all layers together carefully to avoid shifting during sewing.
Consider quilting your table runner – pattern by sewing straight lines, echoing the design, or using free-motion quilting if you’re confident. This not only adds texture but helps keep everything in place during use and washing.
After quilting, trim the edges of your table runner to square it up. This will make binding much easier and give a polished, professional finish. Double-check that the measurements are even and the corners are aligned.
For the binding, you can use pre-made bias tape or make your own from coordinating fabric. A double-fold binding is most common for durability. Cut 2.5” wide strips, join them on the bias, and press them in half lengthwise.
Attach the binding by sewing it to the front of the runner with a ¼” seam, folding it over to the back, and then stitching it down. You can machine-stitch or hand-stitch the binding, depending on your comfort level and desired look.
If you prefer a cleaner, non-bound finish, you can use the envelope method. This involves placing the top and backing right sides together, stitching around the edges (leaving a small gap), then turning the piece right side out and pressing.
Don’t forget to add a label! Whether it’s your initials, the date, or a personal message, labeling your handmade items adds a sentimental and professional touch. You can embroider it, write it with fabric pen, or use a custom label.
Once complete, give your table runner – pattern a final press and lay it out on your table. Admire your work and enjoy the transformation it brings to your space. It’s a small project with a big impact.
One of the most enjoyable aspects of working with a table runner – pattern is how easily it can be adapted for various occasions and styles. By switching out fabric choices and block layouts, the same base pattern can take on a whole new life.
For spring or summer, opt for light pastels, floral motifs, or even fruit prints. You can incorporate flower appliqués or use embroidery to add cheerful details that celebrate the season.
Fall-themed runners might use warm tones like rust, mustard, olive, and brown. Try incorporating maple leaf quilt blocks or plaids for a cozy, rustic feel. Using burlap or textured fabrics can also enhance the autumn aesthetic.
Winter or holiday runners can feature deep reds, greens, silvers, or blues. Add star blocks, snowflake appliqués, or metallic thread for festive flair. For Christmas, you can include patchwork trees or presents.
You can also personalize the runner for birthdays, anniversaries, or family events by using meaningful fabrics or prints that reflect the recipient’s style. These make fantastic handmade gifts that are both practical and heartfelt.
Modern table runners often feature minimalist layouts with solid fabrics, asymmetrical blocks, or negative space. This style is perfect for contemporary homes and allows the quilting itself to become the focus.
Use themed table runners throughout the year to refresh your decor without a full redesign. It’s a sustainable and affordable way to update your living space and celebrate each season creatively.
Q1: What is the best size for a table runner?
A standard size is 14″ x 40″, but it depends on your table. Measure your table and leave at least 6-8 inches of overhang on each side for a balanced look.
Q2: Do I need batting for a table runner?
Batting adds softness and structure but is optional. If you prefer a flat runner or plan to use it under hot dishes, consider fusible fleece or heavy interfacing.
Q3: Can I machine wash my table runner?
Yes, if you’ve used pre-washed, machine-safe fabrics. Use a gentle cycle with mild detergent and lay flat or tumble dry on low heat.
Q4: How do I prevent the runner from slipping on the table?
Adding a layer of grippy shelf liner underneath or using a heavier backing fabric like canvas can help reduce sliding.
Q5: What’s the easiest pattern for beginners?
A simple strip-pieced runner or a patchwork design using squares is ideal for beginners. It offers great practice in measuring, sewing straight seams, and pressing.
Q6: Can I make a reversible table runner?
Absolutely! Simply back your runner with another decorative fabric and quilt through all layers. This gives you two looks in one project.
Creating your own table runner – pattern is a satisfying and accessible project that lets you personalize your space while honing your sewing skills. From fabric selection and design planning to assembly and finishing touches, every step offers an opportunity to express your creativity and care.
Whether you’re crafting for seasonal decor, gifting, or simply trying a new technique, table runners are the perfect blend of form and function. They’re fast, fun, and flexible—ideal for sewers of all levels.
We’d love to hear your thoughts! If you enjoyed this tutorial, leave a sincere opinion and share any suggestions or project ideas you’d like us to explore next. Happy sewing!


