
Log Cabin Quilt Block - Tutorial

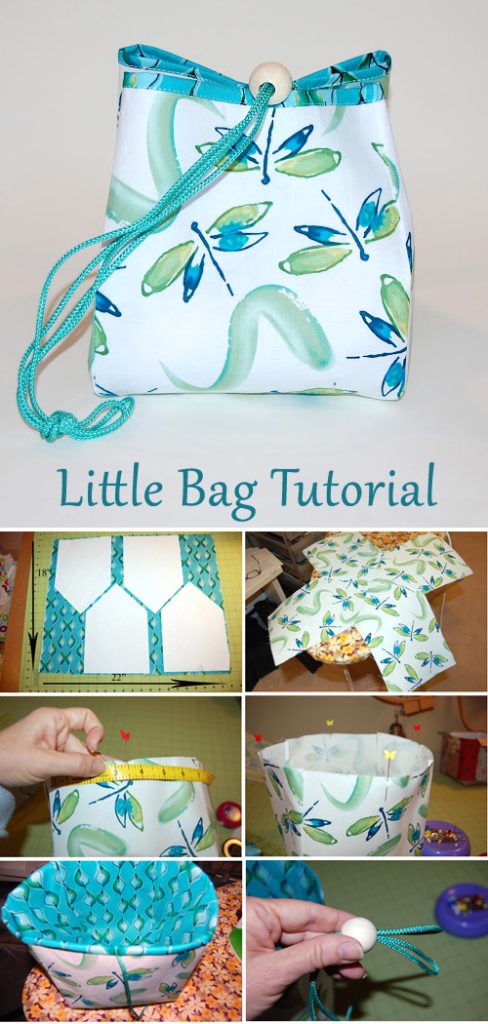
Creating something by hand always brings a special satisfaction, and this Little Bag Tutorial – Pattern is a perfect example of that. Whether you’re new to sewing or an experienced crafter looking for a fun weekend project, this easy and charming little bag pattern will bring your creativity to life. It’s practical, stylish, and can be made with scrap fabric or your favorite prints.
In this Little Bag Tutorial – Pattern, we’ll walk you through the steps to create a small, functional bag that’s ideal for holding makeup, small gifts, earbuds, or even coins. The best part? You can easily customize the size, colors, and closure options to suit your needs or match your personal style.
This tutorial is designed to be beginner-friendly, but it’s also enjoyable for more experienced makers who want a relaxing and rewarding sewing session. So, gather your materials, get your sewing machine ready, and let’s bring this delightful little bag pattern to life!
Selecting the right materials is the first step to making your little bag a success. Since this project is small, it’s a great opportunity to use leftover fabrics from previous projects or to try that print you’ve been saving for something special.
Start with two contrasting cotton fabrics—one for the exterior and one for the lining. This will give your bag a clean and polished look on both the inside and outside. Cotton is an ideal fabric because it’s easy to sew and holds its shape well.
For added durability, consider using interfacing between the fabric layers. This helps the bag keep its shape and adds a more professional feel. Fusible interfacing is the easiest to apply—just iron it onto the wrong side of your fabric before sewing.
Once you’ve selected your fabrics and interfacing, it’s time to print or draw your Little Bag Pattern. Many tutorials provide downloadable templates, or you can draft your own with simple rectangles depending on your desired size. A standard size to start with is 8” x 5”.
Carefully cut your fabric and interfacing using your pattern. Make sure to cut two pieces for the exterior, two for the lining, and two interfacing pieces if you’re using it. Press all your fabric pieces so they’re smooth and ready to stitch.
Finally, gather your additional supplies: pins or clips, a sewing machine, coordinating thread, scissors, and your choice of closure—zippers, snaps, or even a drawstring.
With your fabric pieces prepared, it’s time to begin sewing. Start by attaching the interfacing to the wrong side of each outer fabric piece if you chose to use it.
Next, place the two outer fabric pieces right sides together. Sew along the sides and bottom using a 1/4” or 3/8” seam allowance, depending on your comfort. Reinforce the corners with an extra backstitch to make them strong.
Repeat the same process with the lining fabric, but leave a 2” to 3” gap along the bottom seam. This gap will allow you to turn the bag right-side-out later.
To give the bag more depth, box the corners. Pinch each corner of the bag so the side and bottom seams align, forming a triangle. Measure and mark 1” from the tip of the triangle, then sew straight across. Trim off the excess fabric. Do this for both outer and lining pieces.
Now, turn the outer piece right side out. Keep the lining piece inside out for now—this will make it easier to assemble the bag later.
If you’re adding a zipper, now is the time to baste or pin it into place between the outer and lining fabrics, aligned with the top edge.
With the zipper or top edges aligned, place the outer bag inside the lining bag—right sides should be facing each other. Pin or clip around the top edge to keep the layers from shifting while sewing.
Sew all the way around the top opening of the bag. Take your time around the zipper or corners, ensuring everything is even. Once complete, reach through the gap in the lining and gently pull the outer bag through.
After turning the bag right-side-out, push the lining into place and smooth out the corners. Press the top edge of the bag to make it crisp and flat.
Sew the gap in the lining closed, either with a machine stitch or a discreet hand stitch using a ladder stitch for a clean look.
Finally, topstitch around the opening of the bag for a professional finish. This helps keep the layers in place and adds a decorative touch.
If you’re using a snap or button as a closure instead of a zipper, install it now, following the manufacturer’s instructions.
Your Little Bag Tutorial – Pattern is now complete, and you have a beautiful, functional little pouch to use or gift!
One of the best parts of this Little Bag Pattern is how easy it is to customize. You can change the size to make mini coin purses, medium-sized toiletry bags, or even larger project bags.
Try using different fabrics like canvas, denim, or faux leather for a sturdier feel. You can also experiment with quilting the exterior panels for extra texture and visual interest.
Add decorative details like embroidery, appliqué, or iron-on patches to make the bag uniquely yours. This is a great way to personalize gifts or create themed bags for holidays.
If you’re making multiple bags, consider setting up a sewing assembly line. Cut and prepare several bags at once, then sew them in batches—it’s efficient and rewarding.
These bags are excellent for gift-giving. Fill them with candy, small toys, makeup, or stationery to make thoughtful and reusable gift packages.
The Little Bag Tutorial – Pattern is also great for teaching kids or beginners how to sew. It introduces basic construction skills and gives a quick, satisfying result.
Q: Can I sew this little bag by hand instead of using a sewing machine?
A: Yes, you can sew it by hand using backstitching for strength, although it will take more time. A sewing machine makes the process faster and neater.
Q: What size should I cut my fabric for a beginner version?
A: A simple size to start with is 8″ x 5″ for the outer and lining fabrics. Adjust as needed depending on what you plan to store in your bag.
Q: Do I need to use interfacing?
A: While it’s optional, interfacing helps your bag keep its shape and adds durability. It’s especially helpful if you plan to carry heavier items.
Q: What type of closure works best?
A: Zippers provide a secure closure, but snaps, buttons, or even a simple drawstring work well depending on the look you want.
Q: Can I wash the bag after it’s made?
A: Yes, as long as you use washable fabric and interfacing. Be sure to wash with gentle detergent and air dry to maintain shape.
Q: Is this a good project for selling handmade items?
A: Absolutely! Many crafters sell these little bags at markets or online. Just be sure to credit or modify the pattern if required by its creator.
In this complete Little Bag Tutorial – Pattern, we covered how to choose materials, cut and sew the pieces, add a closure, and even personalize your bag. Whether you’re sewing for fun, creating gifts, or building your handmade business, this versatile little bag is a rewarding project.
We hope you enjoyed learning and making your very own custom bag! If you tried this tutorial, leave us a comment with your experience, share your tips, or suggest new ideas for future projects. We’d love to hear from you! 🧵👜


