
Log Cabin Quilt Block - Tutorial

The Card Trick Quilt Block Tutorial – Pattern is a classic favorite in the quilting world, known for its clever design that creates the illusion of overlapping cards. This optical illusion makes the block visually striking and perfect for adding a touch of sophistication to any quilt. While it may look complex, with careful piecing and attention to color placement, it’s achievable even for intermediate quilters.
Whether you’re creating a full quilt using just card trick blocks or using this block as a featured centerpiece, the result is always captivating. This block is an excellent opportunity to practice precision piecing, contrast management, and visual alignment. And best of all, once you master the technique, you’ll find endless ways to play with fabric combinations and layouts.
In this Card Trick Quilt Block Tutorial – Pattern, we’ll guide you step by step through fabric selection, cutting, layout planning, piecing, and final assembly. By the end of this tutorial, you’ll not only have created a stunning quilt block, but you’ll also understand how to adapt the pattern to fit your personal style or quilt project.
The magic behind the Card Trick Quilt Block lies in how the fabrics interact. Choosing the right colors and prints is essential to successfully pulling off the optical illusion of overlapping cards. Let’s dive into how to do it effectively.
To start, you will need four different fabrics, each representing one of the “cards” in the block. You’ll also need a background fabric to frame the design and help the illusion pop. The key here is contrast—select fabrics that are distinct from each other and from the background so the shapes don’t blend together.
Try choosing fabrics within the same color family but with different tones (light, medium, dark) for a harmonious but dynamic effect. Or go bold and use completely different colors for each “card” for a vibrant and playful appearance. Avoid prints that are too busy or similar in value, as they can muddle the illusion.
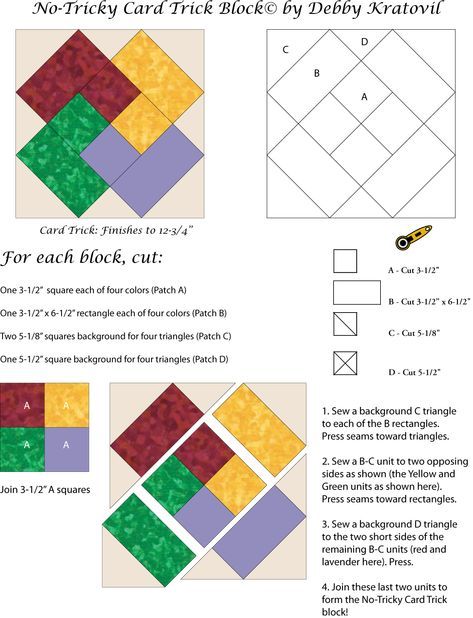
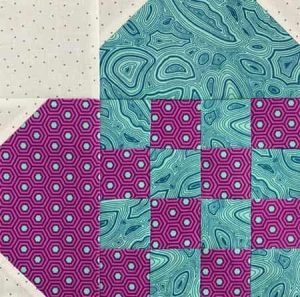
Understanding how the illusion works can make layout easier. Each fabric will appear to weave under and over the others, like a stack of playing cards. The block is typically composed of half-square triangles (HSTs), quarter-square triangles (QSTs), and squares that, when combined, create the illusion.
Label your fabrics before cutting to help keep track of where each piece belongs in the layout. This will save time during assembly and ensure that the “trick” works as intended.
Before you cut, press all your fabrics well to remove any creases or distortion. This will help with accurate cutting and piecing, which is essential in this pattern.
Once your fabrics are chosen, it’s time to start cutting. Precision is critical for the Card Trick Quilt Block Pattern, so take your time with this step. Your finished block will typically measure 12″ x 12″, but you can scale it based on your quilt needs.
Start by cutting your four card fabrics and background fabric into squares that will become your HSTs and QSTs. For a 12” finished block, cutting 3.5” squares gives you room for trimming after piecing.
Each of the four card fabrics will need:
From the background fabric, cut:
Use the 4.25” squares to make QST units. To do this, pair two contrasting fabrics right sides together, draw a diagonal line, sew 1/4” on both sides of the line, and cut both diagonals. This gives you four matching QST units.
For HSTs, pair the 3.5” squares as needed, sew a diagonal line as before, and trim each unit to 3” square. Keeping your seams consistent is crucial to having everything line up in the final block.
Once all your triangles and squares are cut and pieced, lay them out according to the card trick layout. Use a design board or large flat surface to keep everything organized before sewing.
At this point, it’s very helpful to refer to a diagram. Keep your card fabrics in the same quadrant throughout the layout to maintain the illusion. This step will help prevent common errors in placement.
Now that your pieces are prepared and organized, it’s time to assemble your Card Trick Quilt Block. This part requires a bit of patience, as proper alignment is essential to maintain the card illusion.
Start by piecing the block in rows or in quadrants. Whichever method you choose, ensure you’re pressing your seams consistently—either all to one side or open, depending on your preference. This helps reduce bulk and allows the block to lay flat.
As you sew rows or quadrants together, constantly double-check your placement against the layout. A single misplaced triangle can break the illusion, so it’s worth the extra moment to verify.
Use pins to match intersections and seams, especially in QST units. This helps maintain crisp corners and a clean visual finish. Don’t be afraid to seam-rip and adjust—precision is key in this block.
After completing all rows, press and square up your finished block. You may need to trim slightly to reach the final 12.5” size (for a 12” finished block). Take care not to trim too much and lose any important visual alignment.
If you’re making multiple blocks for a quilt, label each one as you go. The Card Trick Quilt Block can look slightly different based on fabric orientation, so labeling helps maintain consistency.
Once assembled, step back and admire your handiwork. The optical illusion should now be visible and impactful—a testament to your attention to detail.
The beauty of the Card Trick Quilt Block Tutorial – Pattern is its versatility. While a single block looks amazing, you can get even more creative with how you use it in your projects.
Consider making an entire quilt of repeating card trick blocks. You can alternate background colors or rotate the blocks for a dynamic, interconnected design. This keeps the eye moving and adds depth to the overall quilt.
Another approach is to feature a single card trick block as the centerpiece in a larger medallion quilt. Surround it with simpler blocks or borders to highlight the complexity of the trick design.
Play with scale by enlarging or shrinking the block. A jumbo-sized card trick block makes a great statement wall hanging or modern quilt design, while mini versions work well in table runners or pillows.
Use color theory to your advantage. Try a monochromatic palette with varying intensities or go for complementary colors for bold contrast. A card trick block made from ombré fabrics can also create a cool gradient illusion.
Don’t limit yourself to traditional fabrics. Try batiks, solids, or even novelty prints for a themed block—great for holidays or personal gifts.
Finally, consider quilting your finished block with echo lines or geometric designs that follow the card shapes. This enhances the visual effect and gives your finished quilt a polished look.
Q: Is the Card Trick Quilt Block suitable for beginners?
A: It’s best suited for confident beginners or intermediate quilters due to its reliance on precise cutting and piecing. However, with careful attention, beginners can succeed.
Q: What is the finished size of the block?
A: The traditional finished size is 12″ x 12″, but you can scale it up or down depending on your project.
Q: Do I need to use solid fabrics for the best effect?
A: Solids or tone-on-tone fabrics work well, but you can also use prints as long as there is strong contrast between them.
Q: Can I make this block without a rotary cutter?
A: A rotary cutter is highly recommended for accuracy, especially with all the triangle pieces. Scissors may not provide the same level of precision.
Q: Can this block be chain-pieced?
A: Yes! Once you organize your pieces, chain piecing similar units (like HSTs) can save time and keep the process efficient.
Q: What’s the most common mistake to avoid?
A: Misplacing fabric in the layout is the most common issue. Always double-check your layout before stitching rows together.
The Card Trick Quilt Block Tutorial – Pattern is a timeless design that continues to captivate quilters with its unique blend of geometry, illusion, and creativity. From careful fabric selection to precise assembly, every step brings you closer to a block that looks far more complex than it actually is.
With this guide, you’ve learned how to choose the right fabrics, cut and piece your units accurately, and bring the card trick illusion to life. Whether you use it in a single project or a full quilt, this block is sure to impress.
Have you made your own card trick block? Share your experiences, tips, or even photos in the comments. We’d love to hear what fabrics you used or how you customized your design. Your feedback helps others and inspires even more quilting creativity!


