
Log Cabin Quilt Block - Tutorial

The timeless beauty of the Flying Geese Quilt Pattern makes it a favorite among quilters of all skill levels. This classic design is simple in structure yet rich in visual impact, often used to create dynamic movement in quilts. Whether you are a beginner looking to master a traditional block or an experienced quilter designing a bold new layout, the flying geese unit offers limitless possibilities.
What makes the Flying Geese Quilt Pattern so iconic is its versatility. It can be used as a standalone block, a border element, or as part of a larger, more complex pattern. Its long triangle “goose” flanked by two smaller “sky” triangles forms a shape that’s instantly recognizable, resembling geese flying in formation. This shape can point in a single direction or alternate to create zigzags and chevrons.
In this article, we’ll explore how to make the flying geese block, different construction techniques, layout ideas, and tips for fabric selection. By the end, you’ll be equipped with the knowledge and inspiration to incorporate the Flying Geese Quilt Pattern into your next quilting project with confidence and creativity.
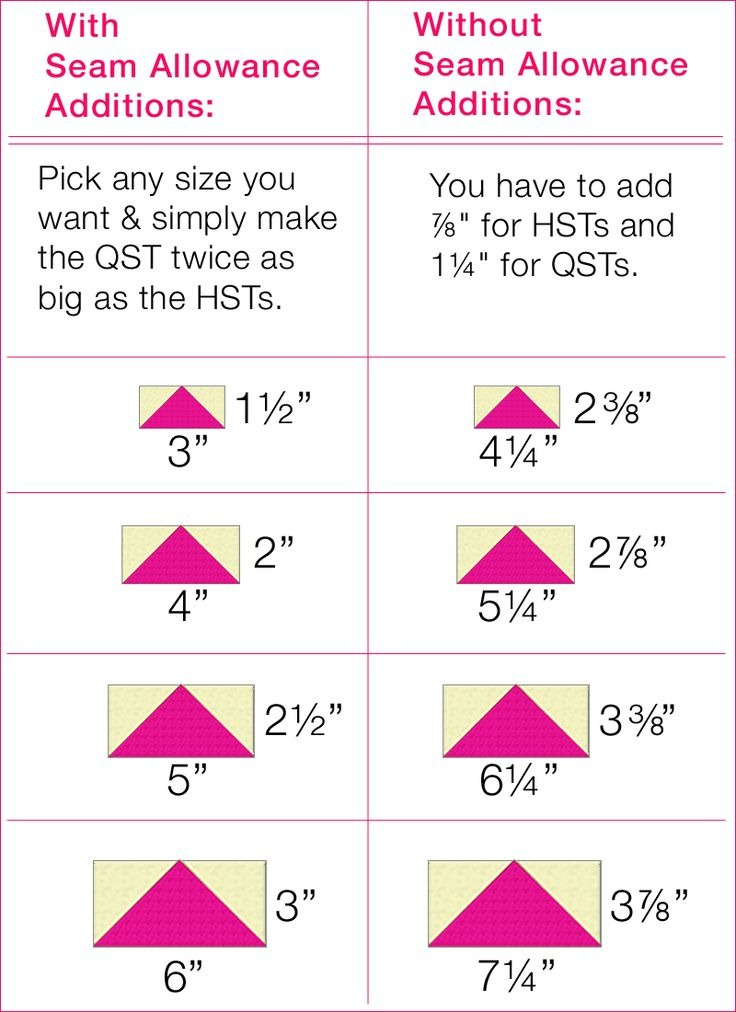
The foundation of any Flying Geese Quilt Pattern is the individual flying geese unit. A standard unit is a rectangle that’s twice as wide as it is tall, with a centered triangle pointing upward or sideways. This simple unit offers a surprising amount of design flexibility.
Traditionally, a flying geese unit measures 2″ x 4″, 3″ x 6″, or 4″ x 8″, though sizes can be adjusted depending on your project. Keeping the 1:2 ratio intact is key for maintaining the proper shape and alignment.
Each unit consists of three fabric pieces: one large triangle (the goose) and two smaller triangles (the sky). The contrast between the fabrics defines the overall visual impact. A high-contrast goose against a neutral sky creates strong lines and a striking effect.
The flying geese block can be pieced using several methods: the stitch-and-flip method, the four-at-a-time method, and traditional piecing with triangles. Each has its advantages, with some being better for scrap usage and others for accuracy.
Using precuts like fat quarters or jelly rolls is possible, but attention must be paid to directionality. Stripes and prints need to be oriented correctly to maintain a clean visual flow across the quilt.
Understanding how these units fit into larger quilt designs is essential. They can be aligned in rows, mirrored for chevron effects, or arranged in circles, stars, and other complex layouts. The more you experiment, the more potential you’ll discover in this pattern.
There are several popular ways to construct a Flying Geese Quilt Pattern, and choosing the best method depends on your skill level, tools, and desired results. Let’s look at three commonly used techniques.
The stitch-and-flip method is one of the easiest ways to make a flying geese unit. Start with a rectangle and two squares. Sew each square diagonally onto the corners of the rectangle, trim the excess, and press. This method is great for beginners but can waste fabric.
The four-at-a-time method is more efficient and accurate for mass production. Begin with one large square (goose fabric) and four smaller squares (sky fabric). Follow a series of cuts and diagonal stitches, and you’ll end up with four perfect flying geese units. This method is ideal when making several units with the same fabrics.
Traditional triangle piecing uses exact triangles and careful seam alignment. Though this method requires precision and can stretch the bias edges, it allows more fabric variety and less waste.
To avoid distorted units, always press seams carefully—either open or to one side depending on your project needs. Use starch or fabric stabilizer if needed to minimize shifting or warping.
Squaring up each unit after assembly ensures accuracy. Many quilters use flying geese trimming rulers to make this easier and more consistent.
Whatever method you choose, consistency is key. Maintaining a precise 1/4” seam allowance throughout the process helps your units align neatly when assembled into larger blocks or borders.
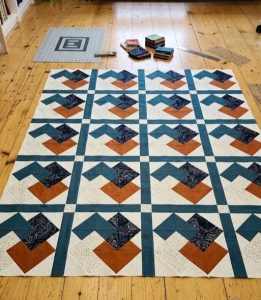
The true charm of the Flying Geese Quilt Pattern lies in how the blocks can be arranged. Because of their directional nature, flying geese units create movement and energy in a quilt, leading the eye in specific directions.
The most basic layout is a straight-line row of geese pointing upward or sideways. This is a clean, modern look often used in minimalist quilts or borders.
If you alternate the direction of each unit, you get a zigzag or chevron pattern, which adds rhythm and bounce to the design. This layout works well in baby quilts, table runners, or modern wall hangings.
Combine flying geese into a circular pattern to create dynamic starbursts or mandalas. When placed around a central block, these designs become showstoppers.
A popular variation is the Dutchman’s Puzzle, which features flying geese units arranged in a pinwheel configuration. This is perfect for creating movement in sampler quilts or traditional blocks.
You can also experiment with offset flying geese, where each unit is staggered instead of aligned. This creates a cascading or waterfall effect, ideal for vertical quilt designs or sashing strips.
Mix and match the flying geese with other blocks like half-square triangles, log cabins, or hourglass blocks to build more complex designs. This adds variety while maintaining cohesion through repeating motifs.
The fabric choices you make for your Flying Geese Quilt Pattern will significantly impact the final look and feel of the quilt. Here are some tips to guide your selection process.
Start with a clear vision: Do you want a bold, graphic quilt or something soft and traditional? For bold designs, go with high-contrast solids or graphic prints. For a more classic feel, choose calicos, florals, or muted tones.
Color placement matters. Make the geese the stars of the show with saturated colors, and keep the background soft. Or reverse it by using dark backgrounds and light geese for a dramatic nighttime sky effect.
Scrappy flying geese blocks are great for using leftover fabric. Just make sure the values are distinct enough to keep the shapes defined. This gives your quilt a charming, homespun feel.
Don’t forget texture. Batiks, linen blends, and even metallic fabrics can add dimension to your quilt. Mixing textures adds subtle visual interest without disrupting the design.
Quilting your finished top with directional motifs, like echo quilting or wavy lines that follow the direction of the geese, enhances the feeling of flight and movement.
Finish your quilt with a border of mini flying geese units or echo the pattern in your binding fabric for a cohesive and professional look.
Q: What size should I cut my fabric for a standard flying geese unit?
A: For a 2″ x 4″ finished unit, cut one 5.25″ x 5.25″ square for the goose and four 2.875″ x 2.875″ squares for the sky (four-at-a-time method).
Q: Why are my flying geese blocks not coming out to the correct size?
A: This usually comes from inconsistent seam allowances. Using a scant 1/4” seam and squaring up your units helps maintain accuracy.
Q: Can I use directional prints in flying geese blocks?
A: Yes, but you’ll need to carefully plan the orientation when cutting and sewing to keep them consistent across the quilt.
Q: Is the flying geese block beginner-friendly?
A: Yes! While some methods are more complex, beginners can start with the stitch-and-flip technique and still get great results.
Q: How many flying geese units do I need for a full quilt?
A: It depends on your layout and quilt size. A lap quilt might use 100+ units, while a baby quilt might need only 40–60.
Q: Can I chain piece flying geese units?
A: Absolutely! Especially when using the four-at-a-time method, chain piecing speeds up the process significantly.
The Flying Geese Quilt Pattern is more than just a classic—it’s a building block for creativity. With its endless arrangement possibilities and simple construction methods, this pattern opens the door to both traditional charm and modern flair.
In this guide, you’ve learned the basics of the flying geese unit, explored various construction methods, discovered inspiring layout ideas, and picked up fabric selection tips to elevate your design. Whether you’re crafting a bold wall hanging or a cozy family heirloom, the flying geese block is a versatile tool in your quilting toolkit.
We’d love to hear from you! Have you tried making a flying geese quilt before? What fabrics did you use, and what layout did you choose? Leave your thoughts, tips, or questions in the comments below—and don’t forget to share your finished projects to inspire fellow quilters!


