
Log Cabin Quilt Block - Tutorial

Nothing says holiday cheer quite like a handmade decoration, and this Festive Quilted Christmas Tree Table Runner – Pattern is a charming way to add warmth, color, and personality to your holiday table. Perfect for both experienced quilters and adventurous beginners, this project is a joyful mix of creativity and tradition.
The Festive Quilted Christmas Tree Table Runner – Pattern features whimsical tree shapes, beautiful patchwork, and festive fabric choices that capture the magic of the season. It’s a great way to use up holiday fabric scraps or showcase favorite prints. Plus, this table runner makes a thoughtful and heartfelt handmade gift.
In this article, you’ll learn how to plan, piece, quilt, and finish your own Festive Quilted Christmas Tree Table Runner – Pattern. With a clear breakdown of each step, tips on fabric selection, and ideas for customization, you’ll be ready to add this delightful piece to your holiday decor in no time.
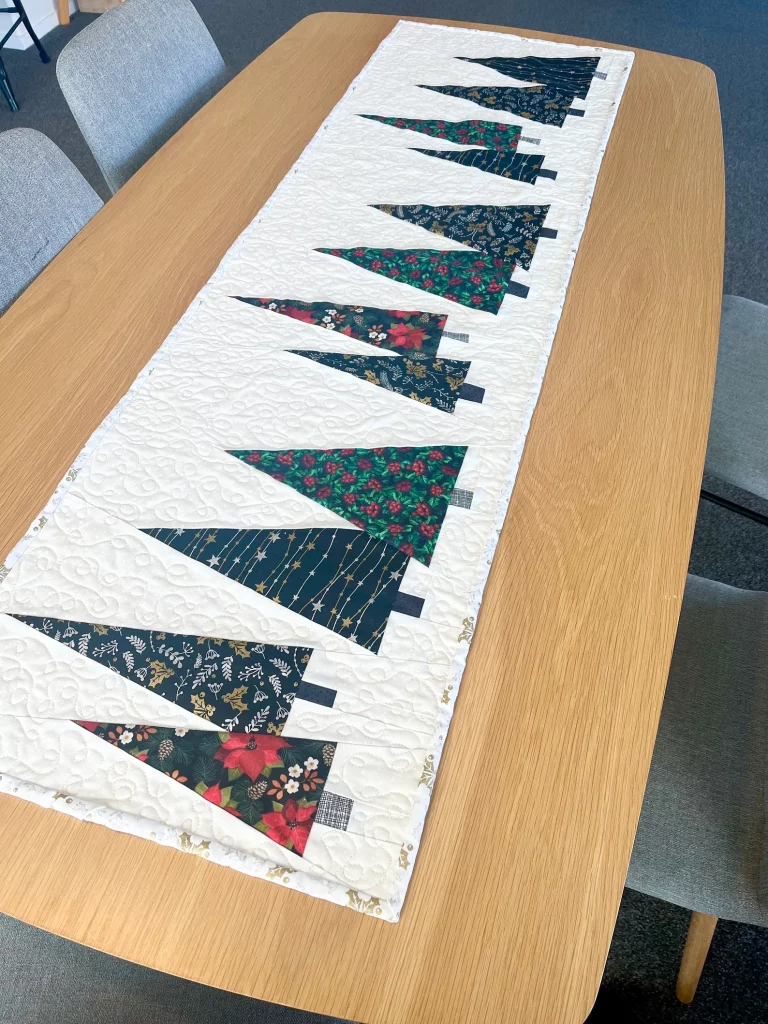
Choosing the right fabrics is one of the most exciting parts of the Festive Quilted Christmas Tree Table Runner – Pattern project. The magic lies in selecting festive prints and colors that embody the spirit of Christmas.
Start with a classic color palette: rich reds, deep greens, crisp whites, and sparkling golds. Then consider textures and prints—gingham, snowflakes, candy canes, holly leaves, or metallic accents. These can add depth and a playful holiday feel to your trees and background.
You’ll typically need a mix of fat quarters or scraps for the tree blocks, ½ yard to ¾ yard for the background, batting, backing fabric, and binding material. If you want a runner with multiple trees, you can create a repeating block design or alternate trees with patchwork stars or squares.
Other essential tools include a rotary cutter, ruler, cutting mat, sewing machine, thread (gold or metallic thread can add sparkle), iron, pins or clips, and quilting gloves if you plan to free-motion quilt.
Pre-washing your fabric can prevent bleeding, especially with reds and dark greens. Press your fabrics well before cutting to ensure accuracy in piecing and alignment.
This is also the time to consider any embellishments you may want to add later—buttons, bells, or embroidery can enhance the final piece and give it a three-dimensional charm.
Once your materials are ready, it’s time to piece together the stars of the Festive Quilted Christmas Tree Table Runner – Pattern—the Christmas tree blocks themselves. These can be as simple or as detailed as you’d like, depending on your quilting experience and design goals.
The most beginner-friendly method is to use simple triangle and rectangle pieces to form the tree shape. You’ll typically start with a triangle for the top and layer slightly wider rectangles underneath to form the branches. A small brown rectangle works great as the tree trunk.
Sew each tree component with a consistent seam allowance (usually ¼ inch). Press seams as you go to avoid bulky intersections, especially at the tree points.
Arrange the trees evenly across your table runner top. You might alternate them with solid blocks or pieced stars, snowflakes, or pinwheel blocks for visual interest.
To make your runner look polished, pay attention to block alignment and overall symmetry. Even a bit of improvisation can still feel balanced with careful layout planning.
Use a design wall or lay your pieces out on a table or floor before stitching rows together. This lets you see the overall look and make adjustments before committing with thread.
Once all blocks are assembled and sewn into a row or grid, press the entire quilt top. This helps it lay flat and prepares it for basting and quilting.
Now it’s time to bring your Festive Quilted Christmas Tree Table Runner – Pattern to life by adding batting, backing, quilting, and binding. These final steps transform your patchwork top into a functional, beautiful runner.
Start by cutting a piece of batting and backing that is slightly larger than your top—around 2″ extra on all sides. Layer the quilt top, batting, and backing in that order, and secure using pins or spray baste.
For quilting, you can keep it simple with straight-line stitching around the trees, echo quilting, or stitch-in-the-ditch along the seams. For a more festive feel, try swirls or free-motion designs like snowflakes, stars, or garland.
Choose a thread color that complements your fabrics—white or gold thread works well for most holiday themes. Metallic thread adds shimmer but may require tension adjustments on your machine.
Once quilting is complete, trim the runner to size, squaring off the edges. Make sure all corners are at 90 degrees for a neat finish.
Binding your runner with a bold red, green, or striped fabric gives it that final festive frame. Machine stitch the binding on one side and hand stitch or machine finish the other side for a clean look.
Before displaying or gifting, give your runner one final press with a steam iron. This sets the quilting and makes everything look crisp and professional.
One of the best parts about the Festive Quilted Christmas Tree Table Runner – Pattern is its flexibility. There are countless ways to make this design your own, whether you’re creating it for yourself or as a thoughtful holiday gift.
Add personalization to your runner with initials, embroidered family names, or small appliqué ornaments on the trees. This makes it extra special, especially if it’s a gift for a loved one.
Want more texture? Use buttons, mini bows, sequins, or beads to “decorate” the trees. Just be sure they’re securely attached and not too bulky if the runner will be used on a dining table.
The table runner can also double as a wall hanging. Add tabs or a sleeve on the back for hanging, and it becomes instant holiday wall art.
Create matching items like placemats, napkin rings, or coasters using leftover fabric. A coordinated set adds charm and polish to your holiday table decor.
If you’re gifting the runner, consider wrapping it in a reusable fabric bag or tying it with a ribbon and a handmade tag. Include care instructions and maybe even a holiday cookie recipe for a personal touch.
You can also adapt this pattern for other seasons by changing the colors—think pinks and hearts for Valentine’s Day or pumpkins for fall. The base layout stays the same, offering endless creativity year-round.
Q: Is this project beginner-friendly?
Yes! The Festive Quilted Christmas Tree Table Runner – Pattern is perfect for beginners. The tree shapes are simple, and it’s a manageable size that allows for easy learning.
Q: What size should the table runner be?
Common sizes range from 14″ x 40″ to 14″ x 60″, depending on your table. You can adjust block sizes or add borders to suit your needs.
Q: Can I make this pattern with a sewing machine only?
Absolutely. All piecing and quilting can be done with a standard sewing machine, though a walking foot or quilting foot is helpful for smoother stitching.
Q: How do I wash the table runner once it’s finished?
Wash it on a gentle cycle with cold water, preferably in a mesh laundry bag. Lay flat or hang to dry, and press if needed.
Q: What kind of batting should I use?
Use low-loft cotton or cotton/poly blend batting. It provides structure without being too bulky—perfect for table runners.
Q: Can I use non-traditional Christmas colors?
Definitely! Try icy blues and silvers for a modern winter feel, or go rustic with plaid, burlap, and woodsy greens and browns.
The Festive Quilted Christmas Tree Table Runner – Pattern is a beautiful way to bring handmade joy into your holiday season. With its charming design, cozy textures, and endless room for customization, this runner is both fun to make and a lovely addition to any home.
From selecting the perfect fabric palette to adding your final quilting stitches, this project offers creative satisfaction and practical beauty. Whether you’re keeping it for your own décor or giving it as a heartfelt gift, this table runner is sure to become a treasured holiday tradition.
We’d love to hear what you think! Leave a comment below with your ideas, suggestions, or photos of your finished project. Your feedback helps grow our creative community—and inspires others to dive into their next sewing adventure. Happy quilting and happy holidays! 🎄🧵


