
Log Cabin Quilt Block - Tutorial

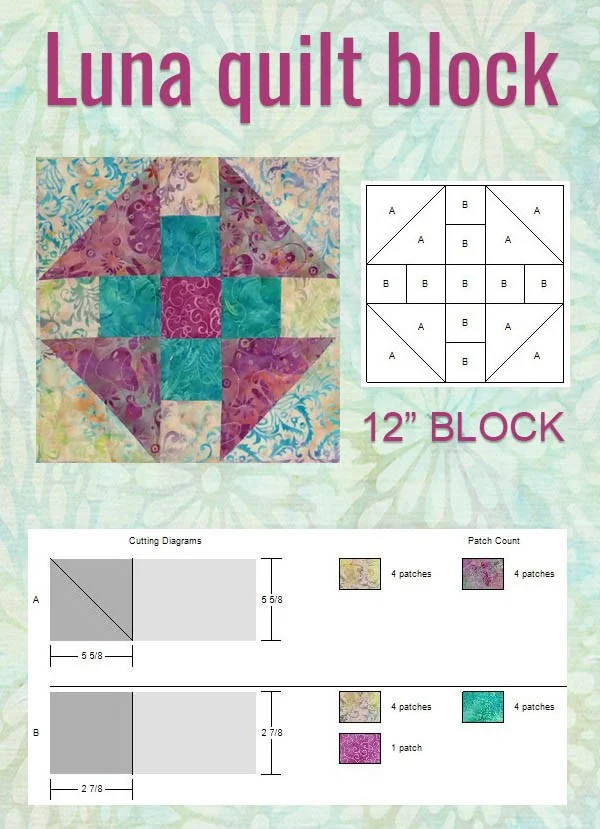
The Luna Baby Quilt – Pattern is the perfect combination of charm, comfort, and creativity—ideal for welcoming a new baby into the world. Whether you’re a beginner quilter looking for a rewarding project or an experienced sewist seeking something soft and sweet, this quilt pattern is a beautiful choice. With soft curves and dreamy fabric options, this quilt makes a heartwarming gift and a treasured keepsake.
Using the Luna Baby Quilt – Pattern allows you to explore gentle, soothing color palettes, create cozy textures, and work with various quilting techniques. It’s an excellent pattern for showcasing both solids and prints, allowing you to personalize each quilt to match a nursery’s theme or reflect the baby’s personality.
In this comprehensive guide, we’ll break down the process of making the Luna Baby Quilt – Pattern step by step. You’ll find tips on fabric selection, construction, design variations, and finishing techniques—all written in a clear and humanized tone to make the process enjoyable and stress-free.
Choosing the right fabrics is one of the most exciting steps in creating your Luna Baby Quilt – Pattern. Because this is a baby quilt, you’ll want to prioritize softness, durability, and machine-washable materials.
Opt for 100% cotton or cotton flannel, which are both gentle against a baby’s skin and easy to sew. Organic cottons are also a great eco-conscious option for sensitive skin. Avoid anything rough, stiff, or embellished with sequins or metallics that could irritate.
Color selection plays a huge role in the overall aesthetic of your quilt. Pastel tones like mint, peach, baby blue, or soft lavender are traditional favorites. However, more modern nurseries might call for bolder choices like navy, mustard, or even monochrome black and white.
Printed fabrics add visual interest to the Luna Baby Quilt – Pattern, especially if you’re using fussy cutting to highlight animals, stars, moons, or storybook scenes. Pair them with solids to create balance and let the motifs shine.
The Luna pattern often incorporates soft curves or circular motifs, so selecting fabrics with light patterns or low contrast helps those shapes blend smoothly. Busy prints can distract from the elegance of the curves.
Before cutting, always prewash your fabrics. This prevents shrinkage and color bleeding after the quilt is completed. Once dry, iron all pieces to ensure accuracy during cutting and piecing.
Once your fabrics are prepped, it’s time to start constructing the quilt top using the Luna Baby Quilt – Pattern layout. This pattern may include gentle curves or arches, depending on the version, so careful cutting and sewing will help you achieve a smooth, clean finish.
Begin by printing or tracing the Luna templates. These usually include arc or circle shapes. Use a rotary cutter or sharp fabric scissors and cut slowly along the edges of your template. Label each piece to avoid confusion during layout.
Layout your cut pieces on a design wall or large table before sewing. This helps you visualize the final pattern and make adjustments to color placement. It also ensures the curved elements line up in a balanced way.
When piecing curves, pin generously—especially at the beginning, middle, and end of each curve. Slow stitching is key. Use a small stitch length and take your time to ease the fabric around the curves.
After sewing each curved unit, press the seams carefully. Use steam and a tailor’s ham if needed to press without distorting the curve. Most quilters press seams open for curves to reduce bulk, but pressing to the side is also acceptable depending on your preference.
Continue piecing units together according to the Luna Baby Quilt – Pattern instructions. Trim and square up each section as you go to ensure the final quilt top lays flat and even.
Once all blocks or sections are joined, give the quilt top a final press. It should now be ready for layering and quilting.
Now that your quilt top is complete, it’s time to sandwich it with batting and backing. This step is where your Luna Baby Quilt – Pattern begins to feel like a finished piece, and it’s also your opportunity to add quilting texture that complements the design.
Cut your backing fabric 3-4 inches larger than the quilt top on all sides. Do the same with your batting. Lay the backing wrong side up, batting centered on top, and quilt top right side up to complete the quilt sandwich.
Baste the layers together using safety pins, basting spray, or long stitches. This prevents shifting during quilting. Place pins or adhesive generously across the quilt to secure it well.
Quilting can be simple or detailed depending on your experience and machine capabilities. Echoing the curved lines, using gentle wave motifs, or adding stars and moons are all beautiful choices that match the theme of the Luna Baby Quilt – Pattern.
If you’re quilting by hand, use a fine needle and high-quality thread. For machine quilting, a walking foot or free-motion foot is helpful. Always test your stitching on a practice sandwich first to adjust tension and thread color.
Once quilting is complete, trim the excess batting and backing. Make sure your quilt edges are straight and corners are square to simplify the binding process.
Bind the quilt with a coordinating or contrasting fabric. Double-fold binding is the most durable and baby-safe option. Hand-stitching the binding to the back creates a clean finish and gives your quilt a polished, professional look.
A completed Luna Baby Quilt – Pattern is not just a cozy blanket—it’s a heartfelt gift and a treasured family heirloom. Make your quilt extra special with personal touches and presentation ideas.
Consider adding an embroidered label or hand-written fabric tag with the baby’s name, birthdate, or a loving message. This adds sentimental value and ensures the quilt is remembered for years to come.
If you’re gifting the quilt at a baby shower, wrap it with a ribbon or place it in a gift basket with other handmade items, books, or baby clothes. It’s sure to be one of the most cherished gifts in the room.
You can also customize the Luna Baby Quilt – Pattern for specific themes like woodland animals, celestial skies, storybooks, or nature scenes. The pattern’s gentle arcs and smooth design make it adaptable to many styles.
Encourage the new parents to use the quilt every day—it’s durable, washable, and made with love. Whether it’s for tummy time, stroller walks, or nursery decor, it’s made to be loved.
Include care instructions: machine wash cold, gentle cycle, and tumble dry low. Use mild detergent and avoid bleach to keep colors fresh and fabric soft.
If you fall in love with this pattern (you probably will!), try resizing it into a toddler quilt, wall hanging, or doll blanket. The design’s versatility allows you to reuse it in creative new ways.
Q: Is the Luna Baby Quilt pattern suitable for beginners?
Yes! While it includes curved piecing, the Luna Baby Quilt – Pattern is beginner-friendly with a little patience and practice. It’s a great project to learn new skills like curved seams.
Q: What size is the finished quilt?
Most versions of the Luna Baby Quilt finish at approximately 36″ x 42″, but sizes may vary depending on how many blocks or rows you include.
Q: Can I use pre-cuts for this pattern?
You can use fat quarters or charm packs for some parts of the pattern, especially the arcs. Yardage is recommended for backgrounds and backing.
Q: What batting is best for a baby quilt?
Use low-loft cotton or cotton/poly blend batting. Look for options labeled “baby-safe” or hypoallergenic, and always pre-wash if required by the brand.
Q: Can I customize the color scheme for a gender-neutral baby gift?
Absolutely! Soft grays, mint, creams, or even rainbow palettes are popular for gender-neutral gifts using the Luna Baby Quilt – Pattern.
Q: Can this pattern be used to make larger quilts?
Yes! Simply add more rows or enlarge the blocks. The Luna pattern scales beautifully and works well for throws and full-sized quilts.
The Luna Baby Quilt – Pattern is a timeless, elegant choice for any quilter wanting to create something heartfelt, practical, and beautiful. Whether you’re crafting for your own little one or making a gift, the gentle curves and soft fabrics of this pattern make it a joy to sew and a comfort to cuddle.
We’ve walked through the key steps—from fabric selection to curved piecing, quilting, and finishing touches—to help you feel confident every step of the way. Along the journey, you’ve learned how this pattern offers endless customization options and long-lasting value.
If you’ve made your own Luna Baby Quilt, we’d love to hear your experience. Leave a comment below with your thoughts, suggestions, or photos. Your insight might inspire another quilter! Happy stitching!


