
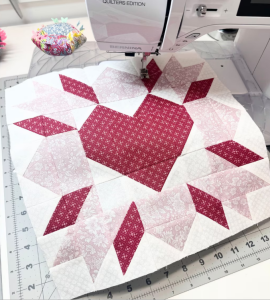
Log Cabin Quilt Block - Tutorial

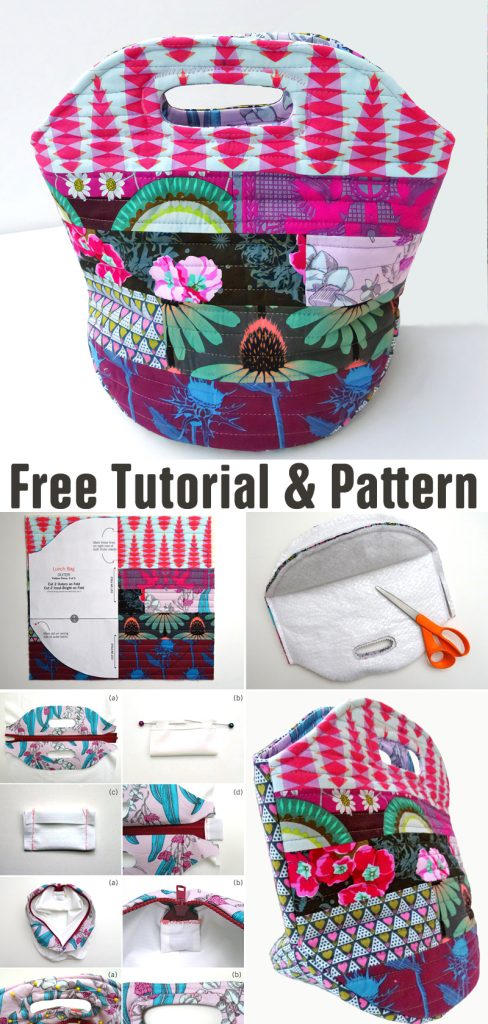
If you’re looking to make your mealtimes more stylish and sustainable, this Lunch Bag Tutorial – Pattern is exactly what you need. With just a few basic sewing supplies and some creativity, you can create a personalized, reusable lunch bag that is both practical and charming. Whether you’re packing snacks for school, lunch for work, or prepping meals for a picnic, this project is a fantastic way to keep your food fresh and organized.
One of the biggest benefits of sewing your own lunch bag is the ability to customize. You choose the fabric, size, insulation, and closures—so it fits your style and needs perfectly. Plus, DIY bags are more eco-friendly than single-use plastic or paper alternatives. With this Lunch Bag Tutorial – Pattern, you’ll be able to sew something durable and beautiful.
This article will walk you through each step of the process, from choosing materials to finishing touches. It’s suitable for beginners and intermediate sewers alike. With helpful tips and clear steps, you’ll complete your lunch bag in no time and feel proud to carry it daily.
Selecting the correct materials is essential for a functional and long-lasting lunch bag. The outer fabric should be sturdy—think cotton canvas, denim, or oilcloth. These fabrics are durable, easy to sew, and come in many colors and prints.
For the lining, consider waterproof materials like PUL (polyurethane laminate), ripstop nylon, or insulated fabric. These help keep spills contained and protect the outer fabric from moisture. They’re also easy to wipe clean.
Interfacing or batting provides structure to the lunch bag. Fusible fleece or foam interfacing adds just the right amount of stiffness and insulation. You’ll want the bag to stand upright and hold its shape when packed with containers or bottles.
Thread is often overlooked, but using polyester thread increases durability—especially when stitching thick layers. Choose a color that complements or matches your main fabric for a clean look.
When it comes to closures, you can use Velcro, magnetic snaps, buttons, or zippers depending on your skill level and preference. Velcro is simple and functional, while zippers offer a more polished and secure finish.
Handles or straps can be made from fabric, cotton webbing, or even recycled belt material. Make sure they are well stitched and reinforced at the seams, especially if you’ll carry heavier items in your lunch bag.
Once you’ve chosen your materials, it’s time to begin cutting according to the Lunch Bag Tutorial – Pattern. Most lunch bag patterns are made from rectangular panels for the front, back, sides, bottom, and flap.
Start by cutting your outer fabric, lining fabric, and interfacing to the specified sizes. You may want to label each piece with a sticky note to keep things organized. Don’t forget seam allowances—usually 1/4″ or 1/2″ depending on the pattern.
Fuse the interfacing to the wrong side of the outer fabric pieces. This adds structure and helps your bag hold its shape. If you’re using insulating batting, baste it in place before assembly begins.
Begin sewing the front and back panels to the side pieces, right sides together. Then attach the bottom panel. This creates a box-like structure. Repeat the same steps for the lining fabric.
If you’re adding pockets (optional but handy), now is the time to sew them onto the lining or exterior panels before full assembly. Inside pockets are great for utensils or napkins, while outer pockets can hold hand sanitizer or notes.
When both outer and lining pieces are constructed, place them right sides together and sew around the edges, leaving a gap at the top or side for turning. This step is essential for enclosing all the seams neatly.
After turning the bag right side out through the opening, press the seams flat and topstitch for a professional finish. Secure the opening with a hidden stitch or by sewing it shut along the top edge.
One of the fun parts of this Lunch Bag Tutorial – Pattern is adding custom features that make your bag unique. Let’s begin with the handles or straps. Measure and cut them to your desired length, then attach securely to the top edges of the bag.
If you’re adding a flap closure, align it at the back panel and sew in place before connecting the lining and outer layers. The flap should overlap the front by at least a few inches to stay closed easily.
Velcro is an easy and child-friendly option for closure. Sew the hook and loop tape to the flap and front panel. Make sure they align well so the bag stays shut when packed.
Zippers require a bit more skill, but they provide a secure, modern finish. If you opt for a zipper, install it before stitching the outer bag and lining together. Use zipper tape and topstitching to ensure durability.
Don’t forget the finishing details! Topstitching around the top edge strengthens the bag and adds a professional look. You can also edge-stitch the handles for extra reinforcement.
For a more polished product, consider labeling your creation with a custom tag or embroidery. It’s a great way to personalize a gift or add your name for school or work use.
Now that your Lunch Bag Tutorial – Pattern is complete, you’ll want to keep it clean and in good shape. Fortunately, caring for fabric lunch bags is simple and helps extend their lifespan.
Wipe the inside clean with a damp cloth daily. If the lining is waterproof, avoid soaking it. For deeper cleaning, hand wash or machine wash on gentle using mild detergent. Always air dry—high heat can damage interfacing or insulation.
To maintain the bag’s shape, stuff it with towels or fabric scraps while drying. Avoid wringing or twisting the fabric to prevent creases or distortion.
If you’re making more than one bag, try changing up the design. Add quilting for texture, experiment with color blocking, or use themed fabrics for holidays or special events.
For kids’ bags, you might want to include their initials or add novelty appliqués. Consider making smaller versions for snacks or bottle holders.
Want something more upscale? Try using faux leather or cork fabric for a modern twist. These materials offer a sophisticated look and are surprisingly easy to sew with the right needle.
Whether you’re making your first or fiftieth lunch bag, each new version is an opportunity to improve your sewing skills, reduce waste, and create something both beautiful and useful.
Q: What type of fabric works best for a DIY lunch bag?
Sturdy fabrics like cotton canvas, denim, or oilcloth are ideal for the outside. Use waterproof or insulated fabric for the lining to protect against spills.
Q: Do I need a sewing machine to follow this Lunch Bag Tutorial – Pattern?
While it’s possible to sew by hand, a sewing machine will make the process much faster and neater—especially when working with thick layers.
Q: Can I make the lunch bag insulated?
Yes! Use insulated batting like Insul-Bright between the outer fabric and lining. It helps maintain food temperature for several hours.
Q: How do I make the lunch bag washable?
Choose machine-washable fabrics and pre-wash them before sewing. Avoid materials that shrink or bleed color. Always air dry after washing.
Q: What size should I make my lunch bag?
Standard sizes are around 9″ x 6″ x 4″, but you can adjust dimensions to suit your container sizes or needs. Just make sure it’s big enough to hold your typical lunch items.
Q: Is this lunch bag pattern suitable for beginners?
Absolutely. With basic sewing techniques like straight stitching and topstitching, even beginners can complete this project successfully.
The Lunch Bag Tutorial – Pattern is a rewarding and functional sewing project that blends creativity with practicality. Whether you’re packing meals for work, school, or a road trip, your custom-made lunch bag will be a reliable companion. With just a bit of fabric, some basic sewing skills, and a dash of creativity, you can create something beautiful and environmentally friendly.
We’ve covered everything from selecting the right materials to piecing, assembling, and personalizing your lunch bag. With every stitch, you’re not just making a bag—you’re crafting a better daily routine.
Have you made your own lunch bag using this tutorial? We’d love to hear your feedback, see your creations, and get your suggestions! Drop a comment below with your honest opinion and share this article with fellow makers who love useful sewing projects. Happy sewing!


