
Log Cabin Quilt Block - Tutorial

Nothing says fall like the warmth of orange, the crunch of leaves, and the charming sight of pumpkins. If you’re ready to bring a bit of that cozy seasonal magic into your quilting projects, the Pumpkin Quilt Block – Pattern is just what you need. This adorable block design is a favorite among quilters during autumn, Halloween, and Thanksgiving. With its simple structure and playful appearance, it’s a delightful way to infuse festive spirit into your quilts, wall hangings, and table runners.
Whether you’re a seasoned quilter or just beginning your quilting journey, the Pumpkin Quilt Block – Pattern offers endless versatility. It can be made using traditional patchwork methods, and with a little imagination, you can personalize it with fabric choices, embellishments, or even some creative piecing. It’s the perfect project for scrap busting or using those special orange fabrics you’ve been saving.
In this in-depth tutorial, we’ll guide you step-by-step through the process of making a pumpkin quilt block. From fabric selection to cutting, piecing, and adding finishing touches, you’ll learn everything you need to confidently create a festive pumpkin block that can stand on its own or become part of a larger fall-themed masterpiece.
When starting your Pumpkin Quilt Block – Pattern, one of the most exciting steps is choosing your fabrics. Since the block mimics the look of a pumpkin, orange is typically the star of the show—but don’t stop there!
Choose a variety of orange fabrics in different shades and prints to give your pumpkin texture and visual interest. Mix solids, ginghams, polka dots, and even florals to give your pumpkin dimension. For a vintage or farmhouse feel, go with muted or dusty oranges. For a modern twist, try bold, graphic prints.
For the stem of the pumpkin, brown or green fabrics work well. You can also use textured fabrics, such as faux wood grain or leafy prints, to give it a more natural look. The background of your pumpkin block can be made with low-volume prints, solid white, beige, or even deep black for a Halloween theme.
Make sure to prewash your fabrics if needed and press them flat before cutting. You’ll also need essential quilting tools: a rotary cutter, cutting mat, quilting ruler, sewing machine, thread, pins or clips, and an iron. If you’re using a downloadable Pumpkin Quilt Block – Pattern, print it out and double-check measurements for accuracy.
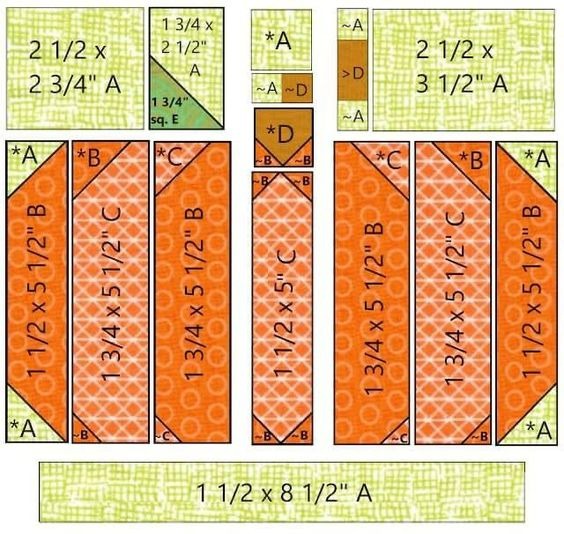
Cut your fabric pieces according to the pattern’s specifications. Most pumpkin blocks are made from squares and rectangles, making them easy to cut and assemble—even for beginners.
With your fabrics prepared, it’s time to move on to assembling your Pumpkin Quilt Block – Pattern. This part of the process is where the block really starts to come to life.
Begin by laying out your pumpkin pieces on a design wall or flat surface. A traditional pumpkin block typically features three main vertical sections for the pumpkin body, a small stem unit at the top, and background pieces that frame the shape and form the block’s edges.
Start sewing the orange rectangles or squares together to form the pumpkin’s rounded shape. Use a consistent ¼-inch seam allowance for all your seams to ensure accuracy. Press your seams open or to the side depending on your preferred method.
Once the body of the pumpkin is complete, add the stem unit. This can be a simple brown or green rectangle, or a more detailed unit made from a small square framed by background pieces. Place the stem centered at the top of the pumpkin block.
Next, sew the background pieces around the pumpkin to square off your block. These can be adjusted to increase or decrease the block size depending on your project’s needs.
Once all your pieces are sewn together, press the entire block flat and square it up with your ruler. You now have a finished Pumpkin Quilt Block – Pattern ready to be part of a larger project or displayed on its own!
The Pumpkin Quilt Block – Pattern is incredibly versatile, and quilters love to add their own spin. You can easily adapt the block for different seasons, themes, or design preferences.
For a Halloween look, use fabrics in spooky prints like spiders, ghosts, and bats along with deep orange and black tones. Add appliqué or embroidery like jack-o’-lantern faces or bats to give your block a fun, eerie vibe.
Want something more rustic? Use homespun or plaid fabrics in soft oranges and browns to give your block a farmhouse or primitive charm. Adding hand-quilting or vintage-style buttons can enhance that cozy aesthetic.
If you’re feeling playful, create a mini quilt with multiple pumpkin blocks in different colors—white pumpkins, pastel pumpkins, or even teal pumpkins for awareness-themed projects.
Use your finished pumpkin block as the centerpiece of a fall-themed table runner. Add leaf blocks, stars, or even acorns around it to create a seasonal story.
You can also size your block up or down. Make tiny pumpkin blocks for mug rugs or pot holders, or enlarge them to use as decorative pillows. The possibilities are endless.
If you’re working with children or teaching a beginner class, the Pumpkin Quilt Block – Pattern is perfect for its simplicity and immediate visual impact. Kids especially love seeing a recognizable shape come together with just a few seams!
Now that your Pumpkin Quilt Block – Pattern is complete, it’s time to decide how you’ll use it and what quilting options will best complement the design.
If you’re incorporating the block into a larger quilt top, arrange it with coordinating blocks and consider using sashing to help each pumpkin stand out. You can alternate with patchwork or solid blocks to balance the layout.
When it comes to quilting, straight-line quilting around the pumpkin shape adds definition, while echo quilting can give a glowing or radiating effect. Free-motion quilting with swirling lines or leaf motifs can enhance the seasonal theme.
Choose a batting that matches the purpose of your project. For wall hangings, thin batting is ideal. For functional quilts, go for a cotton or cotton-blend batting for warmth and softness.
Select a backing fabric that complements the front. Consider fall prints, warm solids, or even a contrasting pop of color for added interest.
For binding, you can use coordinating orange or brown fabric or make a scrappy binding using leftovers from your pumpkin block for a playful finish.
Once quilted, trim and bind your quilt. If you’re making a wall hanging or table topper, add hanging sleeves or corner tabs for easy display. Don’t forget to label your quilt with your name and date—it’s always special to preserve that history.
Q: What size is a standard pumpkin quilt block?
A: Most common sizes range from 6″ to 12″ square, but you can resize it to suit your project. Mini versions are great for coasters and larger ones work well for pillows or quilt centers.
Q: Can I use scraps for my pumpkin block?
A: Absolutely! This is a fantastic scrap-buster project. Use small leftover pieces of orange, brown, and background fabrics to create unique and colorful blocks.
Q: Do I need a special template or ruler?
A: No special tools are required for most versions. Basic quilting rulers and a rotary cutter are enough. Some advanced variations may include angled cuts or curves, but beginners can stick to rectangles and squares.
Q: Can I make a Halloween-themed pumpkin block?
A: Yes! Use themed fabrics and consider adding details like embroidered jack-o’-lantern faces, spooky background prints, or decorative stitching to make it festive.
Q: How do I get sharp points and clean edges?
A: Use a consistent seam allowance, press seams properly, and square up your units as you go. Taking your time with piecing makes a big difference in the final look.
Q: Can I use this block in non-quilt projects?
A: Definitely! Turn your block into a placemat, tote bag panel, table topper, or even frame it as a seasonal wall art piece.
The Pumpkin Quilt Block – Pattern is a delightful and versatile addition to any quilter’s repertoire. Whether you’re looking to add a festive touch to your fall decor or create a heartwarming gift, this block is a fun and approachable project that yields beautiful results.
From fabric selection to piecing and final assembly, this tutorial has walked you through every step of creating your own pumpkin block. We’ve also shared creative ideas and answered common questions to help you make the most of your project.
We’d love to hear what you think! If this guide helped you or inspired you to create your own version of the Pumpkin Quilt Block – Pattern, please leave your honest opinion and suggestions below. Happy quilting, and may your fall be filled with warmth, creativity, and beautiful stitches! 🎃


