
Log Cabin Quilt Block - Tutorial

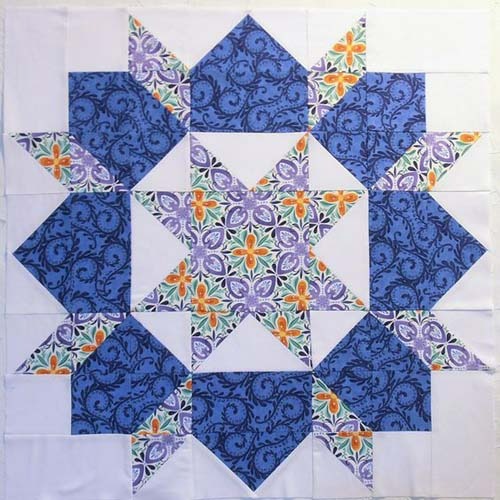
The Quilt Carpenter Star – Pattern is a timeless and captivating design that continues to inspire quilters across generations. With its intricate appearance and stunning geometric symmetry, it’s no wonder this block is cherished by beginners and seasoned quilters alike. Whether you’re creating a statement wall hanging or a full-sized quilt, the Carpenter Star never fails to impress.
Often thought of as complex, the Quilt Carpenter Star – Pattern is actually more approachable than it seems. With smart cutting, accurate piecing, and a little patience, this beautiful star design can come together smoothly—even for those newer to quilting. Its radiating points and classic eight-point structure create visual impact that looks far more complicated than it actually is.
In this article, we’ll explore the history and beauty of the Quilt Carpenter Star – Pattern, walk you through fabric selection, construction steps, customization options, and help answer common questions to support your creative journey. Let’s dive into why this design has stood the test of time and how you can bring it to life in your own sewing space.
The Quilt Carpenter Star – Pattern has deep roots in American quilting tradition. Its strong geometric shapes and interlocking diamonds symbolize craftsmanship, precision, and harmony—making it a favorite in both antique and modern quilt collections.
Historically, the pattern is believed to have originated from Pennsylvania Dutch and Amish quilting traditions, where bold color contrasts and clean lines were celebrated. The Carpenter Star was often used to showcase a quilter’s technical skill, due to its visual complexity and layered layout.
At its core, the Carpenter Star is based on the eight-point star design but constructed from half-square triangles (HSTs), diamonds, and squares. The clever use of these shapes creates an optical illusion of overlapping pieces, forming a star within a star.
Modern quilters love this pattern because it can be scaled easily. A single block can stand alone as a mini quilt or pillow, or be repeated for a full-size bed quilt. The central star draws the eye, making it a perfect focal point.
Choosing fabrics that contrast well is crucial in making the Carpenter Star shine. High contrast between the background and star elements ensures that the design’s complexity is visible and well-defined.
Whether you’re making a traditional quilt or a bold modern piece, the Carpenter Star is a pattern that celebrates both heritage and creativity. It invites you to explore balance, symmetry, and the power of simple shapes.
Selecting the right materials is an essential part of bringing your Quilt Carpenter Star – Pattern to life. Because of the sharp lines and layered design, fabric choice plays a huge role in how your final piece will look.
Start by choosing a color palette that emphasizes contrast. Many quilters opt for two or three main colors along with a neutral background. Dark colors for the star paired with a light background can help the design pop, while softer tones can create a dreamy, subtle look.
Solids work beautifully in this pattern, highlighting the clean lines and sharp angles. However, small-scale prints can also add texture without distracting from the overall star design. Avoid large prints that may get lost in the piecing.
In terms of fabric quantity, a single Carpenter Star block usually measures 36″ square or larger, so plan accordingly. If you’re creating a full quilt, multiply fabric amounts based on how many blocks you’ll include.
Tools you’ll need include a rotary cutter, quilting ruler, self-healing mat, sewing machine, iron, pins or clips, and fabric marking tools. Accuracy is key in this pattern, so high-quality tools make a difference.
Pre-washing your fabric is recommended, especially if you’re using contrasting colors. This prevents any color bleed during washing and gives your finished quilt a more polished appearance.
Lastly, don’t forget batting and backing fabric if you’re completing the quilt. For a wall hanging or mini quilt, you might choose lightweight batting, while bed quilts require more durable options.
Now it’s time to piece your Quilt Carpenter Star – Pattern together. Although the design appears complex, it breaks down into manageable sections using common techniques like half-square triangles and strip piecing.
Start by cutting your fabric into squares, rectangles, and triangles as required by your specific pattern or block size. Precision here ensures a smooth assembly later on. Take your time with cutting—it’s the foundation of your quilt.
Construct your half-square triangles (HSTs) using the two-at-a-time method. This not only saves time but also ensures uniformity. Be sure to press seams consistently and square up your HSTs before moving on.
Lay out your pieces to form the Carpenter Star shape. It’s helpful to use a design wall or flat surface to visualize the final layout. The block typically builds from the center outwards, with each quadrant mirroring the others.
Begin sewing your units together row by row. Use a ¼” seam allowance throughout and press your seams to reduce bulk. A consistent seam allowance is crucial to keeping points sharp and blocks aligned.
Join the rows carefully, making sure points match up where the diamonds and triangles meet. Pin generously at intersections to maintain alignment. Press the completed block well before moving on.
If you’re making a larger quilt, repeat the block as needed, alternating colors or backgrounds for variety. Once all blocks are complete, assemble them into rows and columns, add borders if desired, and prepare for quilting.
Once your quilt top is complete, it’s time to layer, quilt, and bind your Quilt Carpenter Star – Pattern. These finishing steps turn your pieced work into a lasting treasure.
Baste your quilt sandwich by layering the quilt top, batting, and backing. You can spray baste or pin baste, depending on your preference. Make sure everything is smooth and taut to prevent puckering.
Choose a quilting style that complements the design. Straight-line quilting emphasizes the symmetry, while free-motion quilting adds texture and personal flair. Echo quilting around the star shape works beautifully too.
After quilting, trim any excess batting and backing. Square up the edges, and attach binding using your favorite method—machine binding is fast, while hand binding offers a classic finish.
Add a quilt label to commemorate your project. Include your name, the date, and any message you’d like. Labels are a special touch that preserves the story behind the quilt.
Consider embellishing your quilt with embroidery, hand quilting, or even fabric paint for a creative twist. These small additions make the quilt uniquely yours.
If you’ve made a mini quilt or wall hanging, add hanging sleeves to the back or loops to display it with pride. A single Carpenter Star block framed can also make a beautiful art piece.
Q: Is the Carpenter Star pattern suitable for beginners?
A: Yes, especially if you’re familiar with half-square triangles. While the block looks complex, it’s constructed using basic units, making it ideal for confident beginners.
Q: What is the standard size of a Carpenter Star quilt block?
A: A common size is 36″x36″, but it can be adjusted based on your project. Some mini versions are 18″x18″, while larger versions may be 48″ or more.
Q: Can I make this quilt using pre-cuts like fat quarters or charm packs?
A: Fat quarters work well, especially if you’re using multiple fabrics for the star. Charm packs may be too small unless you’re making a mini version.
Q: What quilting techniques are best for this pattern?
A: Straight-line quilting, echo quilting, or stitch-in-the-ditch are all great options that complement the symmetry of the design.
Q: Is it better to use solids or prints?
A: Both work! Solids emphasize the geometry, while small-scale prints add texture. Just ensure there’s enough contrast between the star and background.
Q: Can I turn a single block into a pillow or wall hanging?
A: Absolutely! A single Carpenter Star block makes a stunning standalone project. Add batting, backing, and finishing for a professional look.
The Quilt Carpenter Star – Pattern is more than just a visually stunning quilt block—it’s a bridge between tradition and creativity. Its timeless design, rooted in history, remains just as relevant today in both classic and modern quilting.
By selecting the right materials, carefully constructing your block, and adding finishing touches that speak to your personal style, you’ll have a quilt that not only looks beautiful but also carries meaning and craftsmanship.
Whether you’re making a full quilt, a wall hanging, or a decorative pillow, the Carpenter Star allows for endless variations and creative freedom. If this guide helped you in your quilting journey, please leave your honest feedback and any suggestions. We’d love to hear how your project turned out and what you’d like to see next!


