
3D Buildings Quilt - Tutorial

The Churn Dash Quilt Block – Pattern is a beloved staple in the world of quilting, admired for its simple construction and striking visual impact. With roots dating back to the 1800s, this traditional quilt block has stood the test of time, evolving alongside quilting trends while still preserving its historic charm. Its iconic layout—featuring half-square triangles and rectangles arranged in a nine-patch format—makes it accessible for beginners and endlessly customizable for seasoned quilters.
This pattern’s name is inspired by the handle of an old-fashioned butter churn, which the block is said to resemble. Over the years, the Churn Dash Quilt Block – Pattern has been reinterpreted in countless ways, yet the essence of the design remains the same: symmetry, balance, and a comforting familiarity. Whether used as a single focal point or repeated across an entire quilt, it creates a rhythmic visual flow that draws the eye and pleases the soul.
In this article, you’ll find everything you need to know about working with the Churn Dash Quilt Block – Pattern. We’ll explore its history and appeal, walk through the fabric selection process, provide construction tips, and share creative ways to customize this versatile design. Whether you’re a new quilter or a long-time enthusiast, this guide will help you bring your Churn Dash quilt project to life.
The Churn Dash Quilt Block – Pattern is one of the earliest known quilt blocks, first appearing in North America during the early 1800s. Its straightforward construction made it ideal for pioneer women who often sewed quilts by hand using scrap fabrics and basic tools.
While it was originally made for practicality—providing warmth and comfort—the Churn Dash block quickly became a means of self-expression. Quilters used fabric choices and layout variations to reflect their personal style or convey messages within the blocks.
One reason the Churn Dash Quilt Block – Pattern has remained popular is its adaptability. It can be enlarged, reduced, made scrappy, or created with modern designer fabrics. No matter how it’s used, the block keeps its strong, recognizable form.
This block is also a great learning tool for beginner quilters. It teaches essential skills like piecing half-square triangles (HSTs), accurate cutting, and maintaining a consistent 1/4” seam—all in one small project.
As quilting became more of an artistic outlet in the 20th and 21st centuries, modern quilters began reinterpreting the Churn Dash Quilt Block – Pattern with bold colors, negative space, and asymmetrical layouts, breathing new life into an old classic.
Despite its age, the Churn Dash remains a favorite in quilting bees, online challenges, and workshops, proving that even the simplest patterns can have lasting beauty and creative potential.
One of the most enjoyable parts of working with the Churn Dash Quilt Block – Pattern is selecting fabrics that enhance its structure. Because the design has strong lines and defined sections, fabric choice can really make the block pop—or blend it gently into a soft, subtle quilt top.
Start by selecting two or three contrasting fabrics: one for the background, one for the “dash” or frame, and optionally one for the center square. The contrast between light and dark tones is what gives the block its visual clarity.
For a traditional look, consider reproduction fabrics in muted tones, small florals, or vintage calicos. These will give your quilt a cozy, heritage-inspired feel. Earthy tones like indigo, brown, and cream work beautifully in classic Churn Dash blocks.
If you’re going for a modern aesthetic, try bold solids, high-contrast colors, or geometric prints. Use a crisp white background with saturated colors like mustard, teal, or coral for a fresh, contemporary look.
Scrappy Churn Dash quilts are another wonderful variation. By using a variety of fabrics for the same block layout, you can create visual interest and texture while putting your fabric scraps to good use.
Pre-cut fabrics like fat quarters or charm packs are perfect for this block. Many patterns use 5” or 10” squares to quickly assemble multiple blocks, which is great for time-saving and consistent results.
Before sewing, always lay out your fabric pieces on a flat surface or design wall. This helps you visualize the final result and make any needed adjustments to your color balance or contrast.
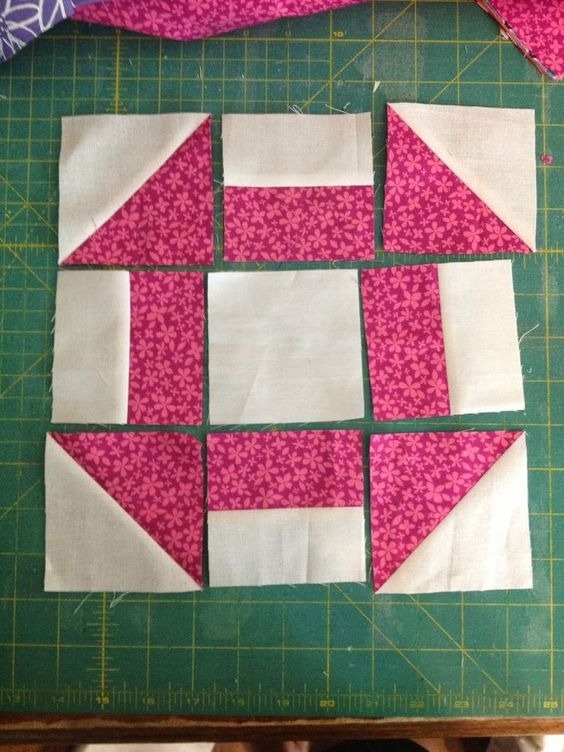
The Churn Dash Quilt Block – Pattern follows a basic nine-patch structure, which makes it ideal for practicing accurate piecing and layout. Once you’ve cut your fabric, the steps are fairly straightforward.
Begin by making the half-square triangles (HSTs), which form the corners of the block. These are typically made by pairing two squares, drawing a diagonal line on the lighter one, sewing 1/4” on each side of the line, and cutting along the line. Press and trim to the correct size.
Next, sew your rectangles that will form the vertical and horizontal bars of the block. These go on the top, bottom, and sides of the center square, framing it in a strong, graphic shape.
Assemble the block in rows, beginning with a top row of one HST, one rectangle, and another HST. The middle row includes a rectangle, a center square, and another rectangle. The bottom row mirrors the top row.
Once each row is sewn together, press the seams—some quilters prefer pressing seams open for a flatter finish, while others press to one side to “nest” the seams when joining rows.
Join the three rows together, taking care to match up your seam intersections. Pinning at these junctions helps ensure clean lines and avoids distortion.
Finally, square up your block using a quilting ruler. The finished size will vary depending on the pattern you’re following, but accuracy at this stage helps keep your quilt top smooth and aligned.
While the traditional Churn Dash Quilt Block – Pattern has a fixed layout, there are many ways to personalize it and make it your own. This flexibility is one of the reasons it remains a favorite among creative quilters.
Try experimenting with different block sizes. Oversized blocks create a bold, minimalist quilt with fewer pieces to sew, while smaller blocks allow for intricate layouts and sampler-style quilts.
Add sashing or borders around each block to give them space to breathe. This technique is especially effective when using bold prints or busy fabrics, as it helps define each block.
Another fun variation is the “wonky” Churn Dash. This modern style involves sewing slightly off-center or uneven lines intentionally to create a playful, dynamic look. It’s a great option if you enjoy improv quilting.
Consider adding appliqué elements to the center square or framing the block with other classic blocks, like Flying Geese or Log Cabin strips. These additions can elevate your quilt and create unique combinations.
Use negative space creatively by placing Churn Dash blocks against a solid background, giving your quilt a modern gallery-style look. This technique is popular in minimalist and modern quilt design circles.
Lastly, mix in asymmetrical layouts or color fades for a more artful and contemporary take. Ombre fabric choices, gradient placement, or block rotation can add energy and movement to the finished quilt.
Q1: Is the Churn Dash Quilt Block good for beginners?
Absolutely! The block is simple to construct and teaches essential quilting techniques like HSTs and precise piecing.
Q2: What size should I cut my fabric for a 12-inch finished Churn Dash block?
For a 12” block, you’ll generally cut 4.5” squares for HSTs, 2.5” x 4.5” rectangles for the sides, and a 4.5” square for the center, but always refer to your pattern for exact measurements.
Q3: Can I use jelly rolls or pre-cut strips for this block?
Yes, jelly rolls work well for the side strips and frames, especially if you adjust the block size accordingly.
Q4: How do I press the seams in a Churn Dash block?
You can press them open for a flat finish or to one side to “nest” seams for easier alignment—both methods are fine, depending on your preference.
Q5: Can I mix fabrics within the same block?
Definitely! Scrappy versions are very popular and add a charming, personalized touch to your quilt.
Q6: How many Churn Dash blocks do I need for a full-size quilt?
It depends on the size of each block and the finished quilt dimensions. For example, 42 twelve-inch blocks (6 x 7 layout) will make a 72” x 84” quilt without borders.
The Churn Dash Quilt Block – Pattern is a timeless design that has charmed quilters for generations. With its simple yet visually effective structure, it provides endless room for creativity, whether you’re keeping it classic or adding your own modern flair.
Throughout this article, we’ve explored its history, fabric selection tips, sewing steps, and creative variations. From mastering
basic techniques to experimenting with bold layouts, the Churn Dash is a reliable go-to block that can grow with your skills.
Have you tried making a Churn Dash quilt block before? Share your thoughts, experiences, or suggestions in the comments below. Your input not only helps others but also keeps the quilting tradition alive and evolving for future generations!


