
Log Cabin Quilt Block - Tutorial

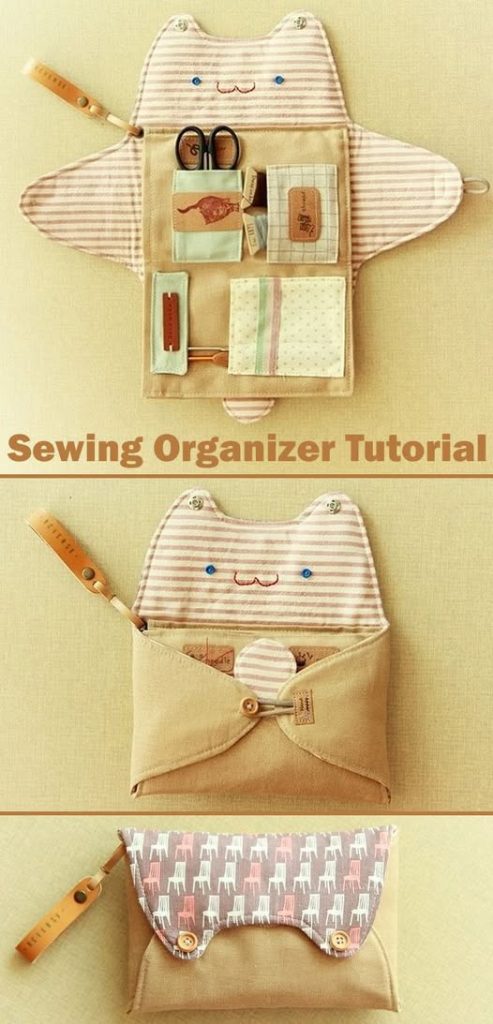
Creating a beautiful and functional sewing organizer – pattern is one of the most satisfying sewing projects you can undertake—especially if you love having your sewing tools in perfect order. A sewing organizer not only saves time during your creative process but also helps keep your space clear and focused, allowing you to enjoy every stitch without the frustration of hunting for scissors or thread.
Whether you sew occasionally or every single day, an organized workstation can make a huge difference. The beauty of following a custom sewing organizer – pattern is that it allows you to design something tailored specifically to your needs. You decide how many pockets you want, where they go, what materials to use, and how it fits into your sewing environment.
This article will walk you through everything you need to know about designing and constructing a functional sewing organizer – pattern, from material selection to step-by-step construction tips. You’ll also find creative ideas to personalize your organizer and some of the most commonly asked questions answered in detail to help you succeed with confidence.
A sewing organizer – pattern isn’t just about aesthetics—it’s a solution to one of the most common problems sewists face: clutter. As you accumulate spools of thread, pins, rulers, marking tools, fabric scraps, and scissors, your sewing area can quickly become a chaotic mess.
A well-made sewing organizer keeps all your tools within reach, sorted by type, and safely stored. This not only improves your efficiency but also prevents accidents—like poking yourself with a stray pin or misplacing expensive fabric scissors.
Another benefit is portability. Many sewing organizers are designed with handles or rolls so you can easily carry them to sewing classes, quilting retreats, or just from one room to another in your home. A good sewing organizer – pattern takes this into account and includes features like zippers, snaps, or Velcro to keep everything secure.
Functionality aside, sewing your own organizer is also a creative project in itself. You get to work with different materials, test your sewing skills, and play with fabric combinations. It’s a satisfying, relatively quick project that produces something truly useful.
Your organizer should reflect your needs. If you mostly hand-sew, small pouches and pincushions might be your focus. If you work with a machine, you might want compartments for thread cones, presser feet, and even your manual.
Ultimately, a good sewing organizer – pattern balances function, form, and fun. It should fit seamlessly into your workflow while adding a touch of handmade charm to your sewing space.
Selecting the right materials is a crucial part of building a durable and attractive sewing organizer – pattern. Since organizers are handled frequently and carry sharp tools, durability and structure are just as important as aesthetics.
Start with sturdy cotton or canvas fabric for the outer shell. These fabrics are strong enough to handle wear and tear but still easy to sew. For extra strength and texture, consider quilting your fabric or using home décor-weight textiles.
For lining, use a lighter cotton or a synthetic blend. Linings help give your organizer a polished interior while protecting the outer fabric from wear caused by sharp tools or heavy notions stored inside.
Interfacing is essential. Use fusible interfacing or foam stabilizer to add structure and make your organizer stand upright. Fusible fleece is another good option if you want your project to have a soft, padded feel.
Don’t forget the hardware. You might need zippers, elastic bands, magnetic snaps, Velcro, or D-rings, depending on the design of your organizer. Choosing high-quality hardware ensures longevity and adds a professional finish to your project.
Thread choice matters too. Use a strong polyester thread that can handle tension. If you’re topstitching or quilting layers together, consider using contrasting thread for a decorative effect or matching thread for a seamless look.
Finally, think about color coordination. Whether you go for a modern, monochromatic theme or a bright, patchwork-style organizer, your fabric choices can elevate the final result. Let your organizer reflect your personality and creativity.
Now let’s walk through how to construct a basic sewing organizer – pattern. This version will feature multiple pockets, a pincushion, and a folding design that ties shut—perfect for a portable toolkit or drawer insert.
Start by cutting your main fabric, lining, and interfacing according to your desired finished size. A good beginner size might be 12″ x 18″ unfolded, with three horizontal pocket rows stitched across.
Fuse the interfacing to the wrong side of your main fabric. If you’re using quilt batting or foam stabilizer, baste or quilt it to your fabric before moving forward. This adds durability and helps the organizer hold its shape.
Next, create your pockets. Cut pocket pieces in various heights and widths, fold the top edge down and hem it. Pin each pocket to the organizer base and topstitch the bottom edge in place, then sew vertical lines to divide pockets into compartments.
Add a pincushion by creating a small fabric rectangle, filling it with crushed walnut shells or polyester fiberfill, and stitching it closed. Attach it to your organizer in a spot that’s easy to access, but out of the way of the main compartments.
Add ties or Velcro closures on each side if you want to be able to fold and secure your organizer. At this point, add any extra features like a small zipper pouch, needle book, or scissor loop.
Finish by placing your lining fabric right sides together with your outer organizer, sew around the edges, leaving a small gap. Turn right side out, press, and topstitch around the entire edge to close and reinforce.
Once you’ve mastered a basic sewing organizer – pattern, the fun really begins—customizing it! There are so many creative options to adapt your organizer to your sewing style and aesthetic preferences.
You can add clear vinyl pockets to see what’s inside at a glance. These are great for storing buttons, small thread spools, or fabric clips. Be sure to use a Teflon presser foot or parchment paper when sewing vinyl to avoid sticking.
Incorporate removable components, such as a detachable pincushion or needle book secured with snaps. These removable pieces can be taken to your machine or workspace separately as needed.
If you’re a quilter, create a patchwork front panel using your favorite quilt blocks. This not only adds visual interest but lets you show off your favorite techniques—like log cabin, churn dash, or flying geese.
Add a personalized name tag or embroidered label. Embroidery adds an heirloom-quality detail to your organizer and makes it unmistakably yours. It’s also a perfect gift idea for a fellow sewist or student.
Make a roll-up style organizer with elastic bands to hold tools like seam rippers, pens, or glue sticks. These versions are super compact and ideal for travel or classroom use.
If you love to hand-stitch or embroider, dedicate a section of your organizer to embroidery floss storage, needle pockets, and hoop loops. Customizing your organizer for a specific craft makes it even more functional and joyful to use.
Q1: Is a sewing organizer a good beginner project?
Yes, absolutely! A sewing organizer – pattern is a great way to practice basic skills like pocket sewing, topstitching, and working with interfacing or zippers. Start with a simple design and add complexity over time.
Q2: What is the best size for a sewing organizer?
There’s no single “best” size—it depends on your needs. A small one (about 9″ x 12″) is perfect for hand sewing kits, while larger sizes (like 12″ x 18″ or even bigger) suit machine sewists and quilters.
Q3: Can I wash my sewing organizer?
Yes, if you’ve used washable fabrics and pre-washed them before sewing. Avoid washing organizers that include cardboard or delicate embellishments. Always check fabric care labels.
Q4: How can I add more structure to my organizer?
Use interfacing, fusible fleece, or foam stabilizer. These materials help your organizer hold its shape, especially when adding lots of pockets or carrying heavy tools.
Q5: Can I make a sewing organizer without a sewing machine?
Technically yes, but it would be very time-consuming and challenging by hand. A sewing machine makes construction much faster and results more durable.
Q6: What other uses does a sewing organizer have?
Besides storing sewing tools, they can be adapted for art supplies, knitting notions, travel toiletries, or even as a tech organizer for cords and gadgets.
A thoughtfully designed sewing organizer – pattern is a game changer for anyone who loves to sew. From improving your workflow to expressing your creativity, this project combines functionality with fun. Whether you follow a pattern or invent your own, the result is a useful and beautiful piece you’ll be proud to use every day.
We’ve explored fabric choices, construction tips, customization ideas, and common questions
to help you succeed. Now it’s your turn to create!
Have you made your own sewing organizer? We’d love to hear about it! Share your honest thoughts, experiences, or suggestions in the comments. Your feedback inspires others and helps build a creative, supportive sewing community.


