
Square-in-a-Square Quilt Block - Tutorial

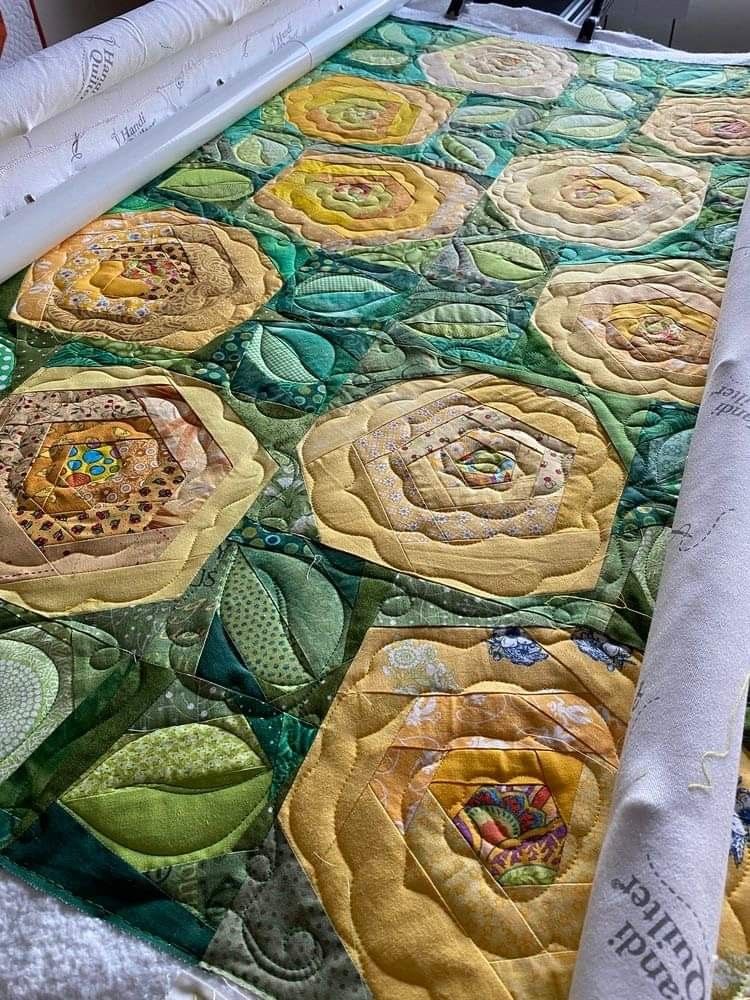
The Rosie Runner Round Quilt – Pattern is one of those rare sewing projects that manages to blend traditional charm with a modern, sophisticated aesthetic, making it a favorite for decorators and quilters alike. When you first set out to create a Rosie Runner Round Quilt – Pattern, you are not just following a set of instructions; you are embarking on a journey that explores the beauty of circular geometry and the warmth of handmade textiles. This specific design stands out because it challenges the standard rectangular runner format, offering a refreshing circular table quilt design that fits perfectly on round dining tables, coffee tables, or even as a centerpiece for a grand foyer.
Understanding the nuances of the Rosie Runner Round Quilt – Pattern requires a bit of patience and an eye for detail, as working with curves is inherently different from sewing straight lines. Many enthusiasts find that the quilt pattern allows for incredible versatility in fabric choice, whether you want to go with a “shabby chic” floral look or a sleek, contemporary minimalist vibe. Because the Rosie Runner Round Quilt – Pattern is designed to be eye-catching, it often serves as the focal point of a room, drawing the eye toward the intricate stitching and the harmonious balance of colors that define this unique round runner style.
As you prepare your sewing space to begin the Rosie Runner Round Quilt – Pattern, it is essential to focus on the preparation stage, ensuring your quilting tools are sharp and your workspace is organized for a curved project. This article will guide you through every technical aspect, from selecting the right cotton fabrics to mastering the bias binding required for a smooth, professional edge. By following the steps outlined here, your Rosie Runner Round Quilt – Pattern will not only look beautiful but will also possess the structural integrity to last as a family heirloom for years to come.
The foundation of any successful project begins with a deep dive into what the Rosie Runner Round Quilt – Pattern actually entails and the materials required to bring it to life. Unlike standard quilts, a round quilt requires specific attention to the grain of the fabric to prevent stretching, which is why choosing a high-quality quilting cotton is non-negotiable for this design. The Rosie Runner Round Quilt – Pattern typically utilizes a series of wedges or a central medallion design that radiates outward, creating a visual flow that is both rhythmic and aesthetically pleasing to the observer.
When looking at the Rosie Runner Round Quilt – Pattern instructions, you will notice that the cutting layout is optimized to minimize waste while ensuring that each piece fits perfectly within the circular template. It is highly recommended to use a rotary cutter and a specialized circle ruler if available, as these tools significantly increase the accuracy of your cuts compared to traditional shears. Accuracy is the secret ingredient here; if your wedges are even a fraction of an inch off, the round quilt runner may not lay flat when finished, leading to unwanted ripples.
Another key aspect of the Rosie Runner Round Quilt – Pattern is the concept of “fussy cutting,” where you strategically cut fabric to highlight a specific motif, such as a flower or a geometric shape. This technique elevates the Rosie Runner Round Quilt – Pattern from a simple utility item to a work of art, allowing the quilter to tell a story through the placement of prints. Since the center of the round quilt is the most visible area, choosing a bold focus fabric for the middle section can set the tone for the entire project’s color story.
In terms of sizing, the Rosie Runner Round Quilt – Pattern can often be adjusted depending on the diameter of your table, though the standard pattern usually caters to a medium-sized centerpiece. Most quilters find that a diameter of 24 to 36 inches is the “sweet spot” for a quilted table runner, providing enough surface area to showcase the design without overwhelming the furniture. Before you make your first cut, always double-check your measurements against the Rosie Runner Round Quilt – Pattern guide to ensure your finished piece will fit its intended location perfectly.
The batting selection is another critical component that often gets overlooked by beginners working on the Rosie Runner Round Quilt – Pattern. For a table runner, a low-loft cotton batting or a bamboo blend is usually preferred because it allows the runner to lay flat against the table while providing enough “body” to showcase the quilting stitches. High-loft batting should generally be avoided for the Rosie Runner Round Quilt – Pattern, as it can make the surface too “puffy,” causing glasses or vases placed on top of it to become unstable or tip over.
Lastly, one must consider the thread weight used for the construction and the decorative quilting of the Rosie Runner Round Quilt – Pattern. A standard 50wt mercerized cotton thread is excellent for piecing because it is strong yet thin enough to allow for flat seams. For the actual quilting—the part where you sew the layers together—you might choose a slightly thicker or even a variegated thread to add a pop of color that complements the Rosie Runner Round Quilt – Pattern design. Taking the time to test your thread tension on a scrap piece of fabric will save you hours of frustration later in the process.
Working with curves is often intimidating for those used to “square” quilting, but the Rosie Runner Round Quilt – Pattern provides an excellent opportunity to master this skill. The most important rule when sewing the Rosie Runner Round Quilt – Pattern is to use plenty of pins—specifically, fine quilting pins that won’t distort the fabric. When joining two curved edges, you are essentially fitting a “convex” curve into a “concave” one, a process that requires gentle manipulation and a consistent quarter-inch seam allowance to ensure the circle remains true to its shape.
To make the assembly of your Rosie Runner Round Quilt – Pattern easier, many experts suggest “stay-stitching” the edges of your curved pieces before you join them. This involves sewing a line of stitching just inside the seam allowance to stabilize the fabric grain, preventing the circular edges from stretching out of shape as you handle them during the sewing process. This small extra step ensures that the Rosie Runner Round Quilt – Pattern maintains its perfect diameter and prevents the dreaded “puckering” that can occur when sewing biased edges together.
As you move toward the center of the Rosie Runner Round Quilt – Pattern, you will find that multiple seams often meet at a single point, which can create significant bulk. To manage this, quilters often use a “swirled” seam technique or press the seams open to distribute the fabric evenly, ensuring the center of the Rosie Runner Round Quilt – Pattern remains flat and professional. A tailor’s clapper can be a useful tool here, as it helps flatten these bulky intersections by trapping heat and steam from your iron, resulting in a crisp, sharp finish for your round quilt design.
The visual impact of the Rosie Runner Round Quilt – Pattern is often defined by the symmetry of its wedges, and maintaining this symmetry requires a methodical approach to piecing. It is often helpful to sew the quilt wedges into pairs, then into halves, and finally into a complete circle, rather than trying to add one wedge at a time in a continuous circle. This “quadrant” method allows you to check the alignment of the Rosie Runner Round Quilt – Pattern at various stages, making it easier to correct any minor deviations before they become major structural issues.
Once the top of your Rosie Runner Round Quilt – Pattern is fully pieced, it is time to prepare for the “quilting sandwich,” which consists of the quilt top, the batting, and the backing fabric. For a round runner, you want to ensure the backing is slightly larger than the top to account for any “shrinkage” that occurs during the quilting process. Basting the layers together—either with safety pins or a temporary spray adhesive—is vital for the Rosie Runner Round Quilt – Pattern, as it prevents the layers from shifting and creating wrinkles on the back of your work.
If you are new to sewing curves, don’t be discouraged if your first attempt at the Rosie Runner Round Quilt – Pattern isn’t perfectly flat; it is a skill that improves with every project. Focus on maintaining a slow, steady speed on your sewing machine, and don’t be afraid to use the “needle down” function to pivot the fabric frequently. The Rosie Runner Round Quilt – Pattern is a fantastic teacher of patience, and the reward is a stunning, circular textile that demonstrates your growing expertise in the art of complex quilting patterns.
The fabric selection process is where the Rosie Runner Round Quilt – Pattern truly begins to take on its own personality and style. When choosing colors for your round quilt, consider the room where the runner will reside; if the room has neutral tones, you might want to use the Rosie Runner Round Quilt – Pattern to introduce a vibrant splash of color. Conversely, if your decor is already busy, a monochromatic color scheme or a “tone-on-tone” fabric selection can make the intricate piecing of the quilt pattern stand out without clashing with the surroundings.
Texture also plays a significant role in the success of the Rosie Runner Round Quilt – Pattern, as different fabric weights can affect how the runner drapes and sits. While 100% cotton is the gold standard, some quilters enjoy incorporating small amounts of linen or even silk for a more luxurious feel. However, be aware that mixing fabric types in the Rosie Runner Round Quilt – Pattern can make the sewing process more challenging due to different shrinkage rates and fraying tendencies. If you are a beginner, sticking to a single fabric manufacturer’s collection is a safe way to ensure all your fabrics “play well” together.
Scale is another factor to keep in mind when shopping for your Rosie Runner Round Quilt – Pattern materials; you want a mix of large, medium, and small-scale prints. A large-scale floral might look beautiful as a center medallion, while a small-scale geometric or “ditsy” print works well for the outer wedges where the fabric is narrower. This variety in scale adds depth and visual interest to the Rosie Runner Round Quilt – Pattern, preventing the design from looking “flat” or uninspired when viewed from a distance.
Don’t forget the importance of the backing fabric for your Rosie Runner Round Quilt – Pattern, even though it isn’t the star of the show. Since table runners are often handled and washed more frequently than bed quilts, choosing a high-quality, durable backing is essential for longevity. Some quilters choose a reversible fabric for the back, effectively giving them two Rosie Runner Round Quilt – Pattern looks for the price of one, which is a clever way to maximize the utility of your handmade creation.
The “value” of your colors—the lightness or darkness—is what creates the “movement” in the Rosie Runner Round Quilt – Pattern. If all your fabrics have the same value, the beautiful star or flower shape inherent in the Rosie Runner Round Quilt – Pattern may get lost. Try using a “black and white” filter on your phone to take a photo of your fabric pull; if the fabrics all look like the same shade of gray, you need to add more contrast. High contrast between the quilt wedges will make the circular nature of the Rosie Runner Round Quilt – Pattern truly pop.
Finally, always pre-wash your fabrics before starting the Rosie Runner Round Quilt – Pattern to prevent color bleeding and uneven shrinkage later on. This is especially important if you are using high-contrast colors like red and white, where the darker dye could potentially ruin the lighter sections during the first wash. By taking the time to prepare your materials properly, you ensure that your Rosie Runner Round Quilt – Pattern remains a vibrant and cherished part of your home decor for many seasons to come.
The most distinctive technical requirement of the Rosie Runner Round Quilt – Pattern is the use of bias binding to finish the edges. Unlike a rectangular quilt where you can use “straight-grain” binding, a round quilt requires binding that is cut on a 45-degree angle (the bias) because this allows the fabric to stretch and conform to the curve. Learning to make continuous bias binding is a game-changer for finishing the Rosie Runner Round Quilt – Pattern, as it results in a smooth, ripple-free edge that follows the circle perfectly.
When you reach the stage of quilting the layers, you have several options for the Rosie Runner Round Quilt – Pattern, ranging from simple “stitch-in-the-ditch” to elaborate free-motion quilting. Many people find that “echo quilting”—where you sew lines parallel to the seams of the wedges—enhances the circular flow of the Rosie Runner Round Quilt – Pattern. This technique draws the eye inward and outward, emphasizing the geometry of the round table runner and giving it a professional, high-end look.
Trimming the excess batting and backing from your Rosie Runner Round Quilt – Pattern is a satisfying but delicate task that requires a steady hand. You want to ensure you leave a perfectly round edge for the binding to attach to, so using your original round quilt template as a guide for trimming is highly recommended. Once trimmed, sewing the binding to the front of the Rosie Runner Round Quilt – Pattern by machine and then hand-stitching it to the back provides the cleanest, most “show-quality” finish.
If you prefer a faster finish for your Rosie Runner Round Quilt – Pattern, you can certainly sew both sides of the binding by machine using a decorative stitch or a matching thread. However, for a piece as unique as the Rosie Runner Round Quilt – Pattern, many quilters find the “slow sewing” aspect of hand-binding to be a meditative and rewarding conclusion to the project. It allows you to inspect every inch of your work, ensuring that the quilt binding is even and the tension is consistent all the way around the circle.
Properly caring for your finished Rosie Runner Round Quilt – Pattern will ensure it stays beautiful despite the spills and dust that come with being on a table. Most cotton quilts can be machine washed on a gentle cycle with a mild detergent, but air-drying is usually best to maintain the shape of the Rosie Runner Round Quilt – Pattern. If the runner needs a quick refresh, a light steam ironing can help flatten any creases and make the quilted texture stand out once more before your next dinner party.
Displaying your Rosie Runner Round Quilt – Pattern is the final and most exciting step of the process. Whether it’s placed under a vase of fresh flowers, used as a base for a holiday centerpiece, or given as a heartfelt gift to a friend, the Rosie Runner Round Quilt – Pattern is a testament to your creativity and skill. Every time you see it, you’ll be reminded of the intricate steps, the careful fabric choices, and the joy of creating a handcrafted round quilt that is truly one of a kind.
1. Is the Rosie Runner Round Quilt – Pattern suitable for beginners? While it is slightly more advanced than a basic square quilt due to the curved edges, a patient beginner can certainly succeed. It is a great “bridge” project for those looking to move beyond straight lines and learn the basics of sewing curves and using bias binding.
2. How much fabric do I need for a standard Rosie Runner Round Quilt – Pattern? Typically, you will need several “fat quarters” or 1/4-yard cuts of different fabrics for the top, plus about a yard for the backing and binding. Always check the specific quilt pattern instructions for exact yardage, as requirements can vary based on the number of wedges.
3. Do I need a special sewing machine for the Rosie Runner Round Quilt – Pattern? No, a standard home sewing machine is perfectly fine. However, a walking foot is highly recommended for the quilting phase, as it helps feed all three layers of the quilt sandwich through the machine at the same rate, preventing shifting and puckering.
4. Can I resize the Rosie Runner Round Quilt – Pattern to be larger? Yes! You can easily scale the Rosie Runner Round Quilt – Pattern by lengthening the wedges or adding an extra “border” ring around the outside. Just remember that a larger circle will require more bias binding and a larger piece of backing fabric.
5. What is the best way to get the Rosie Runner Round Quilt – Pattern to lay flat? The key to a flat round quilt is accurate cutting and careful pressing. Never “push” the iron across the fabric, as this can stretch the curves; instead, use an “up and down” pressing motion. Additionally, ensure your seam allowance is a consistent 1/4 inch throughout the project.
The Rosie Runner Round Quilt – Pattern is a magnificent project that combines technical precision with artistic flair. Throughout this article, we have explored the essential tools needed, the intricacies of mastering circular geometry, the art of selecting the perfect fabric palette, and the final touches that make a quilted runner truly stand out. By focusing on details like bias binding, fabric scale, and accurate piecing, you can create a stunning home accessory that defies the traditional “square” boundaries of quilting. Whether you are making this for your own dining room or as a special gift, the Rosie Runner Round Quilt – Pattern offers a rewarding experience that sharpens your skills and results in a beautiful, functional piece of art.
We hope this guide has inspired you to pick up your rotary cutter and start your own Rosie Runner Round Quilt – Pattern journey! We would love to hear your thoughts on this design—do you prefer working with curves or do you find them challenging? Please leave your sincere opinion and suggestions in the comments below, as your feedback helps us create better content for the quilting community. Happy sewing!


