
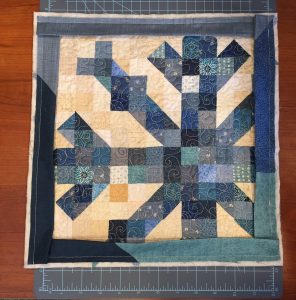
Square-in-a-Square Quilt Block - Tutorial

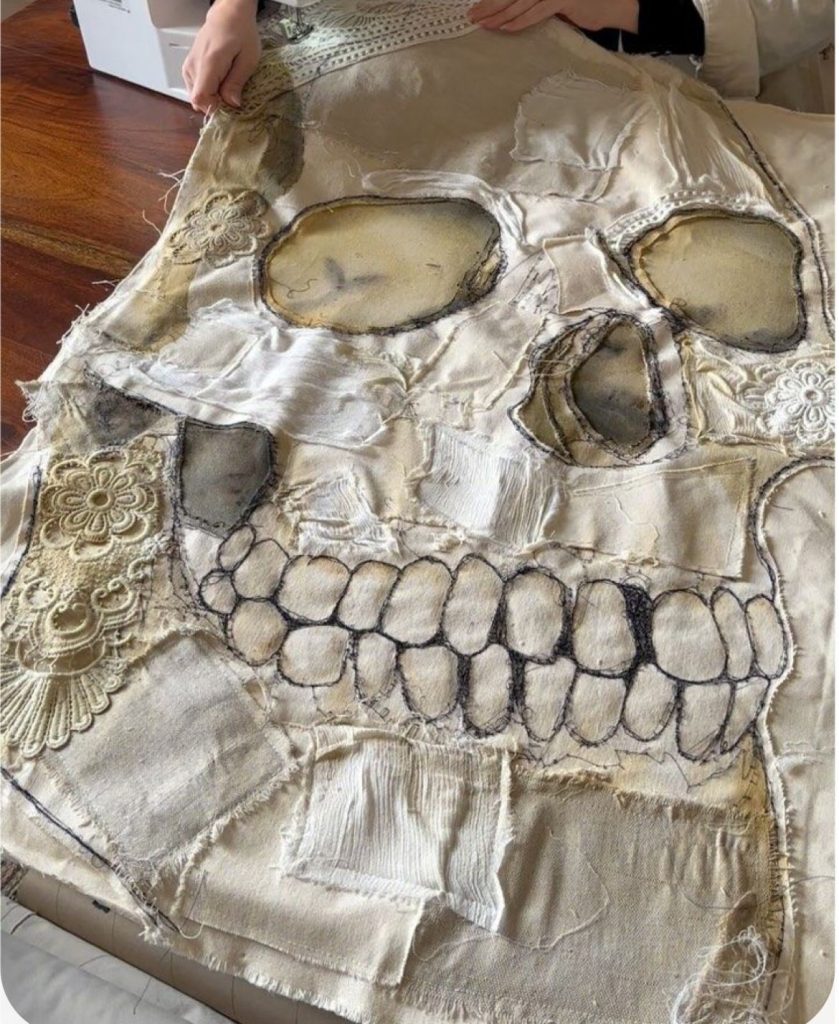
Creating a Patchwork quilt with skull design – Pattern is an exciting way to blend traditional folk art with a modern, edgy aesthetic that stands out in any bedroom or living space. For decades, quilting was associated primarily with floral motifs and geometric stars, but the contemporary “modern quilt” movement has opened the door for more daring imagery. A Patchwork quilt with skull design represents a unique intersection of craftsmanship and personal expression, allowing makers to explore themes ranging from “Memento Mori” to the vibrant celebrations of “Dia de los Muertos.” By following a specific Pattern, even those who are relatively new to the world of textile arts can produce a professional-looking piece that looks more like a work of gallery art than a simple bed cover.
When we talk about a Patchwork quilt with skull design, we are referring to the intricate process of joining small pieces of fabric—the patchwork—to form a larger image of a skull. This can be achieved through various techniques such as foundation paper piecing, appliqué, or traditional block construction. The Pattern is the essential blueprint for this project; it provides the dimensions, the cutting instructions, and the assembly order required to ensure the skull’s proportions remain accurate. Without a well-designed Pattern, it is incredibly difficult to manage the complex angles and negative space required to make the skull motif recognizable and visually striking.
Understanding these terms is the first step toward a successful project. A Patchwork quilt with skull design is essentially a functional mosaic made of cloth, where every scrap of fabric contributes to a larger, symbolic picture. The Pattern serves as the mathematical guide that translates a creative vision into a physical reality. In this article, we will delve deep into how you can select your materials, interpret your Pattern, and execute a Patchwork quilt with skull design that is both durable and breathtaking. Whether you prefer a gothic monochrome look or a bright, “sugar skull” inspired palette, the principles of construction remain the same, focusing on precision, creativity, and a love for the craft.
Selecting the fabric is perhaps the most enjoyable part of starting a Patchwork quilt with skull design – Pattern. For the skull itself, most quilters opt for a high-contrast color like stark white, cream, or even a bold metallic silver to ensure the design “pops” against the background. Since the skull design involves several small intersections, using 100% high-quality quilting cotton is highly recommended. This material is stable, doesn’t stretch excessively, and holds a crisp crease when ironed, which is vital for maintaining the sharp lines of the skull’s jaw and eye sockets.
The background of your Patchwork quilt with skull design provides the atmosphere for the entire piece. If you want a classic “rock and roll” or gothic vibe, deep blacks, charcoal grays, or midnight blues work perfectly. However, if you are following a Pattern inspired by Mexican folk art, you might choose a riot of colors like turquoise, orange, and hot pink. The key is to ensure there is enough visual separation between the skull and the surrounding blocks so that the skull design remains the focal point of the quilt from across the room.
Don’t be afraid to experiment with texture and subtle prints within your Patchwork quilt with skull design. Using a tone-on-tone fabric—where the print is the same color as the base fabric—can add depth to the skull without distracting from the overall shape. For example, a white fabric with a faint floral or spiderweb print can make the skull design look more intricate and custom. When you purchase your materials according to the Pattern requirements, always buy a little extra fabric to account for any cutting errors or to use for the binding later on.
Pre-washing your fabrics is a debated topic, but for a Patchwork quilt with skull design, it is often a wise choice. Darker fabrics, particularly blacks and deep reds used in the background, have a tendency to bleed color onto lighter fabrics during the first few washes. By pre-washing, you minimize the risk of your white skull design turning pink or gray after the quilt is finished. If you decide not to pre-wash, consider using “color catcher” sheets in the laundry once the quilt is fully assembled and ready for its first cleaning.
The weight of the fabric is also a crucial consideration for any Patchwork quilt with skull design – Pattern. You want to avoid mixing very heavy fabrics like denim with very light fabrics like silk or thin polyester. Consistency in fabric weight ensures that the quilt hangs evenly and that the seams don’t become overly bulky. A consistent medium-weight cotton allows the Pattern to be executed with much higher precision, especially in the areas where multiple seams meet, such as the teeth or the temple of the skull.
Finally, consider the “fussy cutting” technique if your Pattern allows for it. Fussy cutting involves cutting a specific part of a printed fabric to feature a particular image within one of the patchwork pieces. You could fussy cut a small flower to sit right in the center of the skull’s forehead or use a heart-shaped print for the nose cavity. This level of detail turns a standard Patchwork quilt with skull design into a personalized masterpiece that reflects your unique style and attention to detail.
A professional Pattern for a Patchwork quilt with skull design acts as a comprehensive manual. It usually begins with a “fabric requirement” list, which tells you exactly how many yards of each color you need to complete the project. It also includes a cutting list, which is perhaps the most important part of the Pattern. Following this list precisely ensures that every square, triangle, and rectangle fits together like a puzzle to form the intended Patchwork quilt with skull design. Precision at this stage prevents frustration during the sewing process.
Most modern Pattern designs for skulls use a technique called Foundation Paper Piecing (FPP). In FPP, you sew the fabric directly onto a paper template that has the skull design printed on it. This technique is incredibly helpful for a Patchwork quilt with skull design because it allows for very sharp points and complex angles that would be nearly impossible with traditional piecing. If your Pattern uses FPP, make sure to set your sewing machine to a shorter stitch length so that the paper is easier to tear away once the block is finished.
Another common method found in a Pattern for this type of quilt is appliqué. In this version, you create a large skull shape and sew it onto a pre-assembled patchwork background. This is often easier for beginners who find the many small pieces of a traditional Patchwork quilt with skull design intimidating. The Pattern will provide the template for the skull, which you can then transfer to your fabric using fusible web or by hand-stitching with a blanket stitch. This method gives the skull design a slightly raised, dimensional appearance.
The “seam allowance” is a term you will see repeated throughout any Pattern. In the world of quilting, the standard is a 1/4 inch seam allowance. Maintaining this exact measurement is critical when making a Patchwork quilt with skull design. If your seams are even slightly too wide or too narrow, the pieces of the skull will not align correctly, resulting in a distorted image. Many quilters use a special “quarter-inch foot” on their sewing machine to ensure that every stitch in the Patchwork quilt with skull design is perfectly placed.
Reading the diagrams in your Pattern is just as important as reading the text. A good Pattern will provide step-by-step visual aids showing how the blocks should be rotated and joined. For a Patchwork quilt with skull design, pay close attention to the orientation of the blocks. It is very easy to accidentally sew a piece upside down, which can ruin the symmetry of the skull’s face. Laying out your pieces on a “design wall” or a large table before sewing them together is a great way to double-check your work against the Pattern illustrations.
Lastly, consider the scale of the Pattern. Some patterns are designed for a single large “medallion” skull in the center of the quilt, while others feature a repeating Patchwork quilt with skull design in smaller blocks across the entire surface. If you are making a bed-sized quilt, a repeating Pattern might be more visually interesting, whereas a wall hanging might benefit from one large, highly detailed skull design. Always check the finished dimensions listed on the Pattern to make sure it fits the intended use for your home.
Once you have mastered the basic construction of the blocks according to your Pattern, you can start thinking about the overall layout. A Patchwork quilt with skull design doesn’t have to be a simple grid. You can create a “staggered” layout where the skulls appear to be floating, or you can alternate the skull blocks with traditional geometric patterns like “Log Cabins” or “Nine-Patches.” This juxtaposition of the edgy skull design with classic quilting motifs creates a sophisticated and balanced look that appeals to a wide range of tastes.
Color blocking is another way to make your Patchwork quilt with skull design stand out. Instead of making all the skulls the same color, you could create a gradient or “ombre” effect. Imagine a quilt where the skulls start as deep violet at the bottom and gradually transition to a pale lavender at the top. Because you are following a Pattern, you can easily plan these color shifts by labeling your fabric pieces before you begin cutting. This adds a layer of artistic complexity to the Patchwork quilt with skull design that makes it feel truly custom-made.
The use of “negative space” is a hallmark of modern quilting and works exceptionally well with a Patchwork quilt with skull design – Pattern. Negative space refers to the empty areas around the main subject. By using a solid, neutral color for the background and placing the skull design off-center, you create a minimalist and contemporary aesthetic. This approach often highlights the intricate stitchwork and the quality of the fabric, making the Patchwork quilt with skull design feel more like a modern painting than a traditional blanket.
Borders and sashing are the “frames” of your quilt. Sashing is the strips of fabric that go between the blocks, and borders go around the outside edge. When making a Patchwork quilt with skull design, you can use sashing to give each skull its own “room,” which prevents the overall design from looking too cluttered. A bold border in a contrasting color can also help contain the energy of the skull design, grounding the piece and giving it a professional, finished appearance as dictated by the Pattern.
For those who want to go above and beyond, consider adding “embellishments” to your Patchwork quilt with skull design. After the top is pieced together according to the Pattern, you can hand-embroider details like teeth, cracks in the bone, or decorative flowers around the eye sockets. Some quilters even add beads or sequins to their skull design for a bit of sparkle. While these aren’t usually included in a standard Pattern, they are easy to add and provide a great way to showcase your individual creativity and hand-stitching skills.
Don’t forget the back of the quilt! The “quilt back” is a large canvas that often goes unnoticed. You can use a single large piece of fabric with a related theme, such as a skeleton print or a dark floral, or you can use your leftover scraps to create a “scrappy” back. Some people even put a smaller version of the Patchwork quilt with skull design on the back, making the quilt completely reversible. This is a great way to use up every bit of fabric you purchased for the Pattern and adds an extra surprise for anyone using the quilt.
The term “quilting” actually refers to the stitches that hold the three layers together: the quilt top, the batting (the middle fluff), and the backing. When finishing your Patchwork quilt with skull design, the style of quilting you choose can drastically change the final look. For a skull design, “echo quilting”—where you sew lines that follow the shape of the skull—can create a ripple effect that emphasizes the motif. Alternatively, “free-motion quilting” allows you to “draw” with your sewing machine, adding swirls, cobwebs, or even names into the background areas.
The “batting” you choose will determine the weight and warmth of your Patchwork quilt with skull design. If you want a flat, modern look that shows off the Pattern clearly, a thin bamboo or cotton batting is ideal. If you want a cozy, puffy quilt that feels traditional, a high-loft polyester batting is a better choice. Just remember that thicker batting can be harder to quilt through, especially if you have many layers of fabric in the detailed areas of the Patchwork quilt with skull design.
Thread choice is another subtle but important detail. You can use a matching thread so the stitches are invisible, or a contrasting thread to make the quilting stand out. For a Patchwork quilt with skull design, using a glow-in-the-dark thread for the skull’s eyes or outline can be a fun and unexpected touch. Most Pattern instructions don’t specify thread color, leaving that creative choice entirely up to you. Just ensure you use a high-quality thread that won’t snap or fray over time as the quilt is used.
Binding is the final step in completing your Patchwork quilt with skull design – Pattern. The binding is the strip of fabric that covers the raw edges of the quilt. A “bias binding” is often used because it is durable and can handle the corners of the quilt well. You might choose a striped fabric for the binding to give the Patchwork quilt with skull design a “circus” or “tim burton” style edge, or a solid black for a more somber, framed look. The binding is like the frame on a picture; it holds everything together and provides a clean finish.
Properly labeling your work is a tradition that every quilter should follow. On the back corner of your Patchwork quilt with skull design, sew a small piece of fabric with your name, the date, and the name of the Pattern you used. This turns your quilt into a documented piece of history. Future generations will know exactly who made the Patchwork quilt with skull design and when it was created. It’s a small step that adds a lot of sentimental value to the finished project.
Finally, caring for your finished Patchwork quilt with skull design is essential for its longevity. While high-quality cotton is durable, it is best to wash your quilt on a gentle cycle with cold water and a mild detergent. Air drying is the safest method, but a low-heat tumble dry can also work if you want that classic “crinkled” quilt look. By following the care instructions and the original Pattern guidelines, your Patchwork quilt with skull design will remain a beautiful and functional piece of art for many years to come.
1. Is a Patchwork quilt with skull design difficult for a beginner?
It depends on the Pattern you choose. Some patterns use simple squares to create a pixelated skull, which is great for beginners. However, patterns that use Foundation Paper Piecing (FPP) require a bit more experience and patience. If you are new to quilting, look for a Patchwork quilt with skull design that is labeled “beginner-friendly” or uses the appliqué method.
2. Where can I find a reliable Pattern for this type of quilt?
You can find a Pattern for a Patchwork quilt with skull design on digital marketplaces like Etsy, specialized quilting blogs, or at your local quilt shop. Many modern designers sell PDF versions of their patterns that you can download and print at home, making it easy to start your project immediately.
3. What colors are best for a skull-themed quilt?
While white and black are the most traditional for a Patchwork quilt with skull design, there are no rules! Many people love using “Sugar Skull” colors like bright pink, yellow, and orange. The most important thing is to have a high contrast between the skull design and the background so the image is clear.
4. How long does it take to finish a full-sized Patchwork quilt with skull design?
Quilting is a slow art. Depending on the complexity of the Pattern and your skill level, it can take anywhere from 20 to 100 hours to complete a full-sized Patchwork quilt with skull design. Breaking the project down into small steps—cutting one day, sewing blocks the next—makes the process much more manageable.
5. Can I use scraps to make the skull design?
Absolutely! A “scrappy” Patchwork quilt with skull design can look incredible. You can use various scraps of white and light gray for the bone areas to give it a textured, mosaic look. This is a great way to use up your “stash” of fabric while following a specific Pattern.
In this article, we have explored the fascinating process of creating a Patchwork quilt with skull design – Pattern. We discussed the importance of fabric selection, emphasizing high-contrast cottons and the necessity of pre-washing dark colors. We also delved into the technical side of the Pattern, explaining techniques like Foundation Paper Piecing and the critical nature of the quarter-inch seam allowance. Furthermore, we looked at creative layouts and finishing techniques—from echo quilting to choosing the right binding—that elevate a simple blanket into a stunning work of textile art. A Patchwork quilt with skull design is more than just a hobby project; it is a way to challenge your sewing skills and express your personal style through a durable, heirloom-quality creation.
We hope this guide has inspired you to pick up your rotary cutter and start your own Patchwork quilt with skull design. Whether you are making it for yourself or as a gift for someone who loves alternative decor, the journey of following a Pattern to create something so unique is incredibly rewarding.


