
Crochet Flower - Tutorial

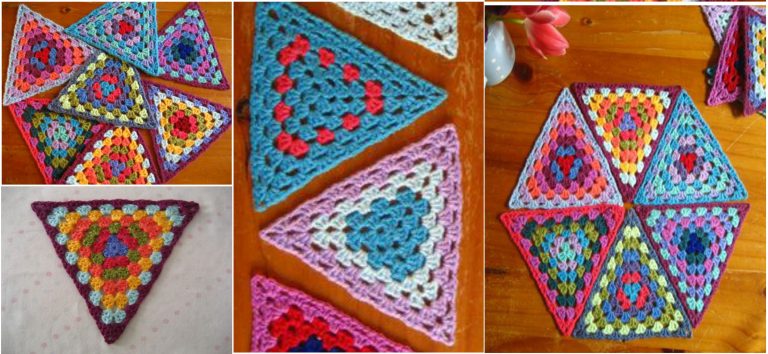
Creating a beautiful Crochet Granny Triangles – Pattern is one of the most rewarding projects a fiber artist can undertake, offering a geometric twist on the classic granny square that has dominated the craft world for decades. This versatile shape opens up a world of creative possibilities, allowing you to construct everything from trendy bunting and festive garlands to sophisticated shawls and unique patchwork garments. Whether you are a seasoned pro or a curious beginner, mastering the Crochet Granny Triangles – Pattern is an essential skill that adds a professional touch to your handmade portfolio.
The beauty of the Crochet Granny Triangles – Pattern lies in its simplicity and the rhythmic nature of its construction, which utilizes basic stitches like the double crochet and chain stitch. Because these triangles grow from the center outward, you have complete control over the final size, making them perfect for using up scrap yarn or creating large-scale home decor items. By understanding the geometry of the stitches, you can manipulate the corners to create a perfectly balanced equilateral shape that lays flat every time.
In this comprehensive guide, we are going to explore the nuances of the Crochet Granny Triangles – Pattern and how you can optimize your technique for the best results. We will dive deep into the essential materials, the step-by-step logic of the design, and creative ways to incorporate these motifs into your daily life. If you have been looking for a project that combines tradition with modern flair, learning this Crochet Granny Triangles – Pattern is the perfect place to start your next artistic journey.
The Crochet Granny Triangles – Pattern is built upon the “granny stitch” philosophy, which involves working groups of three double crochet stitches into the same space. Unlike a square, which has four corners, the triangle focuses on three distinct points of increase to create its iconic shape. This requires a specific mathematical approach to ensure the sides remain even and the corners stay sharp.
To begin your Crochet Granny Triangles – Pattern, you will typically start with a magic ring or a small chain loop. This center serves as the anchor for your first round of clusters. High-quality cotton yarn or acrylic yarn are the most popular choices for this project because they offer great stitch definition, which is crucial for showing off the “windows” or gaps inherent in the granny style.
A key element in the Crochet Granny Triangles – Pattern is the corner space, usually created by a chain-2 or chain-3 sequence. These spaces are where the growth happens in every subsequent round. By placing two clusters of stitches into one corner space, you force the fabric to expand outward in three different directions simultaneously, maintaining the triangular integrity of the piece.
Many crafters prefer the Crochet Granny Triangles – Pattern for making crochet bunting because the pointed shape naturally hangs downward in an aesthetically pleasing way. You can experiment with different hook sizes to change the drape of your work; a larger hook will result in a lacy, loose triangle, while a smaller hook creates a dense, sturdy fabric ideal for coasters or bags.
Consistency is vital when working through the Crochet Granny Triangles – Pattern. You must ensure that your tension remains even throughout the process so that each triangle in a set matches the others. This is especially important if you plan on joining multiple triangles together to form a larger blanket or a triangular prayer shawl, where symmetry is the main attraction.
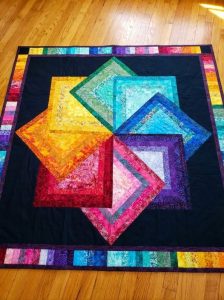
Finally, the Crochet Granny Triangles – Pattern is highly adaptable to color changes. By switching yarn colors at the end of each round, you can create a vibrant, “stained glass” effect that highlights the geometric precision of the stitches. This makes the pattern an excellent tool for color theory practice, allowing you to see how different hues interact within a structured framework.
Before diving into the Crochet Granny Triangles – Pattern, you must gather the right supplies to ensure a smooth crafting experience. The most important tool is your crochet hook, which should be sized appropriately for the weight of the yarn you have chosen. Most beginners find that a G/4.0mm or H/5.0mm hook works best with medium-weight worsted yarn, providing a comfortable grip and clear visibility.
The yarn you select for your Crochet Granny Triangles – Pattern will dictate the final look and feel of the item. For home decor like wall hangings, a stiff mercerized cotton is ideal because it holds its shape well. However, if you are making a wearable item like a triangle scarf, a soft wool blend or premium acrylic will provide the necessary warmth and softness against the skin.
You will also need a sharp pair of craft scissors and a tapestry needle (also known as a yarn needle). The needle is essential for weaving in the ends of your Crochet Granny Triangles – Pattern, especially if you are changing colors frequently. Hiding your yarn tails properly ensures that your hard work doesn’t unravel and that the finished product looks professional from both sides.
Stitch markers can be incredibly helpful when working on the Crochet Granny Triangles – Pattern, particularly for beginners who might lose track of where the corners are. Placing a marker in the center chain space of each corner helps you identify exactly where to place your increases. This simple step prevents the common mistake of accidentally turning a triangle into a lopsided polygon.
Another highly recommended tool is a blocking board or foam mats with T-pins. Once you finish your Crochet Granny Triangles – Pattern, the edges might curl slightly. Blocking involves wetting the crochet piece and pinning it into the desired shape until it dries. This process sets the stitches and ensures your triangles have perfectly straight edges and sharp points.
Lastly, consider keeping a measuring tape nearby. If you are creating a series of triangles for a specific project, such as a pennant banner, you will want to ensure each Crochet Granny Triangles – Pattern reaches the same dimensions. Measuring across the base and from the center to the peak will help you maintain uniformity across your entire collection of motifs.
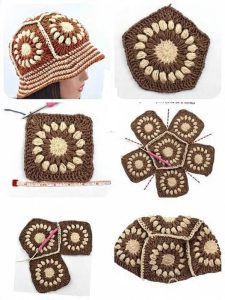
The first step in the Crochet Granny Triangles – Pattern is creating the foundation. You will chain 4 and join with a slip stitch to form a ring, or use the magic circle method for a tighter center. Inside this ring, you will work your first round, which consists of three clusters of three double crochets, each separated by a chain-2 space to form the three corners.
As you move to the second round of the Crochet Granny Triangles – Pattern, you will slip stitch your way to the first corner space. In this space, you will work a “corner shell” (3 double crochets, chain 2, 3 double crochets). Between the corners, you will work into the spaces created by the previous round, adding the necessary stitch clusters to expand the sides of the triangle.
The beauty of the Crochet Granny Triangles – Pattern is that it is a “repeat” pattern. Every round follows the same logic: work a corner shell into every corner space and work a single cluster of three double crochets into every side space. This mathematical growth ensures that the Crochet Granny Triangles – Pattern remains a perfect equilateral triangle regardless of how many rounds you add.
To keep your edges straight, some versions of the Crochet Granny Triangles – Pattern suggest adding a chain-1 between clusters on the flat sides. This adds a bit more “breathability” to the fabric and prevents the work from pulling too tight. If you find your triangle is starting to bowl or cup upward, it usually means your tension is too tight or you need to add an extra chain in the corners.
Closing a round in the Crochet Granny Triangles – Pattern is typically done with a slip stitch into the top of the initial starting chain. If you are changing colors, this is the moment to cut your yarn and join the new strand. For a seamless look, many experts use the standing double crochet technique to start a new round, which eliminates the visible “chain-3” look at the start of rows.
Once you have reached your desired size, the final round of your Crochet Granny Triangles – Pattern can be finished with a row of single crochet stitches all the way around. This provides a clean, solid border that makes it easier to join the triangle to other pieces. It also gives the piece a more “finished” look, especially if you are using the triangle as a standalone motif or applique.
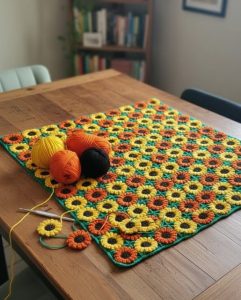
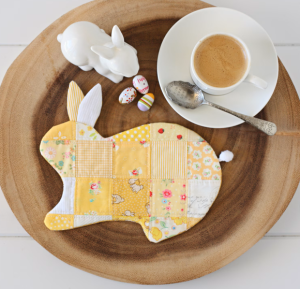
One of the most popular ways to utilize the Crochet Granny Triangles – Pattern is by creating seasonal bunting. By crocheting several triangles in themed colors—such as orange and black for Halloween or pastels for Easter—you can string them together on a long chain to create a festive garland. This is a quick and easy way to add a handmade touch to your home decor for any holiday.
The Crochet Granny Triangles – Pattern is also the foundation for the classic granny ripple shawl. By continuing the pattern for many rounds until the triangle is large enough to wrap around your shoulders, you create a beautiful, drape-heavy garment. This type of shawl is a favorite in the boho-chic fashion world and is a staple project for many crochet enthusiasts.
If you enjoy making bags, you can join two large versions of the Crochet Granny Triangles – Pattern together to form a unique tote bag. By seaming the sides and adding a sturdy strap, the triangular shape provides a modern, geometric silhouette that stands out from traditional square bags. You can even line it with fabric to make it more functional for carrying smaller items.
In the realm of baby gifts, a series of soft, cotton Crochet Granny Triangles – Pattern motifs can be turned into a “loveyl” or a small security blanket. The points of the triangle are easy for little hands to grab, and the openwork texture provides sensory interest. You can even attach a small plush toy to the center for an extra dose of cuteness.
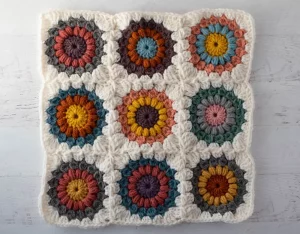
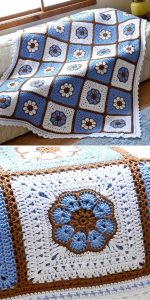
For those interested in interior design, the Crochet Granny Triangles – Pattern can be used to make decorative pillow covers. By joining several triangles into a square or hexagonal layout, you can create intricate, mosaic-like patterns that look much more complex than they actually are. This is a great way to showcase your stitch-work and add texture to a living room or bedroom.
Finally, don’t overlook the potential of the Crochet Granny Triangles – Pattern for small accessories. A tiny version of the pattern can be stiffened with fabric glue and attached to a metal hook to create crochet earrings. Or, you can use them as patches to cover holes in jeans, giving your clothing a second life through visible mending and creative crochet art.
1. Is the Crochet Granny Triangles – Pattern suitable for beginners?
Yes, absolutely! If you know how to do a double crochet and a chain stitch, you can easily master this pattern. It is often considered the next step after learning the traditional square.
2. How do I stop my triangle from curling at the edges?
Curling usually happens due to tight tension. Try using a larger hook or ensure you are adding enough chain stitches in the corners. Blocking your finished piece will also solve most curling issues.
3. Can I use any type of yarn for this pattern?
While you can use any yarn, worsted weight yarn is the easiest to work with. For better stitch definition, avoid very “fuzzy” or “eyelash” yarns until you are more comfortable with the stitch placement.
4. How many rounds should I do for a standard bunting?
Most decorative buntings use triangles that are about 4 to 6 rounds deep. This creates a piece that is roughly 5-7 inches tall, which is the perfect size for hanging on walls or mantels.
5. How do I join these triangles together?
You can join them using a slip stitch join, a whip stitch with a tapestry needle, or by crocheting them directly onto a long foundation chain to create a continuous banner.
6. Why is my triangle looking like a circle?
This usually happens if you are adding too many clusters on the sides or not enough chains in the corners. Ensure you only have three corners with specific increases to maintain the sharp triangular shape.
In this article, we have explored the wonderful world of the Crochet Granny Triangles – Pattern, covering everything from the basic stitches to advanced finishing techniques. We learned that by mastering the three-corner increase method, you can create versatile motifs suitable for home decor, fashion, and gifts. Whether you are using vibrant colors or classic neutrals, this pattern remains a timeless favorite because of its geometric beauty and ease of execution.
We hope this guide has inspired you to pick up your hook and start experimenting with your own Crochet Granny Triangles – Pattern variations. Remember that practice and consistent tension are the keys to success in any crochet project. By following the steps outlined above, you will soon have a collection of beautiful triangles ready for any creative endeavor.


