
Square-in-a-Square Quilt Block - Tutorial

The Star block Quilt – Pattern is one of the most iconic and timeless designs in the world of quilting, offering a perfect blend of geometric precision and artistic expression. For centuries, quilters have turned to the star motif to commemorate special life events, tell stories, and bring warmth to their homes. Whether you are a beginner looking for your first challenging project or an experienced artisan seeking a sophisticated layout, the Star block Quilt remains a versatile foundation that adapts beautifully to modern fabrics and traditional techniques alike.
Exploring a new Pattern is often a journey of discovery, where the choice of colors and the arrangement of shapes can completely redefine the final aesthetic. The Star block Quilt – Pattern is particularly celebrated because it allows for endless variations, ranging from the classic Sawtooth star to the intricate Lone Star or the playful Wonky star. By manipulating the “points” of the star through various piecing methods, you can create a visual secondary design that makes the entire quilt look like a complex mosaic, even if the individual blocks are relatively simple to construct.
In this comprehensive guide, we will delve into the technical nuances of the Star block Quilt – Pattern, providing you with the insights needed to achieve sharp points and flat seams. We will discuss the essential tools for precision cutting, the importance of fabric contrast, and how to scale your Star block Quilt for different bed sizes or wall hangings. Our goal is to empower you with the knowledge to tackle this Pattern with confidence, ensuring that your finished masterpiece becomes a cherished heirloom for generations to come.
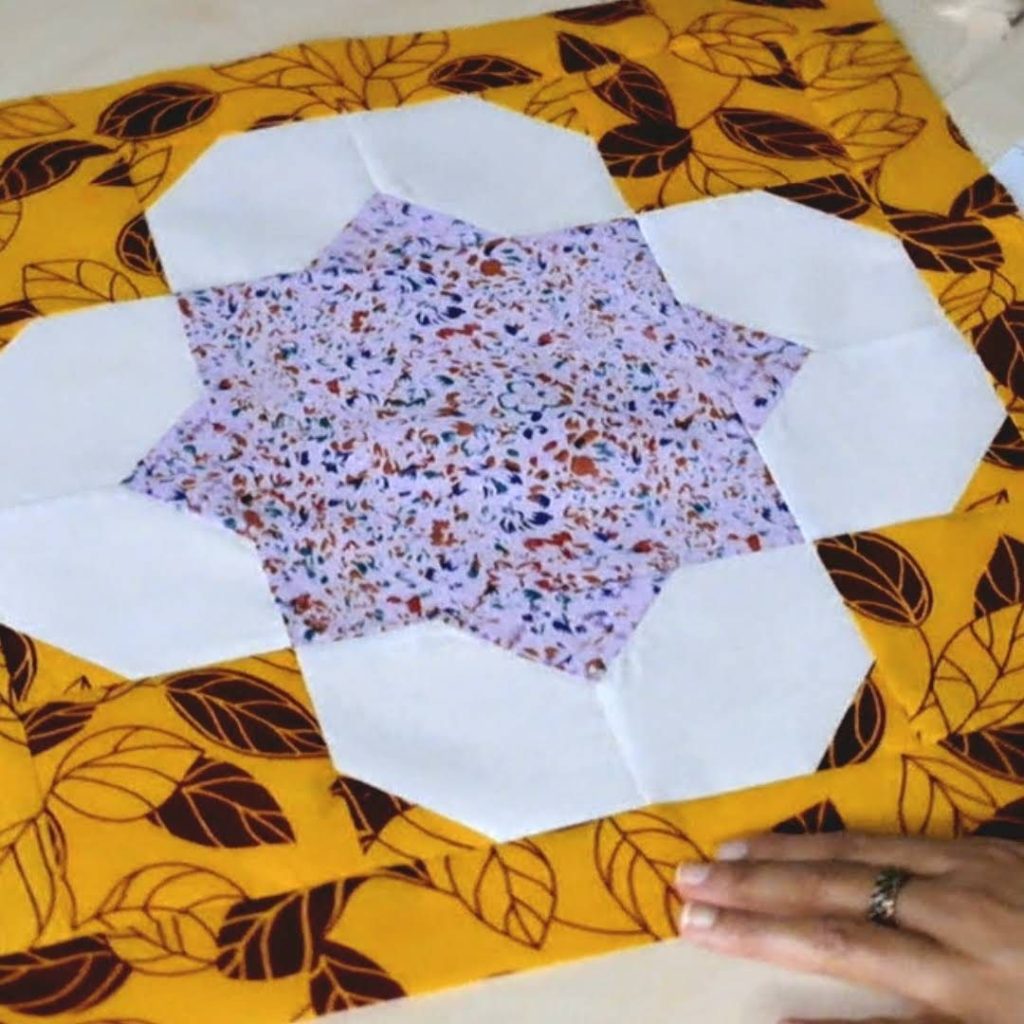
The architecture of a Star block Quilt – Pattern is fundamentally based on a grid system, most commonly the nine-patch or the four-patch layout. In a standard nine-patch star, the center square is surrounded by four “star point” units and four corner squares. Understanding this underlying structure is key to mastering the Pattern, as it allows you to visualize how the individual pieces of fabric will interact once they are sewn together. The symmetry of the Star block Quilt is what gives it its classic, balanced appeal that fits perfectly in any interior design style.
One of the most critical components of the Star block Quilt – Pattern is the use of “Flying Geese” units or half-square triangles (HSTs) to create the star’s points. These triangular shapes are the “rays” of the star and require careful attention to seam allowances to ensure the tips don’t get “chopped off” during assembly. When you follow a high-quality Star block Quilt design, you will notice that the Pattern accounts for a quarter-inch seam allowance, which is the industry standard for maintaining the geometric integrity of the points.
Fabric selection plays a massive role in how the Star block Quilt – Pattern is perceived by the eye. To make the star “pop” against the background, quilters often use high-contrast colors. For instance, a dark navy Star block Quilt with bright white stars creates a celestial, high-impact look. Conversely, using “low volume” prints for the background and soft pastels for the star points results in a romantic, vintage-style Pattern that feels cozy and inviting for a nursery or a farmhouse bedroom.
The versatility of the Star block Quilt – Pattern means it can be adapted into many sub-styles. The “Ohio Star” uses quarter-square triangles for a more detailed look, while the “Friendship Star” uses simple HSTs for a beginner-friendly approach. No matter which variation you choose, the Pattern remains a favorite because it can be scaled up to 24-inch blocks for a fast finish or scaled down to 4-inch blocks for an intricate, miniature Star block Quilt that showcases your technical precision and patience.
Modern quilters often experiment with the Star block Quilt – Pattern by introducing “negative space” or asymmetrical layouts. By placing a single, oversized star off-center on a solid background, you transform a traditional Pattern into a piece of contemporary art. This minimalist approach to the Star block Quilt is currently very popular in modern quilting circles and allows the quilting stitches themselves—whether done by hand or long-arm machine—to become a primary decorative element of the finished quilt.
Ultimately, the Star block Quilt – Pattern is a celebration of angles and intersections. Mastering the “match point” where the star tips meet the corner squares is a milestone for any quilter. As you progress through the Pattern, you will develop a “quilter’s eye” for detail and a steady hand for piecing. This growth is part of the joy of the Star block Quilt, turning a collection of fabric scraps into a structured, harmonious design that radiates beauty from the center of every block.
Precision is the heartbeat of a successful Star block Quilt – Pattern. Before you even touch your sewing machine, you must ensure your fabric is prepared and your tools are sharp. A high-quality rotary cutter with a fresh blade is non-negotiable for the Star block Quilt, as dull blades can lead to frayed edges or slightly inaccurate cuts. Even a sixteenth of an inch error can multiply across a Pattern, leading to a quilt top that won’t lay flat or stars with blunt, unattractive points.
Acrylic rulers are the best friend of anyone tackling a Star block Quilt – Pattern. You will ideally need a square ruler that matches the size of your finished block and a long rectangular ruler for cutting strips. Many specialized rulers exist specifically for the Star block Quilt, such as “trim-down” rulers for Flying Geese units. These tools allow you to over-size your pieces slightly and then trim them to the exact dimensions required by the Pattern, ensuring every star point is perfectly uniform.
Fabric starch is a “secret weapon” used by professionals when working on a Star block Quilt – Pattern. Because star designs often involve cutting fabric on the “bias” (the diagonal grain of the fabric), the pieces can become stretchy and distorted. By starching your fabric before cutting, you give the fibers more stability. This makes the Star block Quilt pieces behave more like paper, allowing for extremely accurate piecing and preventing the dreaded “wavy” seams that can ruin the look of a geometric Pattern.
When following the cutting instructions of your Star block Quilt – Pattern, organization is paramount. It is helpful to label your cut pieces with letters or numbers that correspond to the Pattern diagram. Since a Star block Quilt often involves many small triangles that look similar but have different orientations, keeping them sorted in trays or pinned with labels will save you hours of frustration. This systematic approach is especially important if you are making a “scrappy” version of the Pattern with many different fabrics.
The “Scant Quarter-Inch” seam is a technical term you will frequently encounter in the Star block Quilt – Pattern world. It refers to a seam that is just a thread’s width narrower than a full quarter-inch. This tiny adjustment accounts for the space the fabric takes up when it is folded over the seam. For a complex Star block Quilt, using a scant quarter-inch ensures that your blocks finish at the exact size specified in the Pattern, making the final assembly of the rows much smoother.
Finally, a high-quality iron and a flat pressing surface are essential for the Star block Quilt – Pattern. Pressing is different from ironing; instead of sliding the iron back and forth, you should lift and press it down firmly. This prevents the star points from stretching. In a Star block Quilt, pressing your seams to the side—or sometimes open—is a strategic decision that helps reduce bulk where multiple points meet. Following the pressing directions in your Pattern will result in a professional-looking, flat quilt top.
The mood of your Star block Quilt – Pattern is dictated almost entirely by your color choices. Using the color wheel can help you create a Pattern that is visually stimulating. For a vibrant, energetic quilt, consider a “complementary” color scheme, such as blue stars on an orange background. If you prefer something more serene and sophisticated, an “analogous” scheme—using colors next to each other on the wheel like greens and blues—will make your Star block Quilt feel harmonious and calm.
Value contrast is perhaps even more important than the colors themselves in a Star block Quilt – Pattern. “Value” refers to how light or dark a color is. If your star points and your background have the same value, the star shape will “disappear” into the background, and the hard work you put into the Pattern won’t be visible from a distance. A quick tip is to take a black-and-white photo of your fabric layout; if you can still see the star clearly in grayscale, your Star block Quilt has sufficient contrast.
For those who love a traditional look, “Civil War” or “1930s Reproduction” fabrics are perfect for a Star block Quilt – Pattern. These fabrics often feature small-scale floral prints and muted tones that evoke the history of the Star block Quilt in American culture. Following a Pattern with these fabrics creates an instant heirloom feel, making the quilt look like it has a story to tell. This style is particularly effective for star designs like the “Star of the West” or the “Variable Star.”
Modern makers might prefer “solid” fabrics or “batiks” for their Star block Quilt – Pattern. Solids allow the geometric lines of the Pattern to take center stage without the distraction of prints. Batiks, with their hand-dyed textures and vibrant saturated colors, can add a sense of movement to the stars, making each Star block Quilt block look unique. When using solids, the precision of your piecing becomes even more visible, so it is a great way to showcase your mastery of the Pattern.
“Fussy cutting” is a technique where you target a specific motif in a fabric—like a single flower or a small animal—to be the center of your Star block Quilt – Pattern. This adds a layer of whimsy and detail to the quilt. By placing a fussy-cut image in the center square of your star, you create a focal point that draws the viewer in. It’s a wonderful way to personalize a Star block Quilt for a child or to highlight a favorite designer’s fabric within the structure of the Pattern.
Finally, consider the “directionality” of your fabric prints. If you are using a striped fabric for the points of your Star block Quilt – Pattern, the stripes will change direction depending on how the triangles are cut and sewn. Some quilters love this kaleidoscopic effect, while others find it distracting. Checking the orientation of your fabric before you cut according to the Pattern will ensure that the final Star block Quilt matches the vision you had in your head at the start of the project.
Once your Star block Quilt – Pattern top is fully pieced, the journey is only half over. The way you choose to “quilt” the layers together (the top, the batting, and the backing) can enhance or hide the star design. For a Star block Quilt, many people choose “Stitch in the Ditch,” where you sew exactly along the seam lines. This keeps the focus entirely on the Pattern itself. However, “outline quilting” just a quarter-inch away from the star points can create a beautiful halo effect that makes the stars seem to glow.
Selecting the right batting is crucial for the drape and warmth of your Star block Quilt – Pattern. Cotton batting is a traditional choice that provides a flat, antique look and gets softer with every wash. If you want your stars to have more “poof” or dimension, a wool or polyester batting with a higher loft is a better option. This extra thickness can make the stars in your Star block Quilt stand out in 3D, adding a tactile element to the visual beauty of the Pattern.
The “backing” of your Star block Quilt is an opportunity to be creative as well. While many people use a single wide fabric, you can also piece together leftover scraps from the Star block Quilt – Pattern to create a “surprise” design on the back. This “two-sided” approach is becoming a hallmark of modern craftsmanship. It ensures that no fabric goes to waste and that your quilt is beautiful from every angle, regardless of which side is facing up.
Binding is the final “frame” for your Star block Quilt – Pattern. Most quilters use a “double-fold” binding for durability. The color of the binding can either blend into the background or act as a bold border. For a Star block Quilt, a striped binding cut on the bias can create a “barber pole” effect that adds a playful energy to the edges. This small detail is the finishing touch that signals the completion of your Pattern and the beginning of the quilt’s life as a functional object.
Labeling your Star block Quilt – Pattern is a step you should never skip. A quilt label should include your name, the date, the location, and the name of the Pattern (in this case, the Star block Quilt). You can also include a small message for the recipient. Future historians and family members will cherish this information. A quilt without a label is a “mystery,” but a labeled Star block Quilt is a documented piece of history that honors the time and effort you invested.
Proper care will ensure your Star block Quilt – Pattern lasts for a century. When washing, use a “color catcher” sheet to prevent dark dyes from bleeding into light star points. Always dry your Star block Quilt on a low heat setting or flat on a rack to prevent the fibers from breaking down. By treating your quilt with respect, you preserve the integrity of the Pattern and the memories woven into every stitch, allowing the Star block Quilt to remain a vibrant part of your home for years to come.
1. Is the Star block Quilt – Pattern suitable for absolute beginners?
Yes, but it depends on the specific star. The Friendship Star is perfect for beginners because it only uses squares and half-square triangles. As you gain confidence, you can move on to more complex Pattern variations like the Sawtooth or the Feathered Star.
2. How do I keep my star points from being cut off?
The secret is to ensure your “Flying Geese” units or triangles are exactly the right size before sewing them to the center. When you sew the final seam, make sure your needle passes exactly through the “X” created by previous seams. This protects the point in the Star block Quilt – Pattern.
3. What is the best fabric for a Star block Quilt?
High-quality 100% quilting cotton is the best choice. It has a tight weave that holds the shape of the Pattern well and is easy to handle under the sewing machine. Avoid stretchy fabrics like jersey or slippery fabrics like silk for your first Star block Quilt.
4. Can I make a Star block Quilt – Pattern using a sewing machine?
Absolutely. Most modern Pattern instructions are written specifically for machine piecing. However, some traditionalists still enjoy the process of “English Paper Piecing” stars by hand, which is a great portable project.
5. How much fabric do I need for a standard Star block Quilt?
This varies widely based on the size of the quilt and the number of stars. A standard throw-sized Star block Quilt – Pattern usually requires about 3 to 5 yards of background fabric and a variety of fat quarters for the stars.
6. Why is my Star block Quilt top not laying flat?
This is usually caused by inaccurate seam allowances or stretching the fabric during pressing. Using starch and a “scant” quarter-inch seam as suggested in the Pattern will usually solve this problem and result in a flat Star block Quilt.
In summary, the Star block Quilt – Pattern is a foundational pillar of the quilting world that offers endless opportunities for creativity and skill-building. We have discussed the geometric structure of the stars, the essential tools for precision, the importance of color and value contrast, and the professional techniques needed to finish your quilt to a high standard. Whether you are following a traditional Pattern or venturing into modern minimalism, the Star block Quilt provides a sense of accomplishment that few other projects can match. It is a design that truly shines, capturing the light of the maker’s spirit in every triangular point.
We hope this article has provided you with the inspiration and technical knowledge to start your own Star block Quilt – Pattern today! Please leave your sincere opinion and suggestions in the comments below—we would love to hear which star variation is your favorite!


