
Patchwork Bird Tutorial

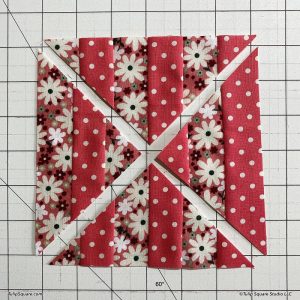
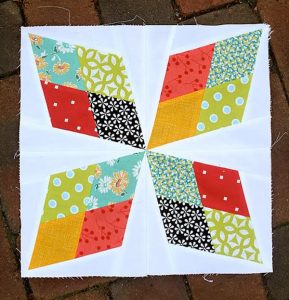
The Double Windmill Block – Pattern is a timeless masterpiece in the world of quilting, offering a sense of motion and geometric elegance that few other designs can match. This specific Double Windmill Block – Pattern is characterized by its interlocking triangles and secondary patterns that emerge when multiple blocks are sewn together, creating a mesmerizing visual “spin.” For quilters who enjoy playing with color theory and contrast, mastering this traditional quilt block is a fantastic way to showcase your skills while producing a stunning finished piece that looks much more complex than it actually is to assemble.
As you dive into the intricacies of the Double Windmill Block – Pattern, you will discover that it is essentially a variation of the classic pinwheel, but with an added layer of depth. The “double” aspect refers to the dual layers of triangles that create a sense of foreground and background, giving the Double Windmill Block – Pattern its distinctive architectural flair. Whether you are aiming for a modern minimalist aesthetic using solid fabrics or a cozy scrappy look with floral prints, this versatile quilting design adapts beautifully to any style or skill level, provided you maintain precision during the cutting and sewing stages.
Understanding the geometry behind the Double Windmill Block – Pattern is the first step toward achieving professional results. Most variations of this quilt block pattern rely on Half-Square Triangles (HSTs) and Quarter-Square Triangles (QSTs), which are the building blocks of many famous quilt designs. By focusing on accurate seam allowances and careful pressing, you can ensure that every point of your Double Windmill Block – Pattern meets perfectly in the center. In this comprehensive guide, we will explore the essential materials, the step-by-step construction, and advanced layout ideas to help you make the most of this captivating design.
To begin your journey with the Double Windmill Block – Pattern, you must first select high-quality quilting cotton fabric. The choice of fabric weight is crucial because the Double Windmill Block – Pattern involves several overlapping seams in the center; using a fabric that is too thick can result in bulky intersections that are difficult to quilt. Opt for 100% cotton with a high thread count to ensure that your Double Windmill Block – Pattern remains crisp and maintains its shape over years of use and washing.
Color selection plays a vital role in how the Double Windmill Block – Pattern is perceived by the eye. To achieve the “spinning” effect, you generally need at least three contrasting values: a light background, a medium-tone “inner blade,” and a dark-tone “outer blade.” This color value contrast is what defines the secondary motion within the Double Windmill Block – Pattern, making the windmill appear as if it is rotating across the surface of the quilt.
A reliable rotary cutter and self-healing mat are indispensable tools for this project. Because the Double Windmill Block – Pattern relies on precise triangles, even a fraction of an inch off in your cutting can cause the entire block to become skewed. Many quilters prefer using a square-up ruler specifically designed for Half-Square Triangles to ensure that every unit of the Double Windmill Block – Pattern is exactly the same size before the final assembly.
Preparation also includes starching your fabric before you begin cutting. Since the Double Windmill Block – Pattern involves cutting on the bias (the diagonal grain of the fabric), the edges can become stretchy and distorted. Applying a light layer of fabric starch gives the cotton more stability, allowing you to handle the pieces for the Double Windmill Block – Pattern with confidence and preventing the dreaded “wavy” edges that can plague triangle-heavy designs.
Don’t forget to check your sewing machine tension and needle type before starting. A size 80/12 universal or microtex needle is usually best for the tight weaves of quilting cotton used in a Double Windmill Block – Pattern. Using a high-quality 50wt cotton thread in a neutral color like grey or tan will allow the seams to lay flat and blend into the fabric, ensuring that the focus remains on the beautiful geometry of your Double Windmill Block – Pattern.
Lastly, create a “test block” before cutting into your precious stash of fabric. Using scraps to build a single Double Windmill Block – Pattern allows you to verify that your scant quarter-inch seam is accurate and that the final block measures exactly what the pattern intends. This small investment of time prevents wasted material and ensures that all subsequent blocks for your Double Windmill Block – Pattern quilt will fit together like a perfect puzzle.
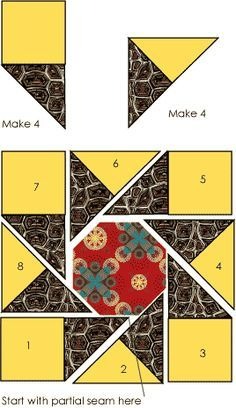
The most common method for creating the Double Windmill Block – Pattern involves the “two-at-a-time” HST method. You start by placing two squares of contrasting fabric right sides together and drawing a diagonal line from corner to corner. By sewing a quarter-inch on both sides of that line and cutting down the middle, you create two perfect units for your Double Windmill Block – Pattern, saving time and increasing the accuracy of your points.
Once your HSTs are made, the next phase of the Double Windmill Block – Pattern involves trimming them to the exact size required by your instructions. Trimming is the “secret sauce” of successful quilting; by removing the tiny “dog ears” (the excess fabric at the corners), you ensure that your Double Windmill Block – Pattern units align perfectly. This precision is what allows the “windmill blades” to look sharp and professional rather than blunt or mismatched.
The Double Windmill Block – Pattern often utilizes a four-patch or nine-patch layout as its internal structure. Depending on the specific variation you are following, you will arrange your triangles to face either clockwise or counter-clockwise. It is helpful to lay out all the pieces for one Double Windmill Block – Pattern on a design board or flat surface before sewing, as it is very easy to accidentally flip a triangle and break the visual flow of the windmill.
Pressing is just as important as sewing when it comes to the Double Windmill Block – Pattern. To reduce bulk at the center where many seams meet, it is often recommended to press seams open or to “spin” the seams at the center junction. This technique allows the Double Windmill Block – Pattern to lay incredibly flat, which is essential if you plan on using a longarm quilting service or if you want your quilt to hang straight on a wall.
As you assemble the rows of your Double Windmill Block – Pattern, use plenty of pins. Pinning at every intersection ensures that the points of the triangles don’t shift as they pass under the presser foot. In a high-contrast Double Windmill Block – Pattern, even a tiny misalignment is visible, so taking the extra time to pin precisely will pay off in the final appearance of your handcrafted quilt.
After the rows are joined, give the entire Double Windmill Block – Pattern a final press from the front. Avoid sliding the iron back and forth, which can stretch the fabric; instead, lift and set the iron down firmly. This “pressing, not ironing” technique keeps the Double Windmill Block – Pattern square and prevents the center from bowing, resulting in a crisp, clean block ready to be joined with its neighbors.
One of the most exciting aspects of the Double Windmill Block – Pattern is how it transforms when you change the layout. If you place the blocks side-by-side without any borders, the points of the windmills meet to create a secondary star pattern. This “infinite” look makes the Double Windmill Block – Pattern ideal for large bed quilts where you want the design to flow seamlessly from one edge to the other without interruption.
Alternatively, you can use sashing and cornerstones to frame each individual Double Windmill Block – Pattern. Sashing consists of strips of fabric placed between the blocks, acting like a window frame. This approach highlights the craftsmanship of each Double Windmill Block – Pattern and is particularly effective if you have used different colors for every block, as the sashing provides a visual “resting place” for the viewer’s eyes.
For a more modern twist, consider an on-point setting for your Double Windmill Block – Pattern. By rotating the blocks 45 degrees, the windmills appear to be tumbling or floating across the quilt top. This layout requires the addition of setting triangles around the edges, but the dynamic energy it brings to the Double Windmill Block – Pattern is well worth the extra effort and planning involved.
The use of “negative space” is another contemporary trend that works beautifully with the Double Windmill Block – Pattern. By surrounding a single, oversized windmill with a large expanse of neutral background fabric, you create a minimalist statement quilt. This highlights the complex geometry of the Double Windmill Block – Pattern and allows you to experiment with intricate free-motion quilting in the empty areas surrounding the block.
Border selection can also change the “mood” of your Double Windmill Block – Pattern. A simple solid border keeps the focus on the central design, while a “pieced border” using the leftover triangles from your Double Windmill Block – Pattern construction can create a cohesive, intricate frame. Adding a thin “flange” or “piping” border can also add a pop of color that draws out a specific shade used within the windmill blades.
Finally, consider the quilting motif you will use to finish the piece. For a Double Windmill Block – Pattern, geometric quilting like “stitch-in-the-ditch” or straight-line echoes can emphasize the sharp points. Conversely, soft swirly or floral quilting provides a lovely contrast to the rigid lines of the Double Windmill Block – Pattern, adding a touch of softness and traditional charm to the final texture of the quilt.
If you find that your Double Windmill Block – Pattern is coming out slightly smaller than intended, the culprit is likely your seam allowance. Quilting requires a “scant” quarter-inch, which accounts for the fold of the fabric. If your seams are a true quarter-inch, the Double Windmill Block – Pattern will lose a tiny bit of size at every junction. Adjusting your needle position slightly can fix this and ensure your quilting units are perfectly sized.
Dealing with “blunted points” is another common challenge with the Double Windmill Block – Pattern. This happens when the seam line crosses over the tip of the triangle. To avoid this, always look for the “X” created by the previous seams on the back of your Double Windmill Block – Pattern units. Aim your needle to go exactly through the center of that “X,” and your points will remain sharp and perfectly visible on the front of the quilt.
For those looking to take the Double Windmill Block – Pattern to the next level, try using foundation paper piecing (FPP). This method involves sewing the fabric directly onto a paper template, which guarantees perfect points and exact measurements every time. FPP is especially useful if you want to scale the Double Windmill Block – Pattern down to a very small size for a miniature quilt or a decorative pillowcase.
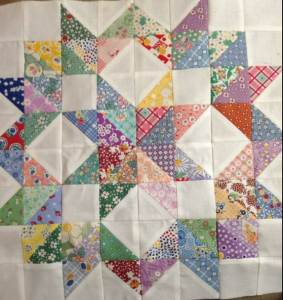
Another advanced variation is the Scrappy Double Windmill Block – Pattern, where no two blades are the same color. This requires careful management of color value to ensure the windmill shape doesn’t get “lost” in the chaos. By keeping a consistent light background and varying the prints of the blades, you can create a vibrant, energetic Double Windmill Block – Pattern that tells a story through various fabric scraps from your collection.
If you encounter “bulkiness” at the center of your Double Windmill Block – Pattern, you can use a small mallet to gently tap the center seam flat before quilting. This may sound unusual, but it is a common trick used by professional quilters to flatten thick intersections. It makes the Double Windmill Block – Pattern much easier to sew through, especially when using a domestic sewing machine that might struggle with many layers.
Lastly, always remember to “square up” your finished Double Windmill Block – Pattern. Even with perfect sewing, fabric can shift. Use a large square ruler to trim all four sides of the completed Double Windmill Block – Pattern so that it is perfectly square and the same size as all its companions. This final step is the hallmark of a meticulous quilter and ensures that your final quilt top will be flat, straight, and ready for the finishing touches.
What is the difference between a pinwheel and a Double Windmill Block – Pattern?
A standard pinwheel uses four triangles to create a single-layer spinning effect. The Double Windmill Block – Pattern uses eight or more triangles (often grouped into secondary units) to create a layered, “double” blade effect that offers more depth and complexity.
How much fabric do I need for a lap-sized quilt using the Double Windmill Block – Pattern?
Typically, for a 50″ x 60″ quilt, you will need approximately 3 to 4 yards of focal fabrics and 2 yards of background fabric. This varies based on whether you use sashing or large borders around your Double Windmill Block – Pattern.
Can I make the Double Windmill Block – Pattern without a rotary cutter?
While possible with fabric scissors and templates, it is highly discouraged. The Double Windmill Block – Pattern requires extreme precision in the triangles, and the rotary cutter is the best tool to ensure that every piece is identical.
Is the Double Windmill Block – Pattern suitable for hand sewing?
Yes, it is! However, because of the many intersections, hand sewing a Double Windmill Block – Pattern requires careful attention to detail at the points. Many traditional quilters enjoy the slow process of hand-piecing these geometric designs.
What is the best way to quilt a Double Windmill Block – Pattern?
“Stitch-in-the-ditch” is the most popular choice as it highlights the shape of the windmill. However, a spiral motif starting from the center of the Double Windmill Block – Pattern can also enhance the “spinning” visual effect beautifully.
Why does my Double Windmill Block – Pattern look like a star instead?
This is likely due to fabric color placement. The Double Windmill Block – Pattern relies on specific contrast to create the “blades.” If your colors are too similar, the eye may skip over the windmill and see the background shapes as a star instead.
In conclusion, the Double Windmill Block – Pattern is a versatile and rewarding project that brings a sense of movement and professional artistry to your quilting repertoire. We have covered everything from the initial fabric selection and the importance of color value contrast to the technical skills of cutting, sewing, and pressing these intricate units. By following the steps outlined for the Double Windmill Block – Pattern, you can transform simple squares and triangles into a sophisticated design that serves as a stunning centerpiece for any quilt.
Remember that the secret to a perfect Double Windmill Block – Pattern lies in the details: the scant quarter-inch seam, the careful trimming of HSTs, and the final squaring up of the block. Whether you choose to set your blocks in a traditional grid, use sashing, or experiment with a modern on-point layout, the Double Windmill Block – Pattern offers endless possibilities for creative expression. It is a design that honors the history of quilting while remaining perfectly relevant in the modern sewing room.


