
Patchwork Bird Tutorial

The Friendship Star Quilt Pattern is one of the most beloved and enduring designs in the world of quilting, representing a beautiful bridge between historical tradition and modern creativity. Whether you are a seasoned quilter or a beginner looking for your first project, this specific pattern offers a perfect balance of simplicity and visual impact. It is characterized by its four-pointed star that seems to spin across the fabric, creating a sense of movement and warmth that has made it a staple in homes for generations.
When we dive into the history of the Friendship Star Quilt Pattern, we find a design rooted in community and connection. Historically, these quilts were often made as parting gifts for friends moving West or as commemorative tokens for weddings and births. Each block would be signed by a different person, turning a simple blanket into a storied archive of relationships. Today, the Friendship Star Quilt Pattern remains a favorite because it is incredibly versatile, allowing makers to experiment with bold modern solids or charming vintage florals.
Understanding the construction of a Friendship Star Quilt Pattern is the first step toward creating your own textile masterpiece. The design relies heavily on the use of Half-Square Triangles (HSTs) and simple squares, making it an excellent “skill-builder” project. By mastering this pattern, you gain confidence in fussy cutting, seam nesting, and quilt block precision. In this comprehensive guide, we will explore everything from choosing your fabrics to the final stitches, ensuring your journey with this iconic star is both successful and deeply rewarding.
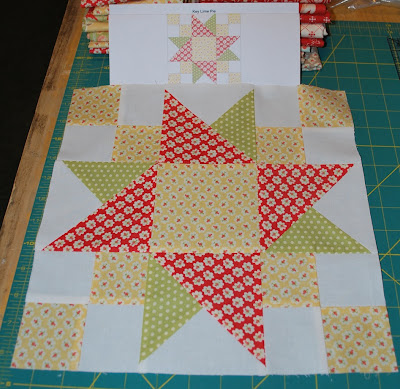
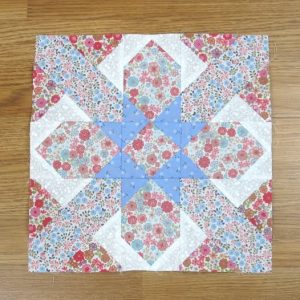
The foundation of a Friendship Star Quilt Pattern is the nine-patch grid, which is one of the most fundamental layouts in quilting. To create the star effect, you place a central square in the middle, four Half-Square Triangles in the corners, and four solid squares (often in a background color) on the sides. This arrangement creates the illusion of four “points” rotating around a center, which is why it is frequently referred to as a “twirling” or “spinning” star.
Choosing the right fabric contrast is essential for making the star pop. Most quilters use a dark or vibrant fabric for the star points and a light, neutral fabric for the background. This high contrast ensures that the geometric shape of the Friendship Star Quilt Pattern is clearly visible from a distance. If the colors are too similar, the star loses its definition and blends into the background, which might be a stylistic choice but usually defeats the purpose of the pattern.
The Half-Square Triangle is the “secret sauce” of this design. To make them, you typically sew two different fabric squares together and cut them on the diagonal. Precision is key here; if your triangles are slightly off-size, your star points won’t line up perfectly in the center. Many modern quilters prefer the “two-at-a-time” method for creating HSTs, as it saves time and reduces fabric waste while maintaining the integrity of the Friendship Star Quilt Pattern.
In terms of sizing, the Friendship Star Quilt Pattern is incredibly scalable. You can create tiny 4-inch blocks for a delicate baby quilt or massive 12-inch blocks for a king-sized bedspread. Because the math is based on a simple 3×3 grid, it is easy to calculate the dimensions for your quilt top. If you want a 9-inch finished block, each individual square in your grid (including the triangles) needs to be 3 inches finished.
One of the most charming aspects of the Friendship Star Quilt Pattern is the “fussy cutting” technique used for the center square. Fussy cutting involves cutting a specific motif from a fabric—like a flower, a bird, or a small quote—to feature it prominently in the middle of the star. This adds a layer of personalization and detail that makes the quilt feel like a true piece of art. It’s a great way to highlight a favorite print within your fabric stash.
Finally, the Friendship Star Quilt Pattern is often used in “exchange quilts.” In this tradition, a group of friends each makes a block and swaps them, resulting in a quilt where every star represents a different person. This social element is why the name has stuck for over a century. Even if you are sewing alone, the process of piecing these stars feels like a nod to the long history of collaborative quilting and handmade gifts.
Before you begin your Friendship Star Quilt Pattern, you need to gather high-quality materials. Cotton is the gold standard for quilting because it is breathable, easy to handle, and holds its shape well under the iron. Look for high-thread-count quilting cotton to ensure your project lasts for years. The color palette you choose will define the mood of the quilt, whether you want a scrappy quilt look or a sophisticated, two-tone modern aesthetic.
Essential tools for a successful Friendship Star Quilt Pattern include a rotary cutter, a self-healing cutting mat, and an acrylic quilting ruler. These tools allow for the precise geometric cuts required for the star points. Unlike dressmaking, quilting requires mathematical accuracy; even an eighth of an inch can throw off the entire alignment of your star blocks. Investing in a sharp blade for your rotary cutter will prevent frayed edges and inaccurate shapes.
Thread choice is often overlooked but stays vital for the longevity of your Friendship Star Quilt Pattern. A 50-weight cotton thread is usually recommended as it is strong but thin enough to not add bulk to your seam allowances. Using a neutral color like grey, tan, or white allows the thread to blend into most fabrics. If you plan on doing decorative topstitching later, you might choose a thicker, contrasting thread for the quilting motifs.
A reliable sewing machine with a 1/4-inch presser foot is a quilter’s best friend. Most quilting patterns, including the Friendship Star Quilt Pattern, rely on a consistent “scant” quarter-inch seam. This allows for the tiny bit of space that the fabric fold takes up when you press your seams open or to the side. If your seams are too wide, your finished block will be smaller than intended, making it difficult to join multiple blocks together.
Marking tools are also necessary when working on the Friendship Star Quilt Pattern. You will need a fabric pen or a Hera marker to draw the diagonal lines on your squares for the Half-Square Triangles. These lines act as your sewing guide. Ensure that any pen you use is either water-soluble or heat-erasable so that the marks disappear once the block is finished. Testing the marker on a scrap piece of fabric first is always a smart quilting tip.
Lastly, don’t forget the quilt batting and backing fabric. The batting provides the warmth and “loft” of the quilt, while the backing is the final layer of the sandwich. For a Friendship Star Quilt Pattern, you might choose a flannel backing for extra coziness or a wide-back cotton for a seamless finish. Having all these components ready before you start sewing will make the creative process much smoother and more enjoyable.
The first step in assembling your Friendship Star Quilt Pattern is the cutting process. You will need one center square, four background squares, and two squares each of your star fabric and background fabric to create the triangles. If you are making a multi-block quilt, it is often easier to “chain piece” your blocks. This means sewing the same components of multiple blocks in one continuous string, which significantly speeds up the quilting workflow.
To create the points of the Friendship Star Quilt Pattern, place a star fabric square and a background square right sides together. Draw a diagonal line from corner to corner. Sew a quarter-inch seam on both sides of that line. Once you cut along the drawn line and press the pieces open, you will have two perfect Half-Square Triangles. Repeat this process until you have the four triangles needed for your star block.
Once your triangles are ready, lay out your pieces in a 3×3 grid to visualize the Friendship Star Quilt Pattern. The top row consists of a background square, a triangle (point facing right), and a background square. The middle row features a triangle (point facing up), the center square, and a triangle (point facing down). The bottom row is a background square, a triangle (point facing left), and a background square. Double-check the rotation of your triangles!
Sew the pieces together row by row. This is where seam nesting becomes important. Press the seams of the first and third rows to the right, and the seams of the middle row to the left. When you go to sew the rows together, the seams will “nestle” against each other, reducing bulk and helping you achieve those perfectly crisp corners that make a Friendship Star Quilt Pattern look professional.
After the rows are joined, give your block a final press with a hot iron. Using a bit of quilting starch can help the block stay flat and crisp as you work on the rest of your quilt. Measure your finished block to ensure it matches your intended size. If it’s slightly too large, you can “square it up” using your rotary cutter and ruler, but be careful not to cut off the points of your star.
The final stage of the block construction is inspecting the “points.” In a well-made Friendship Star Quilt Pattern, the points of the star should stop exactly a quarter-inch from the edge of the block. This ensures that when you sew the blocks together into a quilt top, the points aren’t lost in the seam. It takes a bit of practice to get this perfect, but the result is a stunning, clean geometric design that showcases your sewing skills.
While the traditional Friendship Star Quilt Pattern is iconic, there are endless ways to modernize the design. One popular variation is the “Wonky Star,” where the triangles are cut at irregular angles for a more whimsical, improvisational look. Another option is to use gradient fabrics or “ombré” prints to give the stars a glowing effect. By playing with color values, you can make some stars appear to recede while others jump forward.
The layout of your blocks can also change the entire vibe of the Friendship Star Quilt Pattern. You can set the blocks “on point” (rotated 45 degrees) for a more dynamic look, or separate them with sashing and cornerstones to give each star its own “frame.” Using a secondary pattern in the sashing can create a “secondary design” where the spaces between the stars form a new geometric shape, adding complexity to the quilt layout.
When it comes to the actual quilting—the stitching that holds the three layers together—you have several choices. For a classic Friendship Star Quilt Pattern, “stitch-in-the-ditch” (sewing directly in the seams) keeps the focus on the piecing. Alternatively, you can use free-motion quilting to add swirls, feathers, or floral patterns in the background squares, which provides a beautiful contrast to the sharp lines of the star.
If you are using a longarm machine or a domestic machine with a walking foot, geometric “straight-line quilting” is a very popular modern choice for the Friendship Star Quilt Pattern. You can quilt lines that radiate out from the center of each star or create a grid that mimics the 3×3 structure of the block. This adds a tactile, quilted texture that enhances the overall “spinning” feel of the star points.
Don’t forget the power of the quilt border. A simple solid border can contain the energy of the stars, while a “pieced border” using leftover scraps from your triangles can extend the theme of the Friendship Star Quilt Pattern all the way to the edges. The border is like a frame for your fabric art, and it provides an opportunity to tie all the colors of your quilt together into a cohesive finish.
Finally, the quilt binding is the finishing touch. You can use a contrasting color to “pop” against the stars or a matching fabric for a seamless look. Some quilters even use a “scrappy binding” made from all the different fabrics used in the stars. Regardless of your choice, completing a Friendship Star Quilt Pattern project is a significant achievement that results in a functional piece of history and a beautiful expression of your personal style.
Is the Friendship Star Quilt Pattern suitable for absolute beginners?
Yes! Because it uses a simple nine-patch grid and basic Half-Square Triangles, it is one of the best patterns for beginners to practice their cutting and sewing accuracy.
What is the difference between a Friendship Star and a Sawtooth Star?
The Friendship Star Quilt Pattern is based on a 3×3 grid, whereas the Sawtooth Star is typically based on a 4×4 grid (or a 1:2 ratio) and uses Flying Geese units instead of HSTs for the points.
How many fabrics do I need for this pattern?
At a minimum, you need two: one for the star and one for the background. However, many people use a variety of colors to create a scrappy quilt effect.
Can I hand-sew a Friendship Star Quilt?
Absolutely. While a machine is faster, this pattern is very manageable for hand-piecing due to its straight lines and simple geometry. It’s a great project for “slow sewing.”
What is the best way to press the seams?
In quilting, we usually press seams to one side (the darker side) to prevent the “shadowing” of dark fabric under light fabric. In this pattern, nesting the seams makes the rows fit together better.
How do I make my star points look sharp?
The key is to ensure your HSTs are trimmed to the exact size needed and that you sew with a consistent quarter-inch seam. Avoid cutting off the “nose” of the star when joining blocks.
The Friendship Star Quilt Pattern is more than just a sewing project; it is a celebration of geometry, history, and the joy of creating something by hand. Throughout this article, we have explored the anatomy of the star, the essential tools required for success, the step-by-step construction of the blocks, and the many creative ways to make this pattern your own.
By mastering the Half-Square Triangle and focusing on precision, you can create a stunning quilt that will be cherished for years to come. Whether you make it as a gift for a loved one or a cozy addition to your own home, the Friendship Star Quilt Pattern remains a timeless choice that never goes out of style.


