
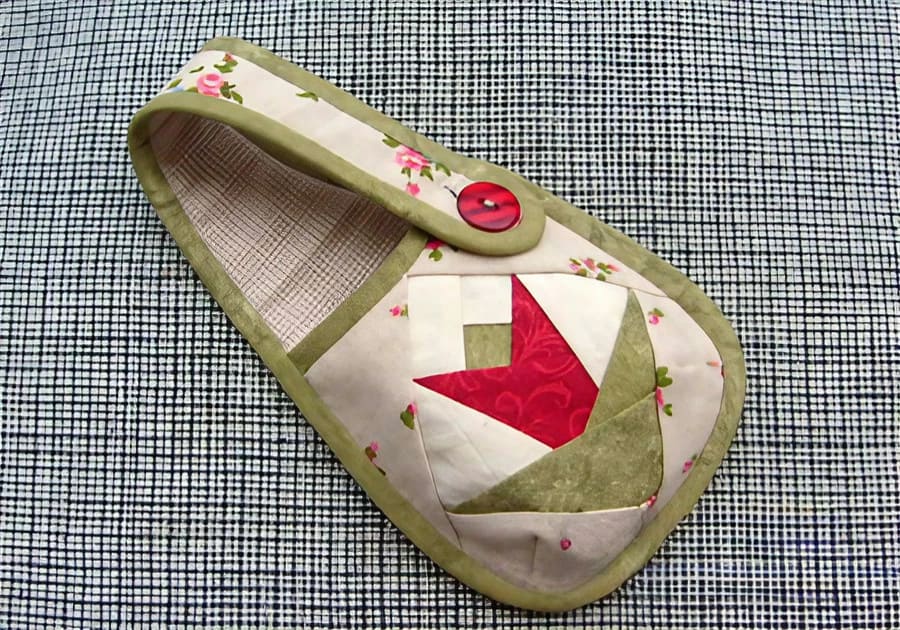
Patchwork Bird Tutorial

Creating a DIY Mini Pouch Bag – Pattern is one of the most rewarding projects for sewing enthusiasts, whether you are a complete beginner or a seasoned pro looking for a quick, satisfying craft. These small but mighty accessories are perfect for organizing coins, earphones, lip balms, or even acting as a sustainable gift wrap for jewelry. In this comprehensive guide, we will walk you through every step of the process, ensuring you have a professional-looking result that combines functionality with personal style.
The beauty of a DIY Mini Pouch Bag – Pattern lies in its versatility and the minimal amount of fabric required, making it an excellent way to use up those beautiful fabric scraps you’ve been hoarding. Beyond being a practical item, these pouches allow you to experiment with different textures, colors, and closures without the commitment of a large-scale project. By the end of this article, you will understand the technical aspects of construction and the creative possibilities that come with mastering this specific sewing pattern.
To ensure your success, we have optimized this tutorial to cover everything from material selection to the final finishing touches. We will focus on the DIY Mini Pouch Bag – Pattern as our central theme, explaining how to scale it, choose the right interfacing, and master the zipper installation. Our goal is to provide you with a high-quality, humanized guide that feels like a masterclass in miniature bag making, keeping SEO best practices in mind so other crafters can find this valuable resource easily.
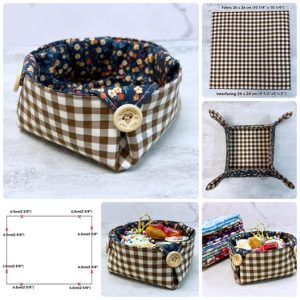
The foundation of any successful sewing project is a well-drafted DIY Mini Pouch Bag – Pattern. This term refers to the template or blueprint used to cut your fabric pieces to the exact dimensions needed for assembly. A good pouch pattern includes seam allowances, which are the distances between the edge of the fabric and the stitching line, usually measured at 1/4 inch for small items.
When you look for a DIY Mini Pouch Bag – Pattern, you are essentially looking for a design that balances aesthetics with ease of construction. Most mini pouches use a rectangular or semi-circular shape, which is easy to handle on a standard sewing machine. The pattern pieces usually consist of an outer fabric, a lining fabric, and sometimes a layer of fusible fleece to provide structure and protection for the contents.
The term DIY Mini Pouch Bag – Pattern also encompasses the creative freedom to modify sizes. While a standard “mini” size might be 4×5 inches, you can easily scale the digital pattern to fit specific needs, such as a smartphone or a small notebook. Understanding how the pieces fit together—the exterior, the interior, and the closure—is the first step toward becoming a confident bag maker.
Choosing the right fabric weight is crucial when working with this specific sewing pattern. Since the bag is small, stiff fabrics like heavy canvas can be difficult to turn right-side out, while very thin fabrics might look flimsy. We recommend a high-quality quilting cotton paired with a light interfacing to give the DIY Mini Pouch Bag – Pattern a professional, crisp finish that holds its shape over time.
Another key aspect of the DIY Mini Pouch Bag – Pattern is the inclusion of “boxing corners.” This technique adds depth to your pouch, allowing it to stand upright rather than lying flat. If your pattern includes these marks, you will sew across the corners to create a gusset. This small detail transforms a simple flat envelope into a sophisticated 3D mini bag that looks store-bought.
Finally, always remember that a DIY Mini Pouch Bag – Pattern is a starting point for your imagination. You can add “D-rings” for a wristlet strap, use contrasting bias tape for the edges, or even incorporate embroidery. By mastering the basic pouch template, you unlock the ability to create endless variations of this essential accessory, making it a staple in your DIY sewing repertoire.
To bring your DIY Mini Pouch Bag – Pattern to life, you need the right tools in your sewing kit. The most important “term” here is notions, which refers to all the small accessories used in sewing, such as thread, zippers, buttons, and snaps. For a mini pouch, a nylon coil zipper is often preferred over metal because it is easier to sew over and can be trimmed to size without damaging your needles.
High-quality thread is another non-negotiable element. When working on a DIY Mini Pouch Bag – Pattern, use an all-purpose polyester thread that matches or complements your fabric. Using a walking foot on your sewing machine can also be incredibly helpful, especially if you are sewing through multiple layers of fabric and padding, as it helps feed the layers evenly through the machine.
The fabric you choose for your DIY Mini Pouch Bag – Pattern should reflect its intended use. If you are making a coin purse, a durable cotton twill is ideal. For a luxury feel, consider velvet or satin, though these require more pins and a slower sewing speed. Regardless of the fabric, always pre-wash it to prevent shrinking after your handmade pouch is completed.
Interfacing is the secret ingredient that gives your DIY Mini Pouch Bag – Pattern its professional “body.” This is a non-woven material that you iron onto the back of your fabric. For mini pouches, a medium-weight fusible interface works best. It provides enough stiffness so the bag doesn’t collapse, but it’s thin enough to keep the seam bulk manageable during the assembly process.
Precision is key, so tools like a rotary cutter, an acrylic ruler, and a self-healing cutting mat are highly recommended for cutting out your DIY Mini Pouch Bag – Pattern. Unlike scissors, a rotary cutter provides perfectly straight edges, which is vital when you are working with small dimensions. Small wonder clips are also better than pins for holding the layers together, as they won’t leave holes in delicate fabrics.
Lastly, don’t forget the iron. Pressing is perhaps the most overlooked step in following a DIY Mini Pouch Bag – Pattern. Every time you sew a seam, you should press it open or to the side. This “sets” the stitches and ensures that your mini pouch has sharp, clean lines. A well-pressed project is the hallmark of a skilled DIY crafter and elevates the entire look of the finished bag.
The most intimidating part of a DIY Mini Pouch Bag – Pattern for many is the zipper installation. However, it is much simpler than it looks. The “sandwich method” is the gold standard: you place the zipper face down on the outer fabric, then place the lining fabric face down on top of the zipper. By sewing along this edge with a zipper foot, you securely attach both layers and the closure in one go.
Once the first side is attached, you repeat the process for the other side of the DIY Mini Pouch Bag – Pattern. It is vital to ensure that your fabric pieces are perfectly aligned so the pouch doesn’t come out lopsided. This step requires patience and perhaps a few tailor’s pins to keep everything in place. Once both sides are sewn, you “topstitch” the fabric away from the zipper teeth to prevent snags.
The next phase of the DIY Mini Pouch Bag – Pattern involves sewing the perimeter. A crucial tip is to leave the zipper at least halfway open before sewing the sides. If you sew it shut, you won’t be able to turn the bag right-side out! You will sew all the way around the outer fabrics and the lining fabrics, leaving a small turning gap in the bottom of the lining.
Dealing with seam allowance is especially important in small-scale projects like a DIY Mini Pouch Bag – Pattern. Because the bag is tiny, excess fabric inside can create lumps. Trimming the corners and reducing the bulk near the zipper ends will help the pouch lay flat. Use pinking shears if you have them, as they help prevent the raw edges of the fabric from fraying inside the lining.
The “turning” process is where the magic happens. You reach through the gap in the lining, grab the outer fabric, and pull the entire DIY Mini Pouch Bag – Pattern through. Use a point turner or a blunt chopstick to gently push out the corners. Seeing your flat pieces of fabric suddenly transform into a functional miniature bag is the most satisfying part of the entire DIY project.
Finally, you must close the opening in the lining. You can do this with a ladder stitch (an invisible hand stitch) or simply topstitch it closed with your machine. Tucking the lining into the outer shell and giving the whole DIY Mini Pouch Bag – Pattern a final steam press will make it look professional. Your handmade mini pouch is now ready to be used or gifted!
Once you have mastered the basic DIY Mini Pouch Bag – Pattern, you can start exploring advanced customizations. Adding a wristlet strap or a “lobster claw” clasp allows you to attach the pouch to your keys or a larger bag. To do this, simply insert a small loop of fabric or ribbon (with the hardware attached) into the side seam before you sew the bag together.
Color blocking is another great way to enhance the DIY Mini Pouch Bag – Pattern. Instead of using a single piece of fabric for the exterior, you can sew two different fabrics together to create a unique look. This is perfect for using scraps and adding a modern, geometric aesthetic to your sewing projects. Just remember to add extra seam allowances where the fabrics join.
If you find that your DIY Mini Pouch Bag – Pattern feels too soft, you might need to reconsider your interfacing. Some crafters prefer using H630 volume fleece for a padded feel, which is excellent if you plan to use the pouch for fragile items like jewelry or small electronics. Experimenting with different stabilizers is a key part of the DIY learning process.
Troubleshooting common issues is part of the journey. If your zipper is “wavy” after sewing, it usually means the fabric was stretched during the process. To fix this, use wash-away quilting tape to hold the zipper in place instead of pins. This keeps the DIY Mini Pouch Bag – Pattern stable and ensures the zipper lies perfectly flat against the fabric.
For those looking to sell their creations, adding a personalized label can make your DIY Mini Pouch Bag – Pattern stand out. Whether it’s a woven “Handmade” tag or a custom brand label, placing it in the side seam during assembly adds a touch of professionalism. Small details like a decorative zipper pull or a charm can also increase the perceived value of your crafted items.
Lastly, don’t be afraid to make mistakes. Every “ruined” DIY Mini Pouch Bag – Pattern is actually a lesson in construction. Whether it’s a wonky seam or a misplaced zipper, these errors help you understand the geometry of sewing. Keep practicing, and soon you’ll be able to whip up a dozen of these mini pouches in a single afternoon, perfect for craft fairs or holiday gifts.
1. What is the best fabric for a DIY Mini Pouch Bag – Pattern? The most beginner-friendly fabric is 100% quilting cotton. It is easy to cut, doesn’t slip while sewing, and takes an iron well. For a more durable pouch, you can use canvas or denim, but ensure your sewing machine can handle the thickness.
2. Can I make this pouch without a sewing machine? Yes! While a machine is faster, you can sew a DIY Mini Pouch Bag – Pattern by hand using a strong backstitch. It will take more time, but the result can be just as beautiful and durable if your stitches are small and consistent.
3. How do I clean my handmade mini pouch? Most cotton pouches are machine washable. However, to preserve the life of the interfacing and the zipper, it is best to hand wash them in cold water and air dry. Always give it a quick press with an iron after drying to restore its shape.
4. What size zipper do I need for a mini pouch? It is always better to use a zipper that is longer than the width of your DIY Mini Pouch Bag – Pattern. You can easily cut off the excess nylon teeth. A 7-inch or 8-inch zipper is usually perfect for most “mini” designs, as it gives you plenty of room to work.
5. Why is my pouch lining baggy? This usually happens if the lining is exactly the same size as the outer fabric. To get a “snug” fit, many experts suggest cutting the lining pieces about 1/8 inch smaller than the exterior pieces of your DIY Mini Pouch Bag – Pattern.
6. Can I add a waterproof lining? Absolutely! Using laminated cotton or PUL fabric for the lining is a great idea if you plan to use the pouch for makeup or toiletries. Just be careful not to iron these fabrics directly, as they can melt; use a pressing cloth instead.
In this guide, we have explored the intricate yet accessible world of the DIY Mini Pouch Bag – Pattern. We covered everything from understanding the initial sewing template, selecting the right notions and interfacing, to the final steps of zipper installation and troubleshooting. This project is a fantastic way to sharpen your sewing skills while creating something genuinely useful and stylish.
Mastering the DIY Mini Pouch Bag – Pattern opens up a world of gift-giving and organizational possibilities. Whether you are making them for yourself, your friends, or even to start a small business, the techniques learned here—like handling seam allowances and topstitching—are fundamental skills that apply to almost all bag-making projects.


