
Crochet Flower - Tutorial

Learning How To Change Colors in Crochet – Pattern is a transformative skill that allows any crafter to move beyond monochrome designs and start creating vibrant, professional-looking projects. Whether you are working on a simple striped scarf or a complex tapestry blanket, knowing exactly when and how to introduce a new strand of yarn ensures that your transitions are seamless and your work remains structurally sound. This guide is designed to take you through the nuances of color work, helping you master the visual flow of your stitches without leaving behind messy knots or visible gaps.
The beauty of mastering How To Change Colors in Crochet – Pattern lies in the endless creative possibilities it unlocks for your handmade wardrobe and home decor. Color changes are not just about aesthetics; they are about precision and timing, specifically understanding the anatomy of a crochet stitch to know exactly when to pull the new loop through. By following a structured crochet pattern, you can plan your palette in advance and use these techniques to ensure that every color block or stripe looks intentional and high-end, rather than an afterthought.
In the following sections, we will break down the technical aspects of this process, providing a comprehensive look at How To Change Colors in Crochet – Pattern for various stitch types and project styles. We will discuss the importance of yarn management, how to handle weaving in ends, and the best ways to maintain stitch tension while switching between different fibers. This article is your ultimate resource for elevating your craft, written with a focus on clarity and helpfulness to ensure your next colorful project is a resounding success in the world of DIY fiber arts.
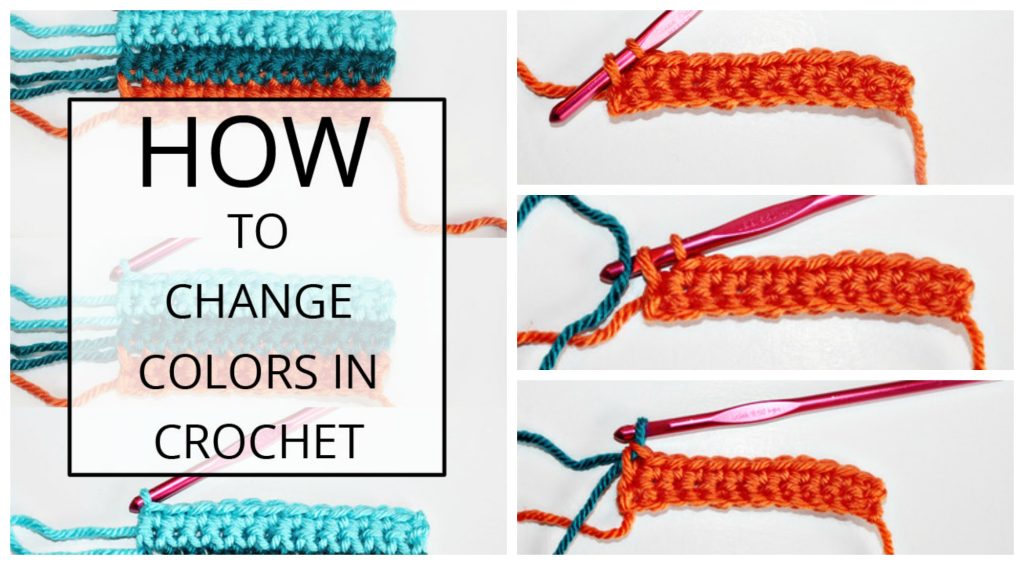
The most critical rule when learning How To Change Colors in Crochet – Pattern is that the color change must happen during the final pull-through of the stitch before the new color starts. If you wait until you have completed the stitch to join the new yarn, your color transition will appear shifted and uneven. This “pre-emptive” change is what creates a clean vertical line between colors, which is essential for any graphgan or striped crochet pattern.
To execute this, you begin your stitch with Color A as usual, but when you reach the final step—where you have two or more loops on your hook—you drop Color A. You then pick up Color B, create a slip knot or a simple loop, and pull it through the remaining loops on your hook to complete the stitch. This ensures the “feet” of the stitch are in the old color, while the “head” or the top loop is ready for the next stitch in the new color, making the How To Change Colors in Crochet – Pattern look flawless.
When working with a crochet pattern that requires frequent changes, such as fair isle or tapestry crochet, this technique becomes second nature. It is important to leave a tail of at least six inches for both the old and new yarn colors. This length provides enough material to securely weave in ends later, preventing your hard work from unraveling after a few washes. Using a yarn needle to hide these tails within the stitches of the same color is a hallmark of a professional finish.
Another key aspect of How To Change Colors in Crochet – Pattern is managing your yarn tension during the switch. Beginners often pull the new yarn too tightly, which can cause the fabric to pucker or the stitch to look smaller than the others. Conversely, leaving it too loose creates unsightly gaps. Finding a “sweet spot” where the new yarn sits snugly against the old stitch is vital for maintaining the gauge of your project, especially in fitted items like sweaters or hats.
The type of stitch you are using also dictates how you apply the How To Change Colors in Crochet – Pattern. For a single crochet, you change on the final “yarn over pull through two.” For a double crochet, you do it on the final “yarn over pull through two” after the initial steps of the stitch are done. Understanding this logic allows you to adapt the color change technique to any advanced stitch, from popcorn stitches to cables, without needing a separate tutorial for each.
Finally, practicing How To Change Colors in Crochet – Pattern on a small swatch is highly recommended before starting a large-scale project. This allows you to get comfortable with the physical movement of dropping and picking up yarn without the pressure of ruining a complex piece. As you gain confidence, you will find that your speed increases and your transitions become so smooth they are nearly invisible, which is the ultimate goal for any serious crochet enthusiast.
When your How To Change Colors in Crochet – Pattern involves alternating colors every few stitches, you have a choice: cut the yarn every time or “carry” it along. Carrying yarn, often called tapestry crochet, involves laying the unused strand across the tops of the stitches of the previous row and crocheting over it with the active color. This keeps the yarn available exactly where you need it next, eliminating the need to cut and tie a hundred different ends.
However, carrying yarn requires a bit of finesse to ensure the hidden color doesn’t “peek through” the active stitches. This is particularly challenging when using high-contrast colors like black and white. To minimize this, you should maintain a consistent tension on the carried yarn, pulling it slightly to keep it straight but not so much that it gathers the fabric. This method makes the How To Change Colors in Crochet – Pattern much more efficient for dense, multicolored designs.
If you are working on a project where colors change only at the end of rows, you can “carry the yarn up the side.” Instead of cutting the yarn at the end of a stripe, you leave it hanging at the edge and pick it back up when you return to that side two rows later. This technique for How To Change Colors in Crochet – Pattern is perfect for blankets or scarves with consistent striping, as it keeps the edges tidy and drastically reduces the amount of finishing work required.
For more complex motifs, such as those found in an intarsia crochet pattern, you might use separate small balls of yarn called bobbins. Instead of carrying the yarn across the entire row, you only use a specific color in a specific section. This prevents the fabric from becoming too thick or stiff, which can happen if you carry too many strands at once. Using bobbins is a sophisticated way to handle How To Change Colors in Crochet – Pattern for large, non-repeating images.
Organization is paramount when dealing with multiple strands. Yarn tangles are the biggest enemy of a smooth How To Change Colors in Crochet – Pattern experience. Many crafters use yarn bowls or even simple binder clips on the edge of a bag to keep the different strands separated. As you turn your work at the end of a row, always turn in the opposite direction of the previous row to “untwist” the strands naturally, keeping your workspace clear and your mind focused on the stitches.
Ultimately, the choice between cutting, carrying, or using bobbins depends on the specific requirements of your crochet pattern and the desired drape of the finished item. A carried yarn will result in a thicker, sturdier fabric, while cutting and weaving ends will keep the fabric light and flexible. Understanding these trade-offs is a vital part of mastering How To Change Colors in Crochet – Pattern and will help you make informed decisions for every unique project you undertake.
The job isn’t finished until the ends are tucked away, and this is especially true when you have used a How To Change Colors in Crochet – Pattern. Weaving in ends is often the least favorite task for crafters, but it is the most important for the longevity of the garment. To secure your color changes, use a tapestry needle to weave the yarn tail through the “meat” of the stitches in the same color block, going back and forth in three different directions to lock it in place.
One common mistake when finishing a How To Change Colors in Crochet – Pattern is cutting the tails too short before weaving. A short tail is difficult to thread onto a needle and even harder to secure properly. Aim for at least 6 inches of yarn. If you are worried about the ends popping out over time, you can split the yarn plies and tie them around a stitch post before weaving the rest in, providing an extra layer of security for your handmade crochet items.
In some cases, you can “crochet over” your tails as you go to save time. While this is a popular shortcut for How To Change Colors in Crochet – Pattern, be careful with slippery yarns like silk or bamboo, as the ends can easily slide out. For wool or cotton, which have more “grip,” crocheting over the tails for about 3-4 inches is usually sufficient, though a quick stitch with a needle at the very end is still the safest method for pieces that will be frequently laundered.
If your How To Change Colors in Crochet – Pattern resulted in a slightly loose stitch at the transition point, you can fix this during the weaving stage. Simply use the yarn tail to “duplicate” the path of the stitch, tightening the loop as you go. This hidden repair technique ensures that your color changes look perfectly uniform across the entire surface of the fabric, hiding any minor tension issues that occurred during the active crocheting process.
For projects with a “wrong side” and a “right side,” such as a sweater, always make sure your knots (if you use them) and yarn tails are hidden on the wrong side. When performing a How To Change Colors in Crochet – Pattern, try to keep all the transitions on the same side of the work to maintain a clean, professional aesthetic on the exterior. This attention to detail is what separates a beginner project from a boutique-quality piece of fiber art.
Finally, once all ends are woven in, give your project a good blocking. Wet blocking or steam blocking helps the fibers settle into their new positions and evens out any slight irregularities in the How To Change Colors in Crochet – Pattern. It allows the different colors to “bloom” and bond together, creating a cohesive and beautiful fabric that showcases your skill in color theory and technical execution.
Even with a perfect How To Change Colors in Crochet – Pattern, you might encounter issues like “jogging” when working in the round. This happens because crochet is worked in a spiral, causing the start and end of a color round to not quite meet up. To solve this, you can use the “invisible join” technique or a “slanted color change” to make the transition less noticeable. This is essential for creating professional amigurumi or circular blankets.
Another challenge in How To Change Colors in Crochet – Pattern is dealing with different yarn weights. If you decide to change colors using a yarn that is slightly thinner or thicker than the previous one, your stitch height will change, leading to a distorted shape. Always try to match the yarn weight and fiber content within a single project, or adjust your hook size accordingly to maintain a consistent density throughout your pattern.
If you notice a “stair-step” effect in your color transitions, it usually means the How To Change Colors in Crochet – Pattern was executed one stitch too late or too early. Check your work every few rows to ensure the pattern is lining up correctly. Using stitch markers at the beginning of color blocks can help you stay on track, especially in complex designs where a single misplaced stitch can throw off the entire visual alignment.
For those looking to push boundaries, try the planned color pooling technique. This advanced version of How To Change Colors in Crochet – Pattern uses variegated yarn to create intentional argyle or plaid patterns. It requires a deep understanding of tension and stitch count, but the result is a stunning, mathematically precise design that looks like it was made with dozens of different yarn balls when it was actually just one.
Don’t be afraid to experiment with unconventional materials too. You can apply the How To Change Colors in Crochet – Pattern logic to t-shirt yarn, wire, or even plastic bags (plarn). Each material reacts differently to tension and joining, but the core principle—changing the color on the final pull-through of the previous stitch—remains the universal key to success in any medium.
Finally, remember that color work is a journey. Your first attempt at How To Change Colors in Crochet – Pattern might not be perfect, and that is okay. Every project is an opportunity to refine your hand movements and your “eye” for color. By consistently applying these professional techniques, you will soon find that you can pick up any complex crochet pattern and execute it with total confidence and artistic flair.
1. When exactly should I change the color in a crochet stitch?
You should always introduce the new color during the final yarn over of the last stitch of the old color. This ensures that the loop sitting on your hook is already the new color when you begin the next stitch, resulting in a clean line.
2. How do I prevent knots from forming when changing colors?
Avoid tying knots whenever possible, as they can come undone or create lumps. Instead, use the overlap method or weave in long tails (6+ inches) securely with a tapestry needle. This is the standard professional approach for any How To Change Colors in Crochet – Pattern.
3. Can I change colors in the middle of a row?
Yes! This is very common in tapestry crochet and intarsia. You simply follow the same rule: change to the new color on the final pull-through of the stitch immediately preceding the color change indicated in your crochet pattern.
4. What is “carrying yarn” and when should I use it?
Carrying yarn means crocheting over the unused strand of yarn to bring it along to the next point of use. You should use this when you have frequent color changes (every 1-5 stitches) to avoid having too many ends to weave in at the end of the project.
5. Why does my color change look messy in circular projects?
In circular projects worked in a spiral, the rounds don’t end at the same level. To fix this, use a joined round instead of a spiral, or look up “jogless stripes” techniques to help the colors align more horizontally.
6. Do I need a different hook size for different colors?
Only if the yarns are of different brands or weights. Sometimes, even within the same brand, darker dyes can make the yarn feel slightly thinner. Always check your gauge when switching colors to ensure the fabric remains consistent.
Mastering How To Change Colors in Crochet – Pattern is an essential milestone for any crafter. Throughout this article, we have explored the technical “final pull-through” method, the art of carrying yarn to minimize waste, and the vital importance of securing your ends for a professional finish. We also delved into troubleshooting common issues like “jogging” in the round and tension imbalances, providing you with a complete toolkit to tackle any colorful crochet project with ease.
By applying these techniques, you transform your work from simple hobbyist pieces into intricate works of art. The ability to seamlessly integrate new hues allows you to express your personality and creativity through every loop and stitch. Remember, the secret to a beautiful How To Change Colors in Crochet – Pattern is patience and practice—the more you do it, the more natural and “invisible” your transitions will become.


