
Patchwork Bird Tutorial

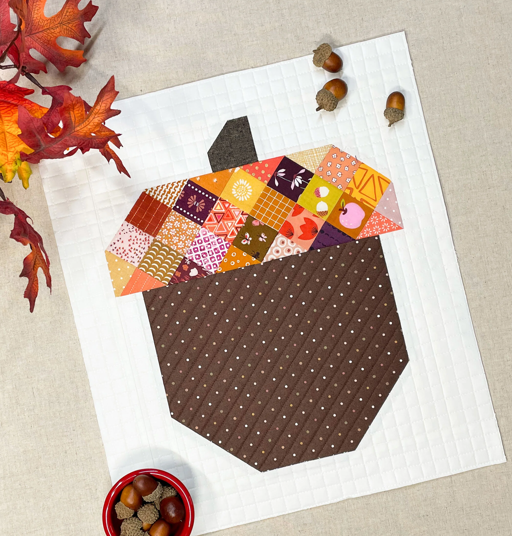
This Scrappy Acorn Quilt Block Tutorial – Pattern is the ultimate way to celebrate the arrival of autumn while simultaneously cleaning out your ever-growing bin of fabric remnants. There is something deeply satisfying about taking small, mismatched pieces of cotton and transforming them into a cohesive, charming symbol of nature. In this guide, we will explore how a few simple geometric shapes can come together to form a delightful acorn, perfect for seasonal runners, cozy throw quilts, or even festive wall hangings.
The beauty of a Scrappy Acorn Quilt Block Tutorial – Pattern lies in its inherent imperfection; the more varied your fabrics, the more character your finished block will possess. We often hold onto tiny scraps of “precious” fabric that are too small for a full garment but too beautiful to throw away, and this specific quilt pattern is designed to give those pieces a starring role. By mixing textures, tones, and prints, you create a rustic, “scrappy” look that evokes the forest floor in October.
Throughout this comprehensive Scrappy Acorn Quilt Block Tutorial – Pattern, we will focus on the technical precision required to keep your corners sharp and your seams flat, ensuring your DIY quilt block looks professional. We have structured this lesson to be accessible for beginners while offering enough creative depth to engage experienced quilters. Get your cutting mat ready and your iron hot, as we dive into the delightful world of autumn-themed patchwork and scrap-friendly sewing.
The first step in any Scrappy Acorn Quilt Block Tutorial – Pattern is the selection and preparation of your fabric “pull.” For a truly scrappy look, you will want to gather various shades of brown, tan, gold, and even deep oranges for the nut and the cap. The term fabric pull refers to the process of auditing your stash to find colors that coordinate without being identical, which adds visual “vibration” and interest to the finished quilt block.
In this Scrappy Acorn Quilt Block Tutorial – Pattern, we categorize our pieces into three main sections: the cap, the nut, and the background. The background should ideally be a neutral, low-volume fabric—something like a cream or light grey—to allow the acorn to pop. Using a low-volume print means the fabric has a subtle design that appears almost solid from a distance, providing a quiet stage for your colorful acorn to shine.
Precision is your best friend when following a Scrappy Acorn Quilt Block Tutorial – Pattern, so ensure you have a sharp rotary cutter and a non-slip acrylic ruler. You will be cutting several small squares and rectangles, and even a 1/8-inch error can cause the block to become wonky. We recommend using a quarter-inch seam foot on your sewing machine to maintain a consistent seam allowance throughout the entire assembly process.
Before you sew a single stitch of your Scrappy Acorn Quilt Block Tutorial – Pattern, it is highly beneficial to starch your fabrics. Fabric starch or a sizing spray adds stiffness to the cotton, which prevents the edges from fraying or stretching as you handle them. Since this pattern involves “snowballing” corners—a technique we will discuss later—having stable, non-stretchy fabric is crucial for achieving those perfect 45-degree angles.
Another essential tool for this Scrappy Acorn Quilt Block Tutorial – Pattern is a high-quality cotton thread. Choose a neutral color like tan or grey that will blend into both the dark acorn fabrics and the light background fabric. Using a 50-weight thread is ideal because it is strong but thin, which helps reduce bulk at the seam intersections, allowing your quilt block to lay perfectly flat once it is pressed.
Lastly, consider the “story” your Scrappy Acorn Quilt Block Tutorial – Pattern tells. Maybe the cap is made from an old flannel shirt and the nut from leftover quilting cotton. This mix of histories is what makes scrappy quilting so sentimental and unique. Once you have your pieces cut to size according to the pattern measurements, organize them into small piles to streamline the sewing phase and prevent any mix-ups.
The core of the Scrappy Acorn Quilt Block Tutorial – Pattern is the assembly of the two main components: the “nut” (the bottom) and the “cap” (the top). For the nut, you will often use a large rectangle or a series of smaller strips sewn together to create a strip-pieced look. If you are using many tiny scraps, sew them together first to create a “new” piece of fabric, then trim it down to the required dimensions for the acorn body.
To give the nut its rounded shape in this Scrappy Acorn Quilt Block Tutorial – Pattern, we use a technique called stitch-and-flip or “snowballing.” You place a small square of background fabric on the bottom corners of your nut fabric, sew diagonally from corner to corner, and then flip the background piece up. This creates a diagonal seam that effectively “cuts off” the corner of the nut, giving it that classic tapered acorn appearance.
The cap of the Scrappy Acorn Quilt Block Tutorial – Pattern is where you can truly go wild with textures. Many quilters choose a darker, more patterned fabric for the cap to distinguish it from the smoother nut below. The cap is usually wider than the nut, so you will follow a similar snowballing technique on the top corners to round it off, ensuring the acorn doesn’t look like a simple stack of rectangles.
When sewing the sections of your Scrappy Acorn Quilt Block Tutorial – Pattern, always sew with a short stitch length. A setting of about 2.0mm is perfect for patchwork because it makes the seams more secure, which is vital when you start trimming away excess fabric from the corners. Secure seams ensure that the points of your acorn stay intact when the quilt is eventually used and washed.
The “stem” is a tiny but mighty part of the Scrappy Acorn Quilt Block Tutorial – Pattern. This is usually a small square or rectangle placed in the center of the top background strip. It requires careful centering to ensure your acorn looks symmetrical. Some advanced versions of this quilt tutorial might even suggest a slightly tilted stem to give the block a more organic, whimsical feel as if it just fell from an oak tree.
As you finish each section of the Scrappy Acorn Quilt Block Tutorial – Pattern, you must press as you go. This means taking the pieces to the ironing board after every seam. For this specific block, pressing the seams toward the darker fabric (the acorn) is generally recommended to prevent the seam allowance from showing through the light background fabric, a common issue known as shadowing in the quilting world.
The “Stitch-and-Flip” method is a cornerstone of the Scrappy Acorn Quilt Block Tutorial – Pattern because it eliminates the need for difficult set-in seams or templates. To master this, you should draw a light pencil line diagonally on the back of your background squares. This line acts as a path for your needle, ensuring that your diagonal seams are perfectly straight and consistent across all corners of the acorn.
One pro tip for this Scrappy Acorn Quilt Block Tutorial – Pattern is to sew just a hair to the outside of your drawn line (the side closest to the corner). When you flip the fabric over, the “fold” of the fabric takes up a tiny amount of space; by sewing slightly off-center, you ensure the background square perfectly covers the corner of the acorn without making the block smaller than the pattern dimensions.
After sewing and checking that the corner aligns correctly, you will trim the excess fabric about 1/4 inch away from the seam. In this Scrappy Acorn Quilt Block Tutorial – Pattern, don’t throw those tiny triangles away! You can sew them together to make “bonus” half-square triangles (HSTs) for a future project. This commitment to using every bit of fabric is the true spirit of a scrappy quilt project.
If your Scrappy Acorn Quilt Block Tutorial – Pattern involves a lot of these corners, consider using diagonal seam tape on your sewing machine’s bed. This tape provides a long guide line that aligns with your needle, allowing you to sew perfect diagonals without having to draw lines on every single square. This “cheat code” significantly speeds up the construction of multiple acorn blocks.
Consistency in your pressing technique is also vital here. For the stitch-and-flip corners of the Scrappy Acorn Quilt Block Tutorial – Pattern, you can either press the seams open to reduce bulk or press them toward the corner. Most quilters prefer pressing toward the corner to make the block “nest” better if they are joining several acorns together in a row, which prevents lumpy intersections.
The beauty of the stitch-and-flip method in this Scrappy Acorn Quilt Block Tutorial – Pattern is its versatility. Once you understand how to use it to shape an acorn, you can use the same logic to create leaves, pumpkins, or even stars. It is a fundamental quilting skill that simplifies complex-looking designs into manageable, straight-line sewing steps that any beginner can master with a bit of practice.
Now that you have your nut, cap, and stem units ready, it’s time for the final assembly of your Scrappy Acorn Quilt Block Tutorial – Pattern. You will sew the stem unit to the cap unit first, and then attach the cap to the nut. It is helpful to use fine quilting pins to align the center points, ensuring that the stem is perfectly balanced over the body of the acorn for a clean, symmetrical finish.
During this final stage of the Scrappy Acorn Quilt Block Tutorial – Pattern, you must pay close attention to the “points” where the cap meets the nut. You want to avoid “chopping off” the tips of your triangles. To prevent this, make sure your needle passes exactly through the “X” created by the previous seams. This level of detail is what makes a handmade quilt look like a work of art.
Once the block is fully assembled, the most important step is squaring up. Even the best quilters find that their blocks can be slightly off by a fraction of an inch. Use a large square acrylic ruler to trim the edges of your Scrappy Acorn Quilt Block Tutorial – Pattern so that it is perfectly square and matches the size called for in the instructions. This ensures that when you sew multiple blocks together, they will fit like puzzle pieces.
If you find that your block is a bit “wavy” after all the pressing, you can use a bit of flattener spray or a heavy wooden tailor’s clapper. Applying steam and then immediately pressing the clapper onto the block traps the heat and flattens the seams into submission. This results in a crisp, professional Scrappy Acorn Quilt Block Tutorial – Pattern that is a joy to quilt over.
Consider adding a border to your Scrappy Acorn Quilt Block Tutorial – Pattern if you intend to use it as a standalone item, like a potholder or a mug rug. A thin border in a contrasting color can act as a frame, highlighting the “scrappiness” of the acorn itself. This is also a great time to experiment with free-motion quilting by stitching a simple leaf or vine pattern into the background.
Finally, take a moment to admire the variety of fabrics in your completed Scrappy Acorn Quilt Block Tutorial – Pattern. The mix of prints and colors tells a story of your past projects and your love for the craft. Whether you make one block or fifty, the techniques learned here will serve as a foundation for many more seasonal sewing adventures in the years to come.
1. Can I use this Scrappy Acorn Quilt Block Tutorial – Pattern for a full-sized quilt?
Absolutely! You can make dozens of these blocks and alternate them with plain squares or leaf blocks to create a stunning autumn-themed quilt. Just ensure all your blocks are squared up to the same size for a consistent look.
2. What is the best size for the scraps in this pattern?
Since this is a Scrappy Acorn Quilt Block Tutorial – Pattern, you can use anything from 1.5-inch strips to 5-inch squares. The pattern usually provides specific cutting sizes, but “crumb piecing” smaller scraps together first is a great way to use even the tiniest bits.
3. Do I have to use brown for the acorn?
Not at all! While brown is traditional, many modern quilters use “fantasy” colors like teal, pink, or purple. The Scrappy Acorn Quilt Block Tutorial – Pattern works with any color palette as long as there is enough contrast between the acorn and the background.
4. My corners are not sharp; what am I doing wrong?
This usually happens due to inaccurate seam allowances. Ensure you are using a true 1/4 inch seam. Also, try “pinning for precision” by sticking a pin directly through the point where the seams meet before you sew.
5. How do I make the acorn block larger or smaller?
To scale a Scrappy Acorn Quilt Block Tutorial – Pattern, you can use a percentage-based approach or a mathematical grid. However, for beginners, it is easiest to follow a pattern specifically written for the size you want (e.g., 6-inch, 12-inch, or 18-inch blocks).
6. Is this pattern suitable for beginners?
Yes, this is a very beginner-friendly project! Because it uses straight seams and the simple stitch-and-flip technique, it is an excellent way for new quilters to practice their accuracy without feeling overwhelmed by complex curves or paper piecing.
In this Scrappy Acorn Quilt Block Tutorial – Pattern, we have journeyed from the initial fabric pull to the final, satisfying press of a completed block. We learned how to select a balanced scrap palette, how to use the stitch-and-flip method to create organic shapes, and the importance of squaring up for a professional finish. This project is more than just a way to use up fabric; it’s a celebration of color, texture, and the cozy spirit of the harvest season.
By mastering the techniques within this Scrappy Acorn Quilt Block Tutorial – Pattern, you’ve added a versatile tool to your quilting repertoire. These blocks are incredibly adaptable and can be used in everything from small home decor items to large-scale heirloom quilts. The “scrappy” nature of the design ensures that no two acorns will ever be the same, making each of your creations a one-of-a-kind masterpiece.


