
Patchwork Bird Tutorial

This Rainbow Seminole Patchwork Tutorial – Pattern offers a vibrant and culturally rich way to elevate your quilting projects, blending a traditional Native American technique with the joyful spectrum of modern color palettes. Seminole patchwork is a unique “strip-piecing” method that originated with the Seminole people of Florida, who developed this efficient yet intricate way to create decorative bands for clothing without the need for small, individual templates. By applying a rainbow theme to this historical craft, you can create stunning, rhythmic designs that look incredibly complex but are actually achieved through a series of logical, repetitive steps that any dedicated maker can master.
Engaging with a Rainbow Seminole Patchwork Tutorial – Pattern is not just about learning a new sewing skill; it is about exploring a mathematical approach to textile art where fabric strips are sewn, cut, and then shifted to create geometric magic. The “rainbow” aspect adds a contemporary layer of energy to the work, making it perfect for borders on baby quilts, decorative table runners, or even striking accents on handmade garments and tote bags. Whether you are a fan of traditional history or modern “color-wash” aesthetics, this specific patchwork style provides a versatile canvas for your creativity, allowing you to “paint” with fabric in a structured and professional manner.
As we delve into this comprehensive Rainbow Seminole Patchwork Tutorial – Pattern, you will discover that the secret to success lies in the precision of your cutting and the consistency of your seam allowance. Unlike block-based quilting, Seminole work relies on the “stair-step” alignment of strips, which means that even a small error can ripple through the entire design. In the following guide, we will break down the foundational steps, provide expert tips on fabric selection for maximum rainbow impact, and show you how to finish your work with the crispness of a boutique heirloom, ensuring your patchwork patterns are both durable and breathtakingly beautiful.
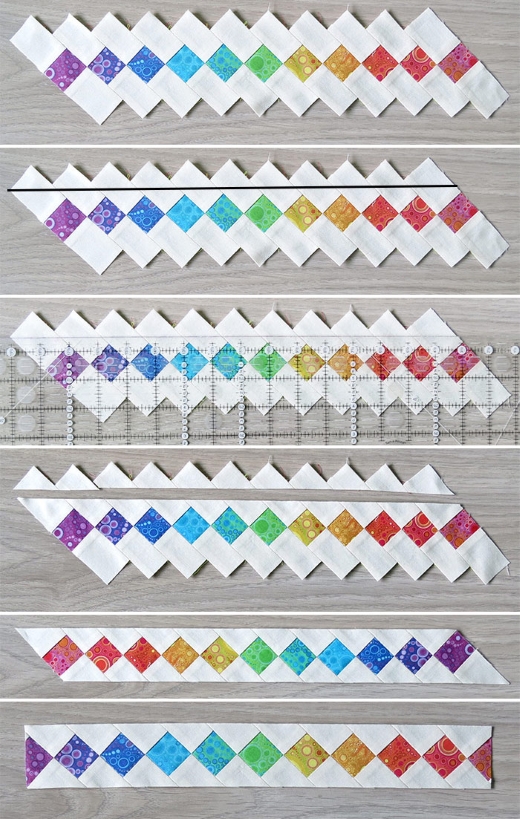
The core principle of the Rainbow Seminole Patchwork Tutorial – Pattern is the creation of a “strip set.” You begin by sewing long, horizontal bands of fabric together in a specific color order—in this case, the classic red, orange, yellow, green, blue, and violet. This initial assembly acts as your “base fabric,” which will later be transformed into the geometric diamonds or zig-zags that characterize the Seminole style. It is essential to use high-quality quilting cotton for this project, as the fabric needs to hold its shape during multiple rounds of cutting and re-stitching.
In this Rainbow Seminole Patchwork Tutorial – Pattern, your seam allowance is your best friend or your worst enemy. Most quilters use a strict 1/4-inch seam, but for Seminole work, many professionals prefer a “scant 1/4-inch” to account for the fold of the fabric when pressing. Consistency across all seams in your rainbow strip set is vital; if one color band is even slightly wider than the others, the points of your diamonds will not align correctly in the final stage, leading to a distorted pattern that loses its geometric appeal.
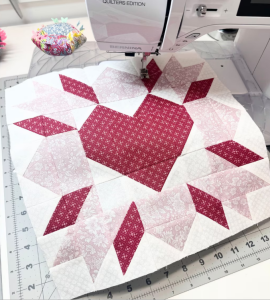
Once your rainbow strips are joined, the next phase of the Rainbow Seminole Patchwork Tutorial – Pattern involves “cross-cutting.” You will rotate your strip set and cut it into new, vertical segments at a specific angle—most commonly 45 or 90 degrees. These new segments are then shifted up or down by a specific increment before being sewn back together. This shifting is what creates the “staircase” effect that eventually forms the iconic Seminole diamond motifs or the energetic zig-zag borders seen in traditional Florida folk art.
Choosing the right “accent” or “background” fabric is a critical decision in the Rainbow Seminole Patchwork Tutorial – Pattern. Traditionally, Seminole makers used solid black or white to separate the colorful bands, which provides a high-contrast frame that makes the rainbow colors “pop.” For a modern twist, you could use a dark navy or even a metallic silver fabric to act as the “void” between your rainbow segments, giving the project a more contemporary, sophisticated feel that suits modern interior decor.
Precision pressing is a technical requirement for any Rainbow Seminole Patchwork Tutorial – Pattern. You should always press your seams to one side—usually toward the darker fabric—to avoid “shadowing.” In Seminole work, many crafters alternate the direction of the seams between rows, a technique known as “nesting seams.” This allows the intersections to lock together perfectly, reducing bulk and ensuring that the finished patchwork strip lies perfectly flat on your cutting mat or ironing board.
Finally, the Rainbow Seminole Patchwork Tutorial – Pattern is highly scalable. You can make the strips as wide or as narrow as you like. Narrower strips result in delicate, jewelry-like bands of color, while wider strips create bold, graphic statements. Understanding this flexibility allows you to customize the pattern for everything from a delicate headband to a massive quilt border. As you practice the basic “shift and sew” method, you will find that the possibilities for custom patchwork designs are virtually infinite.
When following a Rainbow Seminole Patchwork Tutorial – Pattern, the “flow” of your colors is what determines the visual success of the piece. To achieve a true “rainbow” look, you need to ensure there is a logical transition between hues. Using “tints” (colors mixed with white) or “shades” (colors mixed with black) can add depth to the work. For example, instead of just a basic green, you might use a lime green next to a forest green to create a gradient effect that feels more organic and professional.
Contrast is another vital element in the Rainbow Seminole Patchwork Tutorial – Pattern. If your colors are too similar in “value” (how light or dark they are), the geometric pattern can get lost, resulting in a “muddy” appearance. A good trick for checking your color values is to take a black-and-white photo of your fabric choices with your phone. If the fabrics all look like the same shade of gray in the photo, your patchwork design will lack the definition needed to make the Seminole shapes stand out.
Pre-washing your fabrics is highly recommended for the Rainbow Seminole Patchwork Tutorial – Pattern, especially when working with reds and purples. These saturated colors are prone to “bleeding” into lighter background fabrics like white or cream. Since this technique involves sewing many small pieces together, a single color run can ruin the entire project. Using a color catcher in the wash or pre-treating with a dye fixative ensures that your rainbow stays crisp and contained within its geometric boundaries.
The “texture” of the fabric can also play a role in your Rainbow Seminole Patchwork Tutorial – Pattern. While most beginners should stick to standard flat cottons, more advanced makers might experiment with subtle tone-on-tone prints or “batiks.” Batiks are particularly beautiful for rainbow designs because their hand-dyed nature mimics the shifting colors of light. However, avoid large, busy prints, as they can distract the eye from the sharp, clean lines that are the hallmark of the Seminole patchwork technique.
Quantity and “grain” of the fabric are technical considerations often missed in a basic Rainbow Seminole Patchwork Tutorial – Pattern. Because you are cutting strips on the “cross-grain” and often at an angle, you will have more fabric waste than in a standard block quilt. Always buy about 25% more fabric than you think you need. Furthermore, working with the “straight of grain” ensures that your long strips don’t stretch or “bow” while you are sewing them, which is crucial for maintaining geometric alignment.
Lastly, consider the “story” your colors tell. A Rainbow Seminole Patchwork Tutorial – Pattern doesn’t always have to use the standard “ROYGBIV” sequence. You could do a “Sunset Rainbow” using pinks, oranges, and deep purples, or a “Tropical Rainbow” with teals, limes, and yellows. The Seminole method is simply the “vessel” for your color expression. By thinking like an artist during the fabric selection phase, you ensure that your hand-stitched project reflects your unique personality and style.
The first practical step in your Rainbow Seminole Patchwork Tutorial – Pattern is to sew your horizontal strips. Aim for a length of at least 20 to 40 inches to give yourself enough material to work with. Use a “walking foot” on your sewing machine if you have one; this ensures that the top and bottom layers of fabric move at the same speed, preventing the “shifting” that can occur over long distances. A consistent stitch length (around 2.0 to 2.5) provides the strength needed for the subsequent cutting.
Once the strip set is pressed, you will perform the “magic cut” of the Rainbow Seminole Patchwork Tutorial – Pattern. Using a rotary cutter and a long quilting ruler, you will cut the strip set into vertical segments. If you want a “zig-zag” pattern, you cut them into rectangles (90 degrees). If you want “diamonds,” you must cut them at a 45-degree angle. This is the most nerve-wracking part for beginners, but remember the old quilter’s adage: “measure twice, cut once” to ensure your precision patchwork is perfect.
The next phase of the Rainbow Seminole Patchwork Tutorial – Pattern is the “stair-step” alignment. Lay your cut segments out on your workspace and shift each one up by exactly one color band. For example, the “red” band of segment two should align with the “orange” band of segment one. Pinning at every intersection is mandatory here. This “pinning for perfection” ensures that when you sew the segments together, the points of the colors meet exactly, creating a seamless rainbow transition.
When sewing the shifted segments together in your Rainbow Seminole Patchwork Tutorial – Pattern, work in pairs. Sew segment one to segment two, then segment three to segment four. Joining these smaller units into a long band is much more manageable than trying to sew a 60-inch strip all at once. This “unit construction” method also allows you to check your alignment more frequently, making it easier to correct any minor errors before they become permanent fixtures of your quilt border.
After the segments are joined, your Rainbow Seminole Patchwork Tutorial – Pattern will have “jagged” or “stepped” edges at the top and bottom. To finish the band, you must trim these edges to create a straight line. Use your ruler to find the “lowest common denominator” of the fabric and trim away the excess triangles. While it feels sad to cut away these small scraps, this “squaring up” process is what allows you to integrate the band into a larger quilt top or a garment.
The final construction step is to add “framing strips” to the top and bottom of your finished Rainbow Seminole Patchwork Tutorial – Pattern band. These solid-colored strips act as a border, protecting the delicate “bias” edges of your patchwork and giving the design a finished, professional look. This framing also adds structural stability, ensuring that the band doesn’t stretch or warp when it is sewn into its final home, whether that be a quilted bag or a piece of home decor.
Troubleshooting is a natural part of learning the Rainbow Seminole Patchwork Tutorial – Pattern. If your points aren’t meeting, the most common culprit is “seam creep,” where the fabric stretches as it passes under the presser foot. To fix this, try using a “straight stitch plate” on your machine, which prevents the fabric from being pushed down into the bobbin area. Understanding these technical sewing adjustments will help you achieve the sharp, crisp look that makes Seminole work so impressive to behold.
Another common issue in the Rainbow Seminole Patchwork Tutorial – Pattern is the “curving” of the long finished band. This usually happens if you always sew in the same direction. To prevent this, “alternate your sewing direction”—sew the first pair of segments from top to bottom, and the second pair from bottom to top. This counteracts the natural “pull” of the machine’s feed dogs, resulting in a patchwork strip that is as straight as an arrow.
Once your Rainbow Seminole Patchwork Tutorial – Pattern band is finished, you can explore creative ways to use it. Many makers use these bands as “inserts” in the sleeves of denim jackets or as decorative straps for “yoga mat bags.” Because the pattern is so bold, even a small amount can completely transform a plain item into a custom piece of handcrafted fashion. The durability of the many seams actually makes the fabric quite strong, which is a bonus for items that see daily use.
In terms of “quilting” the finished piece, “stitch-in-the-ditch” is the most popular choice for a Rainbow Seminole Patchwork Tutorial – Pattern. By sewing directly into the seams between the colors, you stabilize the piece without distracting from the geometric design. For a more decorative look, you could use a variegated “rainbow thread” to quilt swirling lines across the band, adding a layer of movement that complements the geometric zig-zags.
For a truly advanced application of the Rainbow Seminole Patchwork Tutorial – Pattern, you can try “double-shifting.” This involves taking a finished Seminole band, cutting it again, and shifting it a second time. This creates “micro-mosaics” of color that look like intricate pixel art. It requires a high level of patience and a very fine-tipped iron for pressing, but the resulting textile masterpiece is often gallery-worthy and a testament to your growth as an artisan.
Ultimately, the Rainbow Seminole Patchwork Tutorial – Pattern is a celebration of history, math, and color. It teaches us that beauty can be built through structure and that the most complex-looking designs are often the result of simple, careful steps. As you integrate these rainbow bands into your life, you are carrying forward a tradition of resourcefulness and artistry. We hope this tutorial empowers you to fill your world with color, one precise patchwork strip at a time.
1. Is the Rainbow Seminole Patchwork Tutorial – Pattern suitable for beginners?
Yes, but it requires patience! If you can sew a straight line and use a rotary cutter, you can do this. Start with a simple 90-degree “shift” before trying the 45-degree “diamond” version to build your confidence in strip piecing.
2. What is the best way to keep my points sharp?
Pinning at every intersection is the secret! Also, using a “scant 1/4-inch” seam allowance ensures that your fabric takes up exactly the right amount of space when folded, which is crucial for Seminole geometry.
3. Do I have to use black as the background color?
Not at all! While black provides the most “pop,” you can use white for a fresh, summery look, or a dark “batik” for a more subtle, textured appearance. The Rainbow Seminole style is very flexible.
4. How do I prevent the fabric from stretching while I sew?
Using a “walking foot” and a light spray of fabric starch before you cut your strips will keep the cotton fibers stiff and manageable, preventing the “bias stretch” that can ruin your alignment.
5. Can I use this pattern to make a full quilt?
Usually, Seminole patchwork is used for “accents” or “borders” rather than a full quilt top, because the many seams make it quite heavy. However, a quilt made of many Seminole bands is a stunning and very durable heirloom!
In this article, we have explored the vibrant world of the Rainbow Seminole Patchwork Tutorial – Pattern, covering the historical foundations of this Native American technique and the modern “rainbow” twist that makes it so popular today.
We discussed the technical importance of precision cutting, consistent seam allowances, and the “stair-step” shifting method that creates the iconic diamond and zig-zag shapes. From fabric selection to final troubleshooting, we’ve provided the tools you need to create professional-grade geometric textiles that are as durable as they are beautiful.


