
Crochet Flower - Tutorial

Finding the perfect Crochet Flower Curtain – Pattern is a wonderful way to breathe new life into your home decor, combining the delicate art of lace-making with a functional design that filters sunlight into a dance of floral shadows. This unique project allows you to transform a standard window into a botanical masterpiece, offering a whimsical and bohemian touch that store-bought curtains simply cannot replicate. Whether you are looking to create a full-length privacy screen or a short, decorative valance, this pattern provides the flexibility to customize your space with a “handmade with love” aesthetic that radiates warmth and creativity.
The beauty of the Crochet Flower Curtain – Pattern lies in its modular construction, which means you are essentially creating dozens of small, beautiful motifs and joining them together to form a larger textile. This makes the project highly portable and less overwhelming than a large Afghan, as you can crochet individual flowers while traveling, watching television, or relaxing in a garden. By choosing a high-quality mercerized cotton thread, you ensure that your curtain has the structural integrity to hang gracefully without stretching, maintaining its intricate floral shapes for many years to come.
As we delve into this comprehensive guide for the Crochet Flower Curtain – Pattern, we will explore how to select the right materials, master the joining techniques, and provide professional finishing touches that ensure your curtain hangs perfectly flat. This project is a celebration of “slow decor,” encouraging you to take your time with every stitch to create a durable piece of art. In the following sections, we will break down the technical requirements and creative possibilities, ensuring that your hand-stitched floral curtain becomes the most talked-about feature of your interior design.
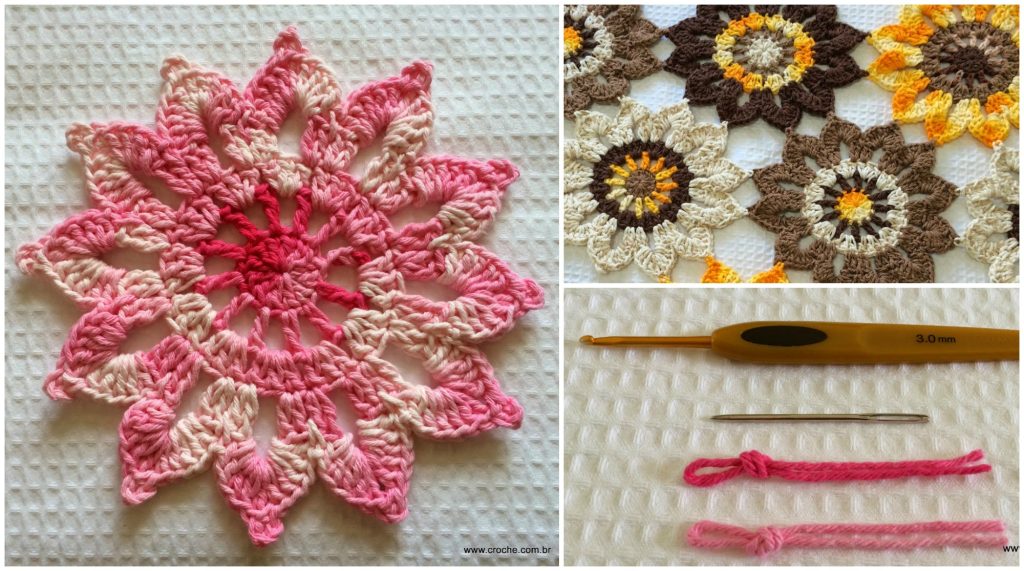
The most critical decision when starting your Crochet Flower Curtain – Pattern is the choice of yarn or thread. For curtains, it is highly recommended to use a size 10 or size 20 mercerized cotton thread rather than standard wool or acrylic yarn. Cotton thread is less prone to sagging under its own weight, which is vital for a vertical hanging project. Furthermore, the mercerization process adds a subtle sheen that reflects sunlight beautifully, enhancing the “lace” effect of the floral motifs and giving the finished product a professional, boutique-quality finish.
Color selection plays a significant role in how the Crochet Flower Curtain – Pattern interacts with your room’s lighting. Traditional white or ecru threads create a classic “vintage lace” look that maximizes the brightness of the room, while vibrant, multi-colored flowers can create a “wildflower garden” effect on your window. If you want a modern, sophisticated vibe, consider using a monochromatic palette of soft greys or blues. Regardless of the color, ensure you purchase enough thread from the same dye lot to avoid subtle color shifts that might be visible when the sun shines through the lace.
The crochet hook size for a Crochet Flower Curtain – Pattern is typically very small, ranging from 1.5mm to 2.25mm. A smaller hook creates tighter, more defined stitches, which are necessary for the delicate “petals” of the flowers to hold their shape. If your stitches are too loose, the weight of the curtain will cause the flowers to distort over time. It is always a good idea to crochet a “gauge swatch”—in this case, a single flower—to see how it behaves when held upright before committing to the entire project.
Durability is another factor to consider when following a Crochet Flower Curtain – Pattern. Since these items will be exposed to direct sunlight for long periods, it is wise to choose high-quality threads that are fade-resistant. Natural cotton is generally more resilient to UV rays than synthetic fibers, which can become brittle over time. By investing in premium crochet supplies from the start, you are ensuring that your labor of love remains a vibrant and sturdy part of your home for decades.
You will also need a sturdy curtain rod and clips or “rings” to hang your Crochet Flower Curtain – Pattern. Depending on the design, you might crochet a “rod pocket” directly onto the top row of flowers, or you may prefer to use vintage-style clips for a more adjustable look. Having your hanging hardware ready during the planning phase allows you to measure the required width and height accurately, preventing the common mistake of making a curtain that is too narrow for the window frame.
Finally, don’t forget the importance of blocking tools. For a project like the Crochet Flower Curtain – Pattern, blocking is not optional; it is the step that transforms a “bunch of yarn” into a crisp, flat curtain. You will need a foam blocking board and stainless steel T-pins. This process opens up the lace stitches and ensures that every flower is the exact same size, which is critical for the “join-as-you-go” method or when sewing the motifs together in a grid.
The heart of the Crochet Flower Curtain – Pattern is the individual flower motif, which usually starts with a “magic ring” or a small chain circle. Most designs involve a central “stamen” created with puff stitches or clusters, surrounded by several layers of petals made with double crochet (dc) and treble crochet (tr). The variety of stitch heights is what gives the flower its organic, three-dimensional look. Mastering the transition between these stitches is key to creating a flowy, natural-looking floral arrangement.
One of the most efficient ways to assemble a Crochet Flower Curtain – Pattern is the “join-as-you-go” (JAYG) technique. Instead of crocheting 200 flowers and sewing them all at once, you connect the current flower to the previous one during the final round of stitching. This creates a much stronger bond than sewing and results in a more seamless appearance. JAYG also allows you to see the curtain grow in real-time, making it easier to adjust the dimensions as you work toward the final width of your window.
If you prefer a more traditional approach for your Crochet Flower Curtain – Pattern, you can crochet all your flowers first and then join them using a “slip stitch join” or a “needle join.” The slip stitch join creates a slightly raised ridge between the flowers, which can add a nice geometric texture to the design. On the other hand, using a tapestry needle to sew the “petals” together provides a flatter, more invisible connection that lets the floral lace take center stage without distracting seam lines.
The layout of your Crochet Flower Curtain – Pattern doesn’t have to be a perfect grid. For a more “organic” feel, you can use flowers of different sizes—large roses mixed with tiny daisies—and join them at random points. This “freeform” style is very popular in bohemian crochet and allows you to use up small scraps of thread. However, it does require more planning to ensure the bottom edge of the curtain remains relatively straight and doesn’t pull in one direction.
Negative space is a vital design element in the Crochet Flower Curtain – Pattern. By including “chain loops” or “mesh bridges” between the flowers, you allow more light to pass through the curtain. This creates a beautiful “stained glass” effect in the room. Adjusting the length of these bridges is a great way to customize the “opacity” of your curtain; shorter bridges offer more privacy, while longer ones create a more open, airy, and delicate lace aesthetic.
Lastly, pay close attention to the “weight” of the join. Because a curtain hangs vertically, the joins at the top will support the weight of the entire piece. It is often a good idea to reinforce the top two rows of the Crochet Flower Curtain – Pattern with an extra row of single crochet or a “header” strip. This prevents the top flowers from stretching into “ovals” and ensures that the curtain maintains its beautiful, symmetrical drape over time.
Once you have completed the last row of your Crochet Flower Curtain – Pattern, the work is only halfway finished. To achieve a professional look, you must “block” the entire curtain. This involves soaking the piece in lukewarm water, gently pressing out the excess moisture with towels, and pinning it to its final dimensions on a blocking board. For a floral curtain, this step is essential to flatten the petals and ensure that the “drop” of the curtain is even across the entire width.
If your Crochet Flower Curtain – Pattern is very large, you might need to block it in sections. Make sure each section is pinned with the same tension to avoid a “wavy” bottom edge. Some crafters use a light spray of fabric starch during the blocking process. Starch adds a bit of stiffness to the cotton thread, helping the flowers resist the pull of gravity and preventing the delicate lace from curling at the edges after it is hung on the rod.
Hanging your Crochet Flower Curtain – Pattern requires a bit of strategy to ensure it doesn’t sag in the middle. If your curtain is wide, consider using a center support bracket for your curtain rod. The weight of hand-crocheted lace can be surprisingly heavy, and a sagging rod will cause the flowers to bunch together in the center, ruining the geometric pattern you worked so hard to create. Using a rod with a larger diameter can also provide a more “architectural” look that complements the fine thread.
Consider adding “weights” to the bottom of your Crochet Flower Curtain – Pattern if you live in a breezy area. Small glass beads or “hidden” drapery weights sewn into the bottom petals can prevent the curtain from blowing around too much when the window is open. This also helps “pull” the stitches straight, maintaining the tension and the visual clarity of the floral motifs. The beads can also serve as a decorative “fringe,” adding a touch of sparkle to the hem.
Weaving in ends is a tedious but necessary part of the Crochet Flower Curtain – Pattern. Because a curtain is often seen from both sides (from inside the room and through the window from outside), your finishing must be impeccable. Use a fine needle to weave the thread tails back into the densest part of the flower centers. Avoid knots, which can create “bumps” in the lace; instead, use a “multi-directional” weaving technique to secure the thread invisibly and permanently.
Finally, take a moment to “dress” your curtain once it is on the rod. Gently pull the flowers into place and ensure the folds are even. The Crochet Flower Curtain – Pattern is a living piece of art that may settle slightly after the first few days of hanging. A quick “steam” with a handheld steamer can help remove any lingering creases from storage or the assembly process, making the crochet lace look its absolute best as it filters the afternoon sun.
Maintaining a Crochet Flower Curtain – Pattern is relatively easy, but it does require a gentle touch. Dust can accumulate in the intricate stitches over time, so it is a good idea to give the curtain a gentle “shake” once a week. For a deeper clean, hand washing in a basin of cool water with a mild detergent is the best method. Avoid the washing machine, as the agitator can snag the delicate flower petals and ruin the assembly joins.
Drying your hand-crocheted curtain should always be done flat. Never hang a wet crochet curtain, as the weight of the water will permanently stretch the fibers and distort the floral pattern. Lay it on clean towels in a shaded area away from direct heat. Once it is dry, a quick “re-blocking” might be needed to restore its crisp shape. This “refreshing” process ensures that your Crochet Flower Curtain – Pattern remains a stunning heirloom for many years.
In terms of styling, the Crochet Flower Curtain – Pattern works beautifully as a “room divider” in studio apartments or open-plan homes. Because the lace is semi-transparent, it defines a space without blocking light or making the room feel small. You can also use smaller versions of the pattern as “cafe curtains” in a kitchen, providing a touch of privacy while still allowing you to see your garden through the gaps in the flowers.
You can also “layer” your Crochet Flower Curtain – Pattern for a more dramatic look. Placing a floral crochet curtain over a solid-colored fabric panel creates a “layered texture” that is very popular in shabby chic and farmhouse decor. The solid background makes the white lace stitches “pop,” allowing the intricate details of the flower pattern to be seen more clearly even from a distance.
For a festive touch, you can weave thin “fairy lights” through the motifs of your Crochet Flower Curtain – Pattern. At night, the lights will illuminate the flowers from within, creating a magical, glowing garden on your window. This is a popular styling choice for holidays or special occasions, turning your handmade lace project into a piece of functional lighting art that adds a cozy ambiance to any evening.
Ultimately, the Crochet Flower Curtain – Pattern is a testament to the maker’s patience and eye for beauty. It is a project that rewards you with every sunrise, as the light filters through your stitches. Whether you stick to a traditional white design or go bold with a rainbow of colors, your curtain is a reflection of your unique style and a celebration of the timeless art of crochet. We hope this guide inspires you to start your own floral lace journey and fill your home with handmade charm.
1. How many flowers do I need for a standard window?
The number of motifs for a Crochet Flower Curtain – Pattern depends on the size of the flower and your window. For a 30-inch wide window using 3-inch flowers, you would need at least 10 flowers per row. A full-length curtain could easily require 150 to 300 flowers.
2. Can I use “scrap yarn” for this project?
Yes! A “scrappy” Crochet Flower Curtain – Pattern is a beautiful way to use up leftovers. Just ensure all the yarns are of a similar weight (e.g., all fingering weight or all size 10 thread) so the curtain hangs evenly.
3. Is this pattern suitable for beginners?
If you know the basic stitches (sc, dc, tr), you can make the flowers! The challenge lies in the assembly and the sheer volume of motifs. It is a great “long-term” project for a beginner looking to improve their consistency.
4. How do I stop the curtain from stretching?
Using mercerized cotton thread and blocking the piece with starch are the best ways to prevent stretching. Additionally, reinforcing the top edge where the curtain meets the rod will help maintain the overall shape.
5. How long does it take to finish a floral curtain?
This is a “slow craft.” Depending on your speed, a single flower might take 15 minutes. A full Crochet Flower Curtain – Pattern can take several weeks or months to complete, making it a very rewarding “marathon” project.
In this article, we have explored the intricate and rewarding journey of creating a Crochet Flower Curtain – Pattern, covering everything from the selection of premium cotton thread to the technical mastery of “join-as-you-go” techniques.
We discussed the vital importance of blocking and starching to ensure a professional vertical hang, and looked at creative ways to style and maintain your hand-stitched lace for years to come. This project is more than just a window covering; it is a piece of artisanal decor that brings the beauty of a garden into your home through the timeless craft of crochet.


