
Patchwork Bird Tutorial

The Jewel Box Quilt – Pattern is a dazzling classic in the quilting world, renowned for its ability to create a mesmerizing visual rhythm that looks far more complex than it actually is to assemble. This particular design is a favorite among both traditionalists and modern makers because it utilizes two of the most fundamental units in quilting—the four-patch and the half-square triangle—to create a secondary pattern that appears to interlock across the fabric. When executed correctly, the Jewel Box Quilt – Pattern transforms simple cuts of cotton into a shimmering grid that mimics the facets of precious gemstones, making it a perfect project for showcasing your favorite vibrant “jewel tones” against a crisp, contrasting background.
Engaging with a Jewel Box Quilt – Pattern is often described by enthusiasts as a “puzzle for the soul,” as the magic truly happens during the layout phase where the orientation of each block dictates the final geometric flow. The history of this pattern is rooted in the “utilitarian beauty” of early American quilting, where resourcefulness met artistry, allowing quilters to use up small scraps of expensive fabrics while maintaining a sophisticated, high-end look. By selecting a mix of deep emeralds, rich rubies, and bright sapphires, you can create a handmade heirloom that captures light and shadow in a way that feels both luxurious and comforting, providing a stunning focal point for any bedroom or living space.
In this comprehensive guide, we will explore every facet of the Jewel Box Quilt – Pattern, offering you the technical insights and creative inspiration needed to bring your own version of this masterpiece to life. From the precision required in the initial cutting phase to the artistic decisions involved in choosing a color story, we will walk you through the process of building a quilt that is as durable as it is beautiful. Whether you are aiming for a scrappy, eclectic look or a controlled, two-tone contemporary aesthetic, mastering this traditional quilt pattern will significantly enhance your repertoire and provide you with a timeless design that never goes out of style.
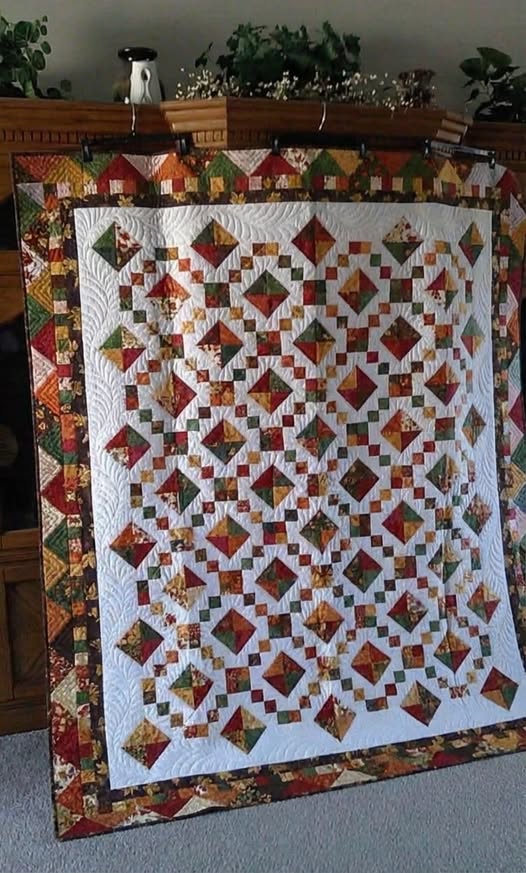
The brilliance of the Jewel Box Quilt – Pattern lies in its clever use of symmetry and the interaction between two distinct types of blocks. The first block is a simple “four-patch,” created by sewing four small squares together to form a larger square, which provides the “stability” of the design. The second block is the “Half-Square Triangle” (HST), which introduces the diagonal lines that create the “shimmer” effect. By alternating these two blocks in a checkerboard fashion, the Jewel Box emerges, creating a secondary diamond pattern that seems to float over the surface of the quilt.
To achieve the best results with your Jewel Box Quilt – Pattern, you must first master the art of “value contrast.” Value refers to how light or dark a fabric is, rather than its actual color. Typically, this pattern uses a “light” background fabric (like cream, white, or silver) to act as the setting, while “dark” or “saturated” fabrics form the jewel shapes. This contrast is what allows the geometric starbursts to pop; without a clear distinction between light and dark, the intricate interlocking lines of the Jewel Box will be lost to the eye.
Fabric selection for the Jewel Box Quilt – Pattern is where you can truly express your personality. While “jewel tones” are the traditional choice, many modern quilters are finding success with “low-volume” prints or even monochromatic palettes. If you are using a scrappy approach, ensure that you have a consistent background color to tie the diverse prints together. This consistency acts as the “mortar” in your mosaic, ensuring that the finished quilt top looks intentional and professional rather than cluttered or disorganized.
Precision cutting is a technical requirement for a successful Jewel Box Quilt – Pattern. Because this design relies on many small intersections meeting perfectly, being off by even an eighth of an inch can cause a “ripple effect” across the entire quilt. Using a sharp rotary cutter and a non-slip quilting ruler is essential. Many quilters prefer to cut their HSTs slightly larger than needed and then “trim them down” to the perfect size after sewing, a technique that ensures every unit in your Jewel Box is identical and easy to join.
The “nesting” of seams is another vital technique when assembling the Jewel Box Quilt – Pattern. When you sew the four-patches and HSTs together, you want the seams to lay in opposite directions so they “lock” into place. This reduces bulk at the intersections and allows your sewing machine to glide smoothly over the fabric. Achieving flat, crisp intersections is the hallmark of a high-quality handmade quilt, and it ensures that the “faceted” look of the Jewel Box is sharp and clear from every angle.
Finally, consider the scale of your Jewel Box Quilt – Pattern. A smaller block size (such as 6 inches) will result in a very intricate, mosaic-like appearance that is perfect for wall hangings or baby quilts. A larger block size (12 inches or more) makes the pattern bold and graphic, which is ideal for queen or king-sized beds. Understanding how scale affects the “visual vibration” of the pattern allows you to tailor the quilting project to the specific needs of your home decor and your personal skill level.
The “Four-Patch” unit in the Jewel Box Quilt – Pattern is often the first thing beginners learn, but it requires a careful touch to stay square. The most efficient way to create these is through “strip piecing,” where you sew two long strips of fabric together, press the seam, and then cut them into segments. This method is much faster than sewing individual squares and significantly improves the accuracy of your blocks. By using strip piecing, you ensure that the “grid” of your Jewel Box remains perfectly aligned throughout the construction process.
The “Half-Square Triangle” (HST) is the “motor” that drives the diagonal movement of the Jewel Box Quilt – Pattern. There are several ways to make these, but the “two-at-a-time” method is the most popular for this design. You place two squares of fabric (one light, one dark) right sides together, draw a diagonal line, and sew a quarter-inch on both sides of that line. When you cut along the line and press open, you have two perfect HSTs, ready to be integrated into your star-shaped motifs.
Tension and “pressing” are the secret ingredients to a professional Jewel Box Quilt – Pattern. You should always press your seams toward the darker fabric to prevent the seam allowance from “shadowing” through the lighter background. For the four-patch units, many quilters like to “twirl” or “fumble” the center seam, which allows the middle of the block to lay completely flat. This attention to detail in the pressing stage prevents the “lumps” that can make quilting on a home machine difficult later on.
Consistency is key when following the Jewel Box Quilt – Pattern instructions. If you decide to use a “scant quarter-inch” seam, you must use it for every single join in the quilt. Because the Jewel Box features many intersecting points, any variation in seam width will cause the blocks to become different sizes. Using a seam guide on your sewing machine can help you maintain this consistency, ensuring that your blocks fit together like perfect puzzle pieces without the need for stretching or tugging.
Another advanced tip for the Jewel Box Quilt – Pattern is to use “starch” or a fabric stiffener before you cut your triangles. Because triangles have a “bias” edge (the diagonal cut that can stretch), they can easily become distorted. Starching the fabric makes it behave more like paper, allowing you to maintain the geometric integrity of the blocks. This is especially helpful if you are working with finer cottons or silks, which have a more delicate “drape” than standard quilting fabrics.
Lastly, don’t be afraid to “audition” your units on a design wall. Before you sew the rows of your Jewel Box Quilt – Pattern together, pin the four-patches and HSTs up and stand back. This allows you to spot any “color clumps” or “rotated blocks” that might break the visual flow. Checking your work from a distance is a common practice among professional quilters, as it gives you a “bird’s eye view” of the secondary patterns that make the Jewel Box so captivating and unique.
The most magical moment in creating a Jewel Box Quilt – Pattern is when you realize how much power you have over the final design just by rotating the blocks. While the “standard” layout creates a series of interlocking diamonds, you can rotate the HSTs to create “zig-zags,” “spinning pinwheels,” or even “broken dishes” effects. This versatility makes the Jewel Box one of the most flexible patterns in existence, allowing you to create multiple quilts from the same basic instructions that look completely different from one another.
“Sashing” is another layout option that can transform the Jewel Box Quilt – Pattern. By placing a thin strip of solid fabric between each block, you “float” the jewel boxes, giving the eye a place to rest. This is a fantastic strategy if you are using very busy “floral” or “batik” prints, as it prevents the design from becoming visually overwhelming. Sashing also allows you to increase the overall size of the quilt top without having to sew dozens of additional intricate blocks.
If you are a fan of “modern quilting,” you might try a “deconstructed” Jewel Box Quilt – Pattern. Instead of a perfectly symmetrical grid, you could place a few blocks in one corner and leave the rest of the quilt as “negative space” (a solid background). This minimalist approach highlights the geometric beauty of the individual Jewel Box blocks and creates a sophisticated, gallery-style piece of textile art that fits perfectly in a contemporary, high-design home environment.
The “border” of your Jewel Box Quilt – Pattern acts as the frame for your artwork. A simple “plain border” in a dark color can act as a “stop” for the eye, while a “pieced border” using leftover HSTs can extend the movement of the quilt all the way to the edge. Many crafters enjoy using a “piano key” border—vertical strips of different jewel-toned fabrics—to add a final burst of energy and color to the quilted masterpiece, echoing the variety found within the blocks themselves.
“On-point” settings are for those who want to take their Jewel Box Quilt – Pattern to the next level. By rotating the entire grid 45 degrees, you change the orientation from squares to diamonds. This layout requires “setting triangles” around the edges, but the result is a dynamic, high-energy quilt that looks like it is radiating from the center. It is a more advanced technique, but the visual impact is well worth the extra planning and the slightly more complex assembly.
Finally, consider the “color-wash” layout for your Jewel Box Quilt – Pattern. You can arrange your blocks so that the colors transition from light to dark or from warm to cool across the surface of the quilt. For example, starting with yellows and oranges in the top left and ending with deep purples and blues in the bottom right creates a “sunset” effect. This artistic use of color gradients elevates the Jewel Box from a simple pattern into a complex study of light and atmosphere.
Once your Jewel Box Quilt – Pattern top is finished, the “quilting” (the stitching that holds the three layers together) can begin. Because the pattern is so geometric, “straight-line quilting” or “matchstick quilting” is a very popular choice. By stitching lines that follow the diagonal paths created by the HSTs, you reinforce the shimmering effect of the Jewel Box. This adds a modern, architectural texture to the quilt that complements the crispness of the pieced design.
For a more traditional finish to your Jewel Box Quilt – Pattern, you might consider “free-motion quilting” (FMQ). Swirling “feathers” or “floral vines” in the background spaces create a beautiful contrast with the sharp angles of the jewel blocks. This juxtaposition of “hard” and “soft” lines is a classic hallmark of artistic quilting, making the finished piece feel balanced and thoughtfully designed. FMQ also allows you to “hide” any minor imperfections in your piecing within the texture of the stitches.
“Stitch-in-the-ditch” is the best option for those who want the Jewel Box Quilt – Pattern itself to be the star of the show. By sewing exactly along the seams where the fabrics meet, you stabilize the quilt without adding any visible thread lines on the surface. This creates a “puffy” effect where the jewel shapes stand out in relief, giving the quilt a tactile, 3-dimensional quality that is both subtle and sophisticated, perfect for a minimalist home aesthetic.
Thread choice is an important technical detail for finishing the Jewel Box Quilt – Pattern. A high-quality 50wt cotton thread in a neutral “dove grey” or “tan” usually blends into almost any color palette, making the stitches nearly invisible. However, if you want to add an extra layer of “luxury,” you might choose a variegated thread that changes color as you sew, adding a “rainbow” of subtle highlights to the background of your jewel-toned fabrics.
Binding is the final step in the Jewel Box Quilt – Pattern journey. For a clean, professional finish, a “bias-cut binding” in a dark, solid fabric acts like a frame on a painting. Alternatively, using a “scrappy binding” made from the leftover bits of your jewel-toned fabrics can add a whimsical, “folk-art” touch to the edges. A well-applied binding ensures that your handmade quilt is durable enough to withstand years of use and frequent washing without fraying or losing its shape.
In conclusion, the Jewel Box Quilt – Pattern is a celebration of geometry, color, and craft. It challenges your precision while rewarding you with a stunning visual result that feels like a treasure chest of light. From the first cut of the four-patch to the final stitch of the binding, every step is an opportunity to express your love for the art of quilting. We hope this guide inspires you to create your own Jewel Box masterpiece, a radiant and comforting gift for yourself or a loved one that will truly stand the test of time.
1. Is the Jewel Box Quilt – Pattern suitable for beginners?
Yes! Because it is made of basic units (four-patches and half-square triangles), it is a fantastic “next step” for a beginner. The key is to take your time with precision cutting and consistent seam allowances to ensure the points align perfectly.
2. What are “Jewel Tones,” and why are they used in this pattern?
Jewel tones are saturated colors that resemble gemstones, such as emerald green, ruby red, sapphire blue, and amethyst purple. They are used in the Jewel Box Quilt – Pattern because their high contrast against a light background creates the “glowing” effect that gives the quilt its name.
3. How do I stop my triangles from stretching?
The diagonal edge of a triangle is on the “bias,” which is stretchy. To prevent this in your Jewel Box Quilt – Pattern, avoid “tugging” the fabric as it goes through the machine and consider using a light spray of fabric starch before cutting.
4. Can I make this quilt using a “Charming” or “Layer Cake” precut?
Absolutely! The Jewel Box Quilt – Pattern is very “precut friendly.” You can use 5-inch squares (Charm Packs) or 10-inch squares (Layer Cakes) to speed up the cutting process, making it a great choice for a “weekend project.”
5. How much fabric do I need for a Queen-sized Jewel Box Quilt?
It depends on your block size, but generally, you will need about 5-7 yards of background fabric and a similar total amount for the colored “jewels” (which could be made from many smaller scraps). Always consult a specific yardage chart once you’ve decided on your block dimensions.
This article has explored the vibrant and structured world of the Jewel Box Quilt – Pattern, highlighting its historical charm and the technical mastery required to create its signature “shimmering” effect. We discussed the importance of value contrast, the efficiency of strip piecing for four-patch units, and the precision needed for perfect half-square triangles.
We also looked at various layout strategies—from traditional grids to modern asymmetrical designs—and shared professional tips for quilting and finishing your handcrafted textile art. By combining simple units with thoughtful color choices, the Jewel Box remains a timeless favorite that celebrates the intersection of geometry and cozy comfort.


