
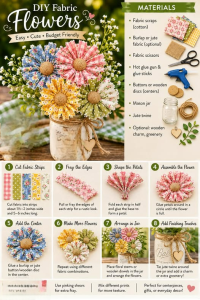
Crochet Flower - Tutorial

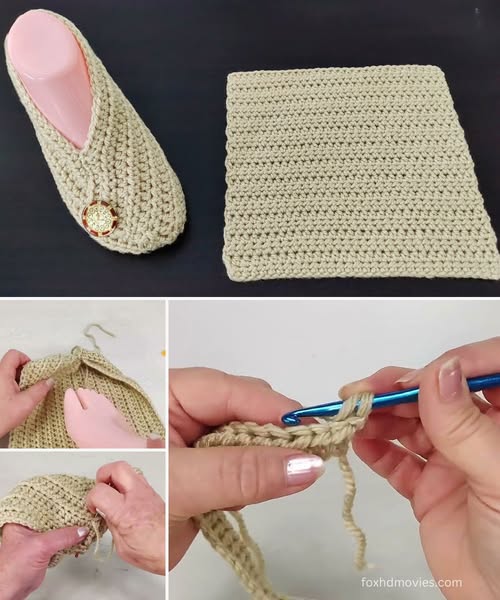
The Very easy crochet slipper – Pattern is the perfect project for anyone looking to combine the cozy comfort of handmade footwear with the simplicity of basic stitching. There is nothing quite like sliding your feet into a pair of warm, soft slippers that you created with your own two hands, especially during the colder months of the year. This specific crochet design is tailored for those who want quick results without the stress of complex shaping or difficult techniques, making it a staple for both busy crafters and those just beginning their journey into the world of yarn arts.
Finding a Very easy crochet slipper – Pattern that actually delivers on its promise of simplicity can be a game-changer for your DIY wardrobe. Many people are intimidated by the idea of making shoes, fearing that they will need to understand complicated heel turns or intricate toe decreases. However, this beginner-friendly slipper pattern relies on basic geometric shapes—usually a simple rectangle or a modified “T” shape—that are folded and seamed to create a comfortable fit. This approach demystifies the construction process, allowing you to focus on the rhythm of your stitches and the joy of creation.
When you choose to work on a Very easy crochet slipper – Pattern, you are also embracing a highly customizable project that can be adapted for the entire family. By simply changing your hook size or the number of starting chains, you can scale these handmade slippers from toddler sizes up to adult men’s sizes. In this guide, we will explore the best yarn choices for durability, the essential stitches you’ll need to master, and the assembly secrets that ensure your crochet footwear looks professional and stays securely on your feet. Let’s dive into the wonderful world of accessible crochet comfort.
The first step in successfully completing your Very easy crochet slipper – Pattern is choosing a yarn that can handle the friction of walking on floors. A bulky weight yarn (Category 5) or a “Super Bulky” yarn (Category 6) is highly recommended for this project. Not only do these thicker yarns make the work go by much faster, but they also provide the necessary padding and insulation to keep your feet truly warm. Using a wool blend yarn is often preferred because of its natural breathability and warmth, though high-quality acrylics are great for their ease of washing.
When looking for the right fiber for your Very easy crochet slipper – Pattern, durability should be a top priority. Since the soles of the slippers will be in constant contact with the ground, a yarn with a tight twist will resist pilling and thinning over time. Some crafters even choose to “double strand” a medium-weight yarn to achieve the same thickness and strength as a bulky yarn. This yarn doubling technique is a fantastic way to use up your existing stash while ensuring your DIY slippers are sturdy enough to last through several winter seasons.
The choice of crochet hook is equally important for the Very easy crochet slipper – Pattern. Generally, you want to use a hook that is slightly smaller than what the yarn label suggests. This creates a dense crochet fabric with fewer holes, which is essential for footwear. If the stitches are too loose, your toes might poke through, and the slippers will lose their shape quickly. A size 6.0mm or 8.0mm hook is typically used with bulky yarns to achieve that firm, supportive structure that makes for a high-quality finished product.
In addition to yarn and hooks, you will need a few basic “notions” to finish your Very easy crochet slipper – Pattern. A large-eyed tapestry needle is essential for seaming the heel and toe areas together. Because the yarn is thick, a plastic needle often works better than a metal one. You will also need sturdy stitch markers to keep track of your rows, especially if you are making two slippers simultaneously to ensure they are exactly the same length. Consistency is key when making a matching pair of crochet shoes.
Safety is an often-overlooked aspect of the Very easy crochet slipper – Pattern. Since crochet fabric can be slippery on hardwood or tile floors, many makers like to add “non-slip” elements to the soles. You can use puff paint, liquid silicone, or specialized iron-on grips to provide traction. Adding these small details transforms your handmade crochet slippers from a cozy indoor accessory into a safe and practical piece of footwear that you can wear confidently throughout your home without fear of slipping.
Finally, consider the aesthetic details of your Very easy crochet slipper – Pattern. You can choose a solid color for a minimalist look or use a “variegated yarn” to create an effortless striped effect without having to change colors manually. Adding a decorative button or a crochet flower to the top of the slipper is a simple way to add personality. These small touches make the crochet project uniquely yours and are especially appreciated if you are making these slippers as a thoughtful, personalized gift for a loved one.
The beauty of the Very easy crochet slipper – Pattern lies in its use of the most fundamental stitches in the craft. Most patterns will rely heavily on the Single Crochet (SC) or the Half Double Crochet (HDC). The Single Crochet is ideal for creating a very tight, durable fabric that mimics the feel of felted wool. Meanwhile, the Half Double Crochet provides a bit more height and softness, making the crochet slipper feel extra plush. Mastering these two stitches is all you really need to create a professional-looking result.
Gauge is an essential concept to understand before you begin your Very easy crochet slipper – Pattern. Because everyone’s tension is different, the number of stitches you make per inch might vary from the designer’s. To ensure your crochet footwear fits your foot perfectly, you should always create a small “test swatch” first. If your swatch is too small, your slippers will be tight and uncomfortable; if it’s too large, they may fall off your feet. Adjusting your hook size is the easiest way to correct your gauge and ensure a perfect fit.
Working in rows is the most common construction method for a Very easy crochet slipper – Pattern. Instead of working in a circle, which can be tricky for beginners, you simply create a rectangular piece of fabric that matches the length and width of your foot. This flat-knit construction is incredibly forgiving and allows you to easily measure your progress against your own foot as you go. It removes the guesswork often associated with shaping crochet items, making it a stress-free experience for crafters of all levels.
“Turning chains” are a small but vital detail in the Very easy crochet slipper – Pattern. When you reach the end of a row and turn your work, you must chain one or two stitches to reach the height of the next row. Keeping these edge stitches consistent will ensure your rectangular fabric has straight sides, which is crucial for a neat seam later on. If you lose or add stitches at the edges, your handmade slipper will look lopsided once it’s folded and sewn together, so count your stitches frequently.
For those who want a bit of extra stretch in their Very easy crochet slipper – Pattern, working in the “Back Loop Only” (BLO) is a fantastic variation. This technique creates a ribbed texture that functions much like an accordion, allowing the slipper to expand and snugly hug your foot. Ribbed slippers are particularly good for people who are between sizes, as the elasticity of the crochet fabric provides a comfortable, customized fit that doesn’t feel restrictive or overly tight.
Lastly, understanding the “Right Side” (RS) and “Wrong Side” (WS) of your fabric is helpful when following a Very easy crochet slipper – Pattern. While many crochet stitches look similar on both sides, the way you seam the slipper will often depend on which side you want facing out. Typically, you will seam the slipper while it is inside out (Wrong Side facing you) so that the seam remains hidden on the inside. This results in a much cleaner, “store-bought” appearance that highlights the beautiful texture of your handmade stitches.
Once you have finished the rectangular portion of your Very easy crochet slipper – Pattern, the assembly begins. You will start by folding the rectangle in half lengthwise or widthwise, depending on the specific instructions. The most common method involves folding the back portion to create the heel and the front portion to create the toe. Using your tapestry needle and a length of yarn, you will use a Whip Stitch or a Mattress Stitch to join the edges. These seams are what transform a flat piece of crochet into a functional shoe shape.
The heel seam of the Very easy crochet slipper – Pattern is where the most tension will be placed. To ensure it doesn’t pull apart, you should double-stitch the beginning and end of the seam. A reinforced heel seam is vital for the longevity of the slipper. Some patterns suggest a “rounded heel” technique, where you slightly curve the corner of the rectangle before seaming to better mimic the natural shape of the human foot, providing a more ergonomic fit that prevents the slipper from slipping off.
Creating the “Toe Box” is perhaps the most satisfying part of the Very easy crochet slipper – Pattern. To get that classic rounded toe, you will usually “weave” your yarn through the stitches at one end of the rectangle and pull it tight, like a drawstring. This cinched toe technique creates a soft, gathered look that is very comfortable for your toes. It’s a much simpler alternative to the complex decreases found in traditional sock patterns, making this pattern perfect for beginners who want immediate results.
If your Very easy crochet slipper – Pattern includes a “cuff” or an “ankle flap,” this is the time to fold it down. A folded cuff not only looks stylish—giving the slipper a “bootie” appearance—but it also provides extra warmth around the ankles. You can even use a contrasting yarn color for the last few rows of your rectangle to make the cuff stand out. This simple design choice adds a touch of “boutique flair” to your homemade footwear without requiring any additional technical skills.
After the main seams are finished, you might find that the opening of the Very easy crochet slipper – Pattern is a bit too wide. A quick fix is to add a round of Single Crochet stitches around the top opening. This “edging” acts as a drawstring, pulling the fabric in slightly and providing a finished, polished edge. You can even use a smaller hook size for this final round to ensure the slipper stays snug around your foot throughout the day.
The final step in the assembly of your Very easy crochet slipper – Pattern is the “finishing touch” of weaving in all your loose ends. Use your tapestry needle to hide the yarn tails deep within the thick stitches of the slipper. This is especially important for items like footwear, as loose ends can be uncomfortable to walk on or may unravel during washing. A well-finished slipper is a durable one, and taking those extra few minutes to secure your ends ensures your crochet masterpiece stays together for years.
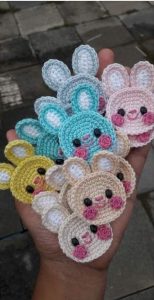
The versatility of the Very easy crochet slipper – Pattern makes it the ultimate gift-giving project. Because they work up so quickly, you can easily make a “family set” of matching slippers in different colors. For children, you can add crochet animal ears or use bright, neon yarns to make the slippers fun to wear. For adults, choosing sophisticated neutral tones like charcoal, oatmeal, or navy blue turns the simple crochet slipper into a stylish piece of loungewear that fits any home aesthetic.
If you want to add a touch of luxury to your Very easy crochet slipper – Pattern, consider using “faux fur” yarn for the cuff. This gives the slippers a high-end, “spa-like” feel that is incredibly soft against the skin. While fur yarn can be difficult to see stitches in, using it only for the final few rows as an accent is an easy way to elevate the design. These glamorous crochet slippers are always a hit at holiday gift exchanges or as “thank you” presents for friends.
Another way to customize the Very easy crochet slipper – Pattern is by adding an “insole.” You can cut a piece of felt or sheepskin to the size of your foot and place it inside the slipper. This provides an extra layer of comfort and helps the slipper keep its shape. For those who want more support, you can even sew the crochet slipper directly onto a pair of inexpensive flip-flop soles. This turns your indoor slippers into “street-ready” shoes with a sturdy, rubber bottom.
For a rustic, “cabin-style” look, you can add leather or suede patches to the heels and toes of your Very easy crochet slipper – Pattern. These patches not only look great but also protect the areas of the slipper that experience the most wear and tear. You can find pre-punched leather patches at most craft stores, or repurpose an old leather jacket. This mixed-media approach adds a professional, artisanal quality to your work that is both beautiful and highly functional.
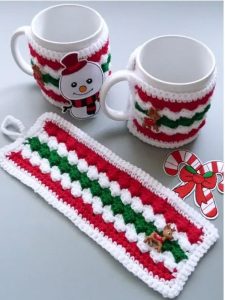
Seasonal themes are perfect for the Very easy crochet slipper – Pattern. You can use red and white yarn for “Santa slippers” in December, or orange and black for “Halloween booties” in October. Because the pattern is so simple, it acts as a blank canvas for your imagination. You can even use “glow-in-the-dark” yarn for a fun novelty gift. The ability to theme your crochet projects makes them much more engaging and fun to produce throughout the year.
Finally, remember that the Very easy crochet slipper – Pattern is a great way to practice “Mindful Crafting.” The repetitive nature of the stitches is known to reduce stress and anxiety. Whether you are making them for yourself or as a gift, the process of creating handmade footwear is a form of self-care. Every pair you finish is a testament to your growing skills and a reminder that the best things in life are often the ones we make with love and patience.
Is the Very easy crochet slipper – Pattern suitable for total beginners?
Yes! This pattern is specifically designed for beginners. It avoids complex shaping and uses only the most basic crochet stitches. If you can crochet a simple rectangle, you have all the skills necessary to complete this project and have a functional pair of slippers in just a few hours.
What is the best way to determine the size?
The easiest way is to measure the length of your foot in inches and crochet your rectangle to match that length. For the width, the rectangle should be able to wrap around the widest part of your foot comfortably. Most Very easy crochet slipper – Patterns provide a size chart, but measuring against your own foot is the most accurate way to ensure a custom fit.
Can I use cotton yarn for these slippers?
While you can use cotton, it is generally not recommended for slippers because it lacks the elasticity and warmth of wool or acrylic. Cotton also tends to stretch out and stay stretched, which can lead to the slippers becoming “floppy” after a few wears. For the best slipper longevity, a wool-acrylic blend is the top choice.
How do I clean my handmade crochet slippers?
If you used acrylic or superwash wool, you can machine wash them on a gentle cycle in a mesh laundry bag. However, to preserve the stitch definition and shape, hand washing in cool water and laying them flat to dry is always the best practice. Never put them in a high-heat dryer, as this can damage the yarn fibers.
How do I make the slippers non-slip?
There are several easy methods! You can apply dots of hot glue, puff paint, or liquid latex to the bottom of the soles. Alternatively, you can sew on pieces of non-slip fabric or leather. Adding traction to the soles is a vital step if you have slippery floors like hardwood or polished stone in your home.
Why do my two slippers look different in size?
This usually happens due to a change in your tension as you work. To prevent this, many crafters recommend working on both slippers at the same time—doing ten rows on one, then ten on the other. This ensures your tension remains consistent throughout the project, resulting in a perfectly matched pair of crochet footwear.
In conclusion, the Very easy crochet slipper – Pattern is an incredibly rewarding project that proves you don’t need years of experience to create something beautiful and functional. We have discussed the importance of choosing a durable, bulky yarn, the simplicity of using basic stitches like the single and half double crochet, and the straightforward assembly process that transforms a simple rectangle into a cozy shoe.
By adding non-slip soles and personalizing your slippers with colors or fur trims, you can create a high-quality product that rivals anything found in a store. Whether you are making these for yourself to enjoy on a quiet morning or gifting them to a friend, these handmade slippers are a perfect example of why the art of crochet is so beloved.


