
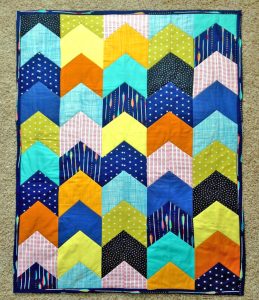
Patchwork Bird Tutorial

The Path and Styles Quilt Block – Pattern is a fascinating intersection of traditional quilting geometry and modern aesthetic versatility. For many enthusiasts, the quest for a design that balances structural complexity with visual clarity ends with this specific quilt block pattern. This design is celebrated for its ability to create secondary patterns when multiple blocks are joined together, forming a “pathway” across the fabric that guides the eye and adds a dynamic sense of movement to any handmade blanket. Whether you are a fan of vintage reproduction fabrics or prefer the clean lines of modern solids, this versatile quilting project offers a unique opportunity to explore color theory and spatial arrangement.
Engaging with a Path and Styles Quilt Block – Pattern allows quilters to practice essential skills such as precision cutting and “nesting” seams, which are crucial for achieving a professional finish. The “path” element of the block usually involves a series of rectangles or squares that lead from one corner to another, while the “styles” refer to the decorative surrounding units that provide contrast and frame the central motif. This quilt construction is particularly popular for “sampler quilts” because it stands alone as a beautiful focal point but also blends harmoniously with other geometric designs. Its mathematical balance makes it a favorite for those who find peace in the rhythmic process of measuring, cutting, and piecing.
When you dive into the details of the Path and Styles Quilt Block – Pattern, you are not just following a set of instructions; you are participating in a rich history of textile storytelling. In the past, specific paths in quilt blocks were often used to symbolize journeys, life choices, or seasonal changes. Today, the contemporary quilt pattern serves as a canvas for self-expression, allowing makers to experiment with “fussy cutting” or monochromatic gradients. In this comprehensive guide, we will break down the materials needed, the technical steps for assembly, and how to troubleshoot common issues like “wavy edges” or mismatched points. By the end of this article, you will see why this classic quilting design continues to be a top choice for artisans around the world.
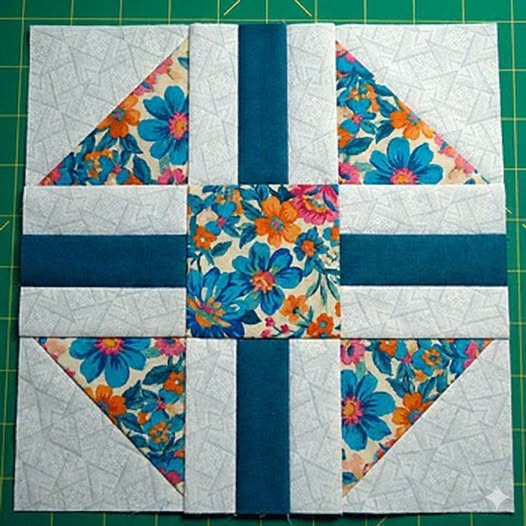
The most important decision you will make for your Path and Styles Quilt Block – Pattern is the fabric selection, as the contrast between the path and the background is what creates the visual depth. 100% quilting cotton is the gold standard for this project because it has a stable weave that prevents stretching during the sewing process. When selecting your colors, think about the “value”—the lightness or darkness of the fabric. A high-contrast color palette ensures that the “path” remains the star of the show, while the “styles” provide a supportive, elegant framework.
Many quilters enjoy using fat quarter bundles for the Path and Styles Quilt Block – Pattern because they provide a coordinated set of prints without the need for extensive color matching. If you want a traditional look, search for small-scale florals or “civil war” reproduction prints in deep navies, burgundies, and creams. For a more modern vibe, try solid bold colors or even neon accents against a dark charcoal or white background. The way you distribute these colors across the quilt block will entirely change the personality of the finished item.
Texture can also play a role in the Path and Styles Quilt Block – Pattern. While standard cotton is traditional, incorporating a small amount of linen-cotton blend can add a rustic, organic feel to the “path” segments. However, be cautious when mixing different fabric weights, as they may shrink at different rates during washing. It is always a good idea to pre-wash your fabrics if you are using high-contrast colors like red and white to prevent color bleeding from ruining your intricate handmade quilt block.
The “Path” section of the Path and Styles Quilt Block – Pattern is where you can truly show off your favorite prints. “Fussy cutting,” which involves centering a specific motif like a bird or a flower within a block unit, works beautifully here. By placing a special fabric motif at the start or end of the path, you create a “discovery” element for anyone looking closely at your work. This level of detail is what separates a simple utility quilt from a bespoke textile masterpiece.
Don’t forget the importance of the background fabric in the Path and Styles Quilt Block – Pattern. A “low volume” print—which is a light-colored fabric with a very subtle, small pattern—can add more interest than a plain solid white. These subtle prints act as a texture-rich canvas that makes the main colors of the path pop without overwhelming the eye. Choosing a high-quality background ensures that the negative space in your quilt looks just as intentional as the pieced sections.
Finally, always purchase a little more fabric than the Path and Styles Quilt Block – Pattern calls for. Mistakes happen, especially with the “Styles” section which may involve many small triangles or rectangles. Having a fabric buffer allows you to recut pieces if a seam goes awry or if you decide you want to add more blocks to the final layout. Being prepared with extra coordinating fabric reduces stress and keeps the creative process enjoyable from the first cut to the final stitch.
Precision is the heart of the Path and Styles Quilt Block – Pattern. You should start by ensuring your rotary cutter blade is sharp; a dull blade can cause fabric to shift, leading to inaccurate cuts. When cutting the rectangles for the “path” and the squares for the “styles,” use a transparent acrylic ruler to check your angles. Even a 1/8th inch discrepancy can snowball as you join units together, resulting in a distorted quilt block that won’t lie flat.
The “Path” units are often constructed using a “strip piecing” method, which saves time and improves accuracy. Instead of sewing individual tiny squares, you sew long strips of fabric together and then cut them into the required widths for the Path and Styles Quilt Block – Pattern. This efficient quilting technique ensures that your seams are perfectly parallel. Once your strips are cut, remember to press your seams to one side—usually toward the darker fabric—to prevent the seam allowance from showing through the lighter sections.
For the “Styles” portion of the Path and Styles Quilt Block – Pattern, you will likely deal with “Half-Square Triangles” (HSTs). To get perfect points, many quilters use the “two-at-a-time” method. When sewing these, it is helpful to shorten your stitch length slightly to prevent the thread from pulling through the fabric at the corners. A perfect 1/4 inch seam is mandatory; if you struggle with this, consider using a specialized “quarter-inch foot” on your sewing machine to maintain consistency across the entire quilt project.
“Nesting” your seams is a secret to achieving those crisp intersections in the Path and Styles Quilt Block – Pattern. This involves pressing the seams of one unit in one direction and the seams of the adjoining unit in the opposite direction. When you place the units together, the seams will “lock” into place, preventing bulk and ensuring that the corners of the “path” meet exactly. This technical precision is what gives the block its high-definition look and makes the quilting process much smoother later on.
As you assemble the rows of the Path and Styles Quilt Block – Pattern, keep a “design board” or a flat surface nearby. It is very easy to accidentally flip a unit, which can break the visual “path” you are trying to create. Frequently referring back to the pattern diagram ensures that your “styles” are oriented correctly. Taking a quick photo of your layout with a smartphone can help you spot directional errors that the naked eye might miss during the repetitive sewing process.
The final step in assembly is “squaring up” the finished Path and Styles Quilt Block – Pattern. Use a large square ruler to trim away any excess fabric and ensure the block is exactly the size specified in the instructions. If your block is slightly smaller or larger, don’t panic; you can often “ease” the difference during the quilt top assembly. However, starting with a perfectly square block makes adding borders and sashing much easier, resulting in a professional-grade finish for your handmade creation.
The real magic of the Path and Styles Quilt Block – Pattern occurs when you begin to join multiple blocks into a full quilt top. Depending on how you rotate the blocks, you can create a “weaving” effect, a “zigzag” path, or a “centered star” design. This modular flexibility is why the pattern is so beloved by artistic quilters. Experimenting with the block orientation on a design wall before sewing them together is a crucial part of the creative journey.
If you choose to use “sashing”—strips of fabric between the blocks—you can isolate each Path and Styles Quilt Block – Pattern, making the individual “styles” stand out more. However, “secondary patterns” usually appear when the blocks are sewn directly to one another (known as “butt-joining”). In this layout, the edges of the “path” from one block meet the edges of the next, creating a continuous flow of color that can look much more complex than it actually is.
Color placement across multiple blocks can also create a “gradient” or “ombre” effect in your Path and Styles Quilt Block – Pattern. By using darker shades in the center of the quilt and lighter shades toward the edges, you give the quilt layout a sense of glowing light. This advanced color-play technique works exceptionally well with geometric paths, as it emphasizes the structural lines of the pattern while adding a soft, painterly quality to the overall work.
For those who love a “Scrappy” look, the Path and Styles Quilt Block – Pattern is an excellent way to use up your leftover fabric stash. By keeping the background fabric consistent (for example, all white) but making every “path” a different color, you create a vibrant “technicolor” quilt. The consistent geometry of the quilt block pattern provides enough structure to keep the variety of colors from looking chaotic, resulting in a joyful and eclectic heirloom.
“Bordering” the final layout of your Path and Styles Quilt Block – Pattern blocks is the finishing touch. A wide, solid border can act as a frame, containing the movement of the “paths” and giving the eye a place to rest. Alternatively, a pieced border that uses elements from the “styles” section can extend the design all the way to the binding. This cohesive design strategy ensures that your quilt looks like a well-planned piece of art rather than just a collection of squares.
Finally, consider the “Quilting Design” (the actual stitching that holds the layers together). For a Path and Styles Quilt Block – Pattern, geometric quilting like “Stitch in the Ditch” or straight-line echoes can emphasize the paths. Conversely, “Free Motion Quilting” with soft swirls can provide a beautiful contrast to the sharp angles of the pieced blocks. The quilting should complement the visual energy of the pattern, adding texture and durability to the finished masterpiece.
One common issue when working on the Path and Styles Quilt Block – Pattern is “stretched bias edges.” Because the “styles” often involve diagonal cuts, the fabric can easily stretch out of shape if handled too roughly. To prevent this, use a starch spray before cutting to stiffen the fibers. If a block does become distorted, a “steam press” can sometimes shrink the fibers back into place, but the best defense is gentle handling and accurate pinning during the sewing stages.
Another challenge is “bulk” where many points meet in the Path and Styles Quilt Block – Pattern. If your sewing machine struggles to go over these thick intersections, try using a “hump jumper” tool or manually turning the handwheel. You can also “flick” the seams at the intersection to make them lie in a miniature pinwheel shape. This reduces the height of the seam and ensures that your quilt top remains flat, which is essential for a smooth quilting process later on.
“Mismatched points” can be frustrating in a geometric Path and Styles Quilt Block – Pattern. If your path doesn’t line up perfectly between blocks, it usually points to a seam allowance that is slightly too wide or narrow. Using a scant quarter-inch seam—which is a hair narrower than a full 1/4 inch—often accounts for the space taken up by the fold of the fabric. Small errors can often be “hidden” with careful quilting, but aiming for point-to-point accuracy will always yield the best results.
Once your Path and Styles Quilt Block – Pattern project is complete, proper care is essential for its longevity. Always wash your quilts in cold water on a gentle cycle. Using a “Color Catcher” sheet in the wash is highly recommended to absorb any loose dye, especially if you used dark “path” fabrics against a light “styles” background. Air drying is the safest method, as the high heat of a dryer can damage the cotton fibers and cause excessive shrinking of the batting.
Storage is also a key factor in maintaining your Path and Styles Quilt Block – Pattern quilt. Avoid folding the quilt in the same way every time, as this can create permanent creases that weaken the fabric over decades. Instead, roll the quilt or refold it periodically in different directions. Storing it in a breathable cotton bag (like an old pillowcase) protects it from dust and pests while allowing the natural fibers to breathe, preserving your hard work for future generations.
Finally, remember that the Path and Styles Quilt Block – Pattern is a journey of learning. Every block you make will likely be better than the last. If you find a mistake in a finished quilt, view it as a “maker’s mark”—a sign that a human hand created it with love. The joy of quilting lies in the process as much as the product. By sharing your finished quilt blocks with a community or gifting them to a loved one, you pass on the warmth and prosperity that the “path” symbolizes in textile tradition.
Is the Path and Styles Quilt Block – Pattern suitable for beginners?
While it involves some intermediate techniques like Half-Square Triangles, a patient beginner can definitely succeed. The key is to focus on accurate cutting and maintaining a consistent seam allowance. It is a great “bridge” project for those who have mastered simple squares and want to try something more architectural.
What is the best size for this quilt block?
The Path and Styles Quilt Block – Pattern is most commonly made in a 12-inch or 10-inch square. These sizes are large enough to show off fabric prints but small enough to manage easily on a standard home sewing machine. You can scale it up for a faster quilt or down for a more intricate, miniature look.
How much fabric do I need for a full quilt?
For a Twin-sized quilt (approx. 63×87 inches), you would typically need about 24 to 30 blocks. This usually requires around 4 to 5 yards of background fabric and a variety of fat quarters for the paths and styles. Always refer to your specific pattern instructions for exact yardage based on your desired layout.
Can I use “Layer Cakes” for this pattern?
Yes! Layer Cakes (10-inch pre-cut squares) are excellent for the “Styles” and “Path” elements. You may need to supplement with yardage for the background, but using pre-cuts can significantly speed up the initial cutting phase of your quilting project.
What batting should I use for a Path and Styles quilt?
For a traditional look, 100% cotton batting provides a lovely “crinkle” after the first wash. If you want more warmth and a lighter weight, a 80/20 cotton-polyester blend is a fantastic choice. It holds its shape well and makes the quilted “paths” look slightly more puffed and defined.
How do I choose the right “Path” color?
Think about the mood you want to create. For a peaceful quilt, use blues and greens. For an energetic quilt, use oranges and yellows. A good rule of thumb is to pick one “hero” fabric for the path and then choose “styles” fabrics that share at least one color with that main print for a coordinated look.
In summary, the Path and Styles Quilt Block – Pattern is a rewarding project that offers a perfect blend of technical challenge and creative freedom. We have discussed the importance of selecting high-quality cotton fabrics with good color contrast, the necessity of technical precision in cutting and seaming, and the exciting secondary designs that emerge when multiple blocks are combined.
By mastering techniques like nesting seams and “squaring up” your blocks, you can ensure a professional finish that will last for years. This pattern is a beautiful reminder that every quilt is a path of creativity, leading to a unique expression of the maker’s style and dedication to the craft of quilting.


