
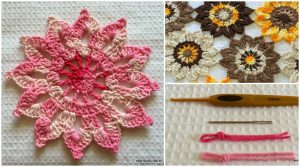
Crochet Flower - Tutorial

Finding the perfect Crocheted Snowflakes- Pattern is like discovering a small piece of winter magic that you can hold in your hand and keep forever. These delicate creations are a staple of seasonal decor, offering a timeless elegance that machine-made ornaments simply cannot replicate. Whether you are looking to adorn your Christmas tree, decorate a window for the winter solstice, or add a handmade touch to a gift package, mastering the art of the crochet snowflake is a rewarding journey for any fiber artist.
The beauty of a Crocheted Snowflakes- Pattern lies in its intricate geometry and the mathematical precision that mirrors actual frozen crystals found in nature. To achieve that ethereal, crisp look, most enthusiasts turn to crochet thread and a small steel crochet hook, which allow for the fine detail necessary to create “points” and “picots.” While the delicate nature of the work might seem intimidating to a beginner, the repetitive rounds and clear structure of these patterns make them an excellent project for improving your tension and learning how to read complex crochet charts.
Beyond their aesthetic appeal, working on a Crocheted Snowflakes- Pattern is a fantastic way to practice sustainability in your crafting. Unlike plastic decorations, these handmade ornaments are biodegradable, washable, and can be passed down through generations as family heirlooms. In this comprehensive guide, we will dive deep into the materials, techniques, and finishing secrets that will turn a simple bit of white string into a stunning work of textile art that captures the very essence of a winter wonderland.
When you begin your search for the ideal Crocheted Snowflakes- Pattern, the first decision you must make is regarding your yarn weight. Traditional snowflakes are almost always worked in mercerized cotton thread, specifically sizes 10, 20, or even 30 for an ultra-fine finish. Mercerization is a treatment that gives the cotton a slight sheen and makes it stronger, which is vital when you eventually need to stiffen your work to hold its shape.
The size of your crochet hook must correspond directly to the thinness of your thread to ensure the stitches are tight and well-defined. For a standard size 10 thread, a 1.5mm to 1.75mm steel hook is usually the gold standard. Using a hook that is too large will result in a floppy, shapeless snowflake, while one that is too small might make it difficult to catch the thread, leading to frustration during the crafting process.
Color choice is another exciting aspect of selecting your Crocheted Snowflakes- Pattern. While classic white or “ecru” is the most traditional choice, many modern designers are experimenting with silver metallic threads or “icy blue” gradients to add a contemporary twist. Some even add glass beads or sequins directly onto the thread before starting, sliding them into place at the tips of the snowflake points for extra holiday sparkle.
Don’t overlook the importance of stitch markers and sharp embroidery scissors. Because the stitches in a Crocheted Snowflakes- Pattern are so small, it can be easy to lose your place at the beginning of a round. A thin piece of contrasting scrap yarn or a specialized micro-marker can save you hours of “frogging”—the act of ripping out stitches—when you realize the symmetry of your snowflake has gone off-track.
If you are a beginner who finds thread work too taxing on the eyes, you can actually use a Crocheted Snowflakes- Pattern with thicker worsted weight yarn and a larger hook. This will result in a much larger, “chunky” snowflake that works beautifully as a festive coaster or a wall hanging. It is a great way to learn the anatomy of the pattern before moving on to the more challenging and traditional thread crochet versions.
Lastly, consider the quality of your thread. Since a Crocheted Snowflakes- Pattern requires a significant amount of labor and precision, using a high-quality brand ensures that the thread won’t fray or snap under tension. Investing in a smooth, high-twist crochet cotton will make the experience much more enjoyable and ensure that the delicate “arms” of your snowflake remain distinct and beautiful for years to come.
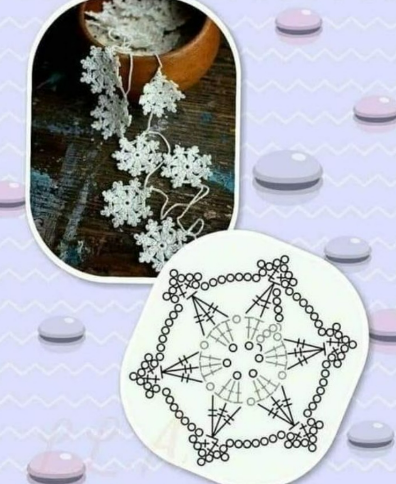
Every Crocheted Snowflakes- Pattern begins with a central ring, which can be made using a magic ring or a small chain loop. The magic ring is often preferred because it allows you to pull the center tight, leaving no hole in the middle, which creates a more professional look. From this center, you will typically work in rounds, building outward in a hexagonal symmetry that mimics a real snowflake’s six-sided structure.
The most common stitch you will encounter in a Crocheted Snowflakes- Pattern is the picot stitch. A picot is created by chaining a small number of stitches (usually three) and then slip-stitching back into the first chain or the base stitch. These tiny loops create the “pointed” or “sparkly” texture at the edges of the snowflake, giving it that characteristic jagged, crystalline appearance that defines the winter theme.
To create the long, thin arms of the snowflake, patterns often utilize treble crochet (tr) or even double-treble crochet (dtr). These tall stitches allow the design to expand quickly from the center while maintaining an “airy” and open lace-like quality. Mastering the tension of these tall stitches is key; if they are too loose, the arms of your Crocheted Snowflakes- Pattern will look uneven once the ornament is hanging on a tree.
Another essential technique is the cluster stitch. By grouping several stitches together at the top, the Crocheted Snowflakes- Pattern can create “petals” or “ice crystals” that look dense and geometric. This contrast between the dense clusters and the open chain spaces (ch-sp) is what gives the snowflake its visual depth and complexity, making it a favorite for those who enjoy intricate crochet.
Reading a crochet diagram or chart can be incredibly helpful when working on a Crocheted Snowflakes- Pattern. Since these designs are symmetrical, a visual map often makes more sense than a long string of written abbreviations. Seeing the way the chains and tall stitches radiate from the center helps you anticipate the next move and ensures that each of the six sides is a perfect mirror image of the others.
Finally, pay close attention to the slip stitch (sl st) joins at the end of each round. In a Crocheted Snowflakes- Pattern, the transition between rounds needs to be as invisible as possible to maintain the illusion of a single, continuous frozen crystal. Sometimes, the pattern will instruct you to “slip stitch into the next chain space” to reposition your hook for the start of the next round, a technique vital for maintaining symmetry.
When you first finish a Crocheted Snowflakes- Pattern, it will likely look like a crumpled, shapeless lace circle. This is perfectly normal! The real magic happens during the blocking process. Blocking involves wetting the lace and pinning it out into its final shape. Without this step, even the most expertly crocheted snowflake will fail to show its intricate detail and beautiful geometric points.
To stiffen your Crocheted Snowflakes- Pattern, you have several options: traditional laundry starch, a mixture of white glue and water, or even a sugar-water solution (though the latter can attract pests). Most modern crafters prefer a non-yellowing fabric stiffener or a 50/50 mix of school glue and water. This ensures the snowflake becomes rigid enough to hang straight without losing its delicate, lacy appearance.
You will need a blocking mat—usually made of foam—and plenty of stainless steel pins. Unlike regular sewing pins, T-pins or stainless steel pins won’t rust when they come into contact with the wet snowflake. Rust spots on a pristine white Crocheted Snowflakes- Pattern are nearly impossible to remove, so using the correct materials during the drying phase is a critical step for success.
The process of pinning is where you define the “personality” of your snowflake. You must pull each picot and point outward and secure it with a pin, ensuring that the distances from the center are equal on all sides. This requires a bit of patience and a “keen eye” for symmetry. Many quilters and crocheters use a blocking template with concentric circles and lines to ensure their Crocheted Snowflakes- Pattern is perfectly round.
Allow your snowflakes to dry completely, which can take anywhere from 12 to 24 hours depending on the humidity. Do not be tempted to unpin them early! If the thread is even slightly damp, the weight of the cotton will cause the points to droop, and you will lose the “crispness” that makes a Crocheted Snowflakes- Pattern so visually striking. Patience is truly a virtue in this final stage of creation.
Once dry, you can add a hanging loop using a simple piece of clear fishing line or a decorative ribbon. The fishing line makes the snowflake appear as if it is floating in mid-air, which is a magical effect when hung in a window or from a chandelier. Your completed Crocheted Snowflakes- Pattern is now ready to be displayed, gifted, or stored away as a precious part of your winter holiday collection.
Beyond the traditional Christmas tree, there are dozens of ways to utilize a completed Crocheted Snowflakes- Pattern. One popular trend is creating a “Snowflake Wall” or a winter garland. By stringing several snowflakes of different sizes and patterns together, you can create a beautiful focal point for a mantle or a doorway that stays relevant all through the winter months, not just during December.
If you enjoy making handmade cards, a small Crocheted Snowflakes- Pattern makes a stunning embellishment. Simply glue or stitch the snowflake to the front of a piece of high-quality cardstock. It adds a tactile, 3D element to your stationary that the recipient can actually detach and use as an ornament later, making your greeting card a “two-in-one” gift that shows immense creative effort.
For those who love home decor, consider sewing your crocheted snowflakes onto solid-colored throw pillows. A navy blue or deep charcoal pillow featuring a cluster of white snowflakes creates a sophisticated, “boutique” look for your living room. Because the snowflakes are stiffened, they hold their shape perfectly against the fabric, acting like a beautiful lace applique.
Another unique idea is to incorporate a Crocheted Snowflakes- Pattern into your gift wrapping. Instead of a plastic bow, tie a snowflake to the top of your package with some rustic twine. It adds an elegant, “farmhouse-chic” vibe to your gifts and provides the recipient with a handmade keepsake they will cherish long after the wrapping paper has been recycled.
If you want to go “extra fancy,” you can spray your finished and stiffened snowflakes with a light coating of glitter spray or clear iridescent paint. This mimics the way real snow sparkles when it catches the light. Just be sure to do this in a well-ventilated area and after the stiffening agent has completely dried, so the Crocheted Snowflakes- Pattern remains sturdy and the glitter adheres properly.
Finally, consider making a snowflake mobile for a nursery or a quiet corner of your home. By hanging snowflakes at different heights from a wooden hoop or a natural branch, you create a piece of “kinetic art” that moves gently with the air currents in the room. It is a peaceful, beautiful application of the Crocheted Snowflakes- Pattern that celebrates the quiet beauty of the winter season in a modern and artistic way.
1. What is the best thread size for a Crocheted Snowflakes- Pattern?
For a classic, delicate look, Size 10 crochet thread is the most popular choice. It is widely available, easy to work with, and produces a snowflake that is sturdy enough to hold its shape well. If you want something even more “fairy-like,” you can move down to Size 20 or 30, but these require very fine hooks and more advanced skill.
2. How do I keep my snowflakes from turning yellow over time?
Yellowing is usually caused by the type of stiffener used or exposure to sunlight and dust. To prevent this, use a professional fabric stiffener or high-quality white glue rather than sugar water. Store your snowflakes in a cool, dry place inside an acid-free box or wrapped in tissue paper when they are not in use to preserve the Crocheted Snowflakes- Pattern’s pristine color.
3. Is a magic ring necessary for this pattern?
While not strictly necessary, a magic ring (or magic circle) is highly recommended for any Crocheted Snowflakes- Pattern. It allows you to close the center hole completely, which makes the snowflake look more like a real crystal and less like a “granny square.” If you find it difficult, you can chain 4 and join with a slip stitch, but the center will be slightly more open.
4. How many points should a snowflake have?
In nature, snowflakes have six sides due to the molecular structure of ice. Therefore, almost every Crocheted Snowflakes- Pattern is designed with six points. If you find a pattern with five or seven points, it is technically a star or a flower, not a snowflake! Sticking to the six-point rule ensures your work looks authentic and balanced.
5. Can I wash my crocheted snowflakes if they get dusty?
Yes, but you will need to re-stiffen and re-block them. If they get dirty, gently swish them in cool water with a tiny bit of mild soap, rinse, and then repeat the stiffening and pinning process described earlier. This is why using a washable cotton thread is so important for the longevity of your handmade ornaments.
6. I’m a total beginner; can I really make a Crocheted Snowflakes- Pattern?
Absolutely! Start with a “beginner-friendly” version that uses fewer rounds and simpler stitches like chains and double crochets. You can also use baby yarn and a 3.0mm hook to make a larger version while you are still learning to see your stitches. Once you understand the “repeat” of the six sides, you’ll find the Crocheted Snowflakes- Pattern surprisingly logical and easy to follow.
In this article, we have journeyed through the enchanting process of creating a Crocheted Snowflakes- Pattern, from the initial selection of mercerized cotton and steel hooks to the vital final steps of blocking and stiffening. We explored the essential stitches like the picot and treble crochet that give these ornaments their crystalline geometry, and we looked at creative ways to display your finished pieces, whether as tree ornaments, wall art, or gift embellishments.
Creating these delicate treasures is a wonderful way to improve your crochet skills while making something truly timeless. We hope this guide has given you the confidence to start your own winter project.


