
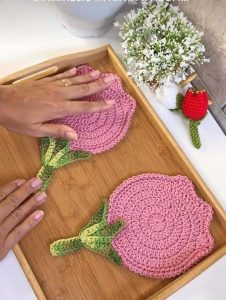
Crochet Flower - Tutorial

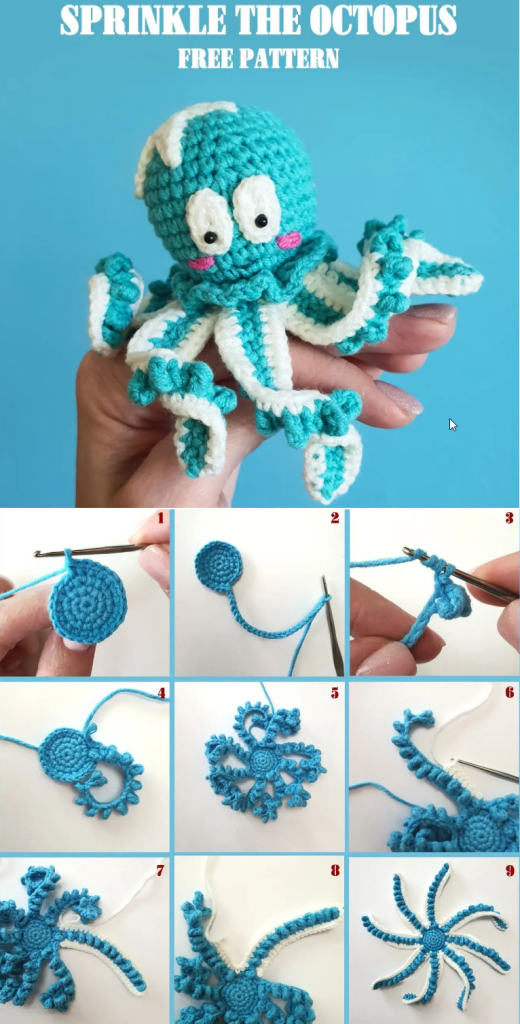
The Sprinkle the Octopus Crochet – Pattern is a delightful project that has captured the hearts of the global crafting community, offering a perfect blend of whimsy and technical skill. This specific amigurumi design is celebrated for its unique aesthetic, featuring a charming cephalopod adorned with “sprinkles” that look like colorful embroidery or beads. Whether you are looking to create a gift for a newborn, a desk companion for a friend, or a decorative piece for your own home, mastering this crochet pattern provides an excellent opportunity to practice shaping, colorwork, and assembly in a single, manageable project.
One of the most appealing aspects of the Sprinkle the Octopus Crochet – Pattern is its accessibility for various skill levels, particularly those who have moved past basic scarves and are ready for 3D crochet construction. The pattern typically utilizes the magic ring technique to start the head, followed by a series of increases and decreases to create a perfectly rounded body. The addition of the “sprinkles”—which can be made using contrasting yarn scraps or French knots—allows for endless customization, ensuring that no two octopuses ever look exactly the same.
In this comprehensive guide, we will explore the essential materials, the step-by-step logic of the design, and the professional finishing techniques required to make your Sprinkle the Octopus Crochet – Pattern stand out. We will also discuss the psychological benefits of working on such a cheerful project, as the repetitive nature of crocheting tentacles is often cited as a meditative and stress-relieving activity. Prepare your hooks and your favorite yarn as we dive deep into the underwater world of this adorable handmade plushie.
Before you begin working on your Sprinkle the Octopus Crochet – Pattern, selecting the right yarn weight is the most crucial decision you will make. Most amigurumi artists prefer a worsted weight cotton or a cotton-acrylic blend because these fibers offer excellent stitch definition and don’t stretch too much when stuffed. Using a high-quality yarn ensures that your octopus maintains its shape over time and that the “sprinkles” remain securely attached to the surface without pulling the fabric.
The choice of a crochet hook is equally important for the success of your Sprinkle the Octopus Crochet – Pattern. To prevent the fiberfill stuffing from peeking through the holes, it is standard practice to use a hook that is one or two sizes smaller than what is recommended on the yarn label. For instance, if your yarn suggests a 5.0mm hook, you might opt for a 3.5mm or 4.0mm hook to create a dense, sturdy fabric that feels like a professional toy.
Safety eyes are a hallmark of the Sprinkle the Octopus Crochet – Pattern, giving the character its expressive and “kawaii” look. These plastic components snap together with a washer on the inside of the work, making them very difficult for children to pull off. However, if you are making this for an infant under three years old, it is highly recommended to embroider the eyes with black yarn instead to eliminate any potential choking hazards while maintaining the charm of the design.
Stuffing is the “muscle” of your octopus, and choosing a premium polyester fiberfill will make a world of difference. You want a stuffing that is “clump-free” so the head of your Sprinkle the Octopus Crochet – Pattern remains smooth and perfectly spherical. Many experienced makers use a small stuffing tool or even a chopstick to push the fiberfill into the far reaches of the tentacles, ensuring that every limb has the same level of firmness and “bounce.”
Don’t forget the “sprinkles” that give this pattern its name! You will need a variety of scrap yarn colors in vibrant shades like pink, turquoise, yellow, and lime green. A large-eyed tapestry needle is essential for weaving these colorful bits into the body. This part of the Sprinkle the Octopus Crochet – Pattern is where your personal creativity really shines, as you can decide the density and placement of the sprinkles to suit your personal style.
Lastly, having a set of stitch markers is vital for working in continuous rounds, which is the standard method for this crochet pattern. Since you won’t be joining each round with a slip stitch, the marker tells you exactly where the new round begins. This prevents errors in your increase and decrease counts, ensuring that the anatomy of your Sprinkle the Octopus Crochet – Pattern is symmetrical and that the tentacles are spaced evenly around the base.
The journey of the Sprinkle the Octopus Crochet – Pattern starts at the very top of the head using the magic ring method. This technique allows you to pull the center hole completely shut, creating a seamless start that is essential for high-quality amigurumi. From here, you will perform single crochet increases in a mathematical sequence (usually multiples of six or eight) until the “dome” of the head reaches your desired diameter, creating a smooth and rounded silhouette.
As you move into the “work even” rounds of the Sprinkle the Octopus Crochet – Pattern, you will notice the fabric beginning to turn downward to form the sides of the head. This is the perfect time to plan your eye placement. Most patterns suggest placing the eyes between rounds 12 and 15, spaced about 8 to 10 stitches apart. Finding the right “face” for your octopus is a subjective process, but keeping the eyes lower on the head often results in a cuter, more youthful appearance.
The transition from the head to the base is where the Sprinkle the Octopus Crochet – Pattern becomes technically interesting. You will typically work a round in the back loops only (BLO). This creates a visible ridge on the front of the work, which serves as a structural anchor for the tentacles later on. This ridge provides a clean “fold line” that helps the octopus sit flat on a surface, preventing it from rolling over once it is fully stuffed.
Decreasing is the next step, and using the invisible decrease technique is highly recommended for this crochet pattern. Unlike a standard decrease, the invisible version involves inserting the hook into the front loops of the next two stitches before completing the single crochet. This prevents the “gaps” or “bumps” that can sometimes ruin the look of a smooth amigurumi surface, making your Sprinkle the Octopus Crochet – Pattern look like it was made by a pro.
Before you close the bottom of the body, you must add the stuffing. It is better to “over-stuff” slightly than to under-stuff, as the fiberfill will settle over time. As you finish the final rounds of the Sprinkle the Octopus Crochet – Pattern, you will gradually reduce the number of stitches until only six remain. You then use your tapestry needle to weave the thread through the remaining loops and pull it tight, creating a clean finish at the base of the toy.
The final part of the body construction involves the “sprinkle” application. Many quilters and crocheters find it easier to embroider the sprinkles before the head is fully closed and stuffed, but it can also be done afterward. By varying the length and direction of your stitches, you create the illusion of real candy sprinkles scattered across the top of the head, which is the defining feature of the Sprinkle the Octopus Crochet – Pattern.
The most iconic feature of the Sprinkle the Octopus Crochet – Pattern is undoubtedly the set of eight curly tentacles. To achieve that “springy” effect, you will work a long chain and then place multiple stitches (usually 2 or 3) into every single chain. This “forced overcrowding” of stitches causes the fabric to twist and spiral naturally as you work, creating a beautiful, bouncy limb without the need for any internal wires or stiffeners.
When working on the tentacles of your Sprinkle the Octopus Crochet – Pattern, consistency is key. You want all eight arms to be roughly the same length and thickness. If you find that your tentacles are too loose, try tightening your tension or using a smaller hook for this section. The spiral should be tight enough to hold its shape but soft enough to be “fidgeted” with, which is why these crocheted octopuses are often used as sensory toys for children.
The attachment of the tentacles to the body can be done in two ways. Some versions of the Sprinkle the Octopus Crochet – Pattern are “no-sew,” meaning you crochet the tentacles directly into the ridge you created earlier using the front loops only (FLO). This method is faster and creates a more durable bond, as there are no sewn seams that could potentially come undone during rough play or multiple washes in a machine.
If your pattern requires sewing the tentacles on afterward, make sure to use the “whip stitch” or “ladder stitch” for a clean look. Spacing the eight tentacles evenly around the base of the Sprinkle the Octopus Crochet – Pattern is crucial for visual balance. A good tip is to pin all eight tentacles in place using pearl-head pins before you sew a single stitch, allowing you to adjust the positioning until it looks perfectly symmetrical.
To add extra detail to your Sprinkle the Octopus Crochet – Pattern, you can use a contrasting color for the underside of the tentacles. This mimics the look of “suction cups” found on real octopuses. You can achieve this by changing colors halfway through the tentacle rounds or by surface-stitching a row of slip stitches along the center of each spiral. This small detail adds a layer of sophistication to your handmade amigurumi.
Finally, give each tentacle a gentle “tug” and a twist once they are attached. This helps the spirals set into their natural shape. The beauty of the Sprinkle the Octopus Crochet – Pattern is that the tentacles will naturally move and bounce whenever the toy is picked up, giving it a sense of life and animation that flat toys simply don’t have. It is this “lively” quality that makes the octopus crochet so popular on social media platforms like Instagram and Pinterest.
Once the physical construction of your Sprinkle the Octopus Crochet – Pattern is complete, it’s time for the “glamour” phase. Using a pink yarn or even a bit of real cosmetic blush, you can add small rosy cheeks just below the eyes. This simple addition significantly boosts the “cuteness factor” of the project and gives the octopus a friendly, approachable personality that is characteristic of the amigurumi style.
If you want to take your Sprinkle the Octopus Crochet – Pattern to the next level, consider adding a small accessory. A tiny crocheted bow perched on the side of the head or a small top hat can turn your octopus into a specific character. These small details don’t take long to make but they add a “designer touch” that makes your handcrafted items more valuable if you are planning to sell them at craft fairs or on Etsy.
For those who want a “shiny” look, you can incorporate metallic embroidery floss for some of the sprinkles. This makes the Sprinkle the Octopus Crochet – Pattern look like it has been dusted with edible glitter. Another popular variation is to use “puffy paint” for the sprinkles, though this makes the toy less soft and is generally not recommended for items intended for very young children who might put the toy in their mouths.
Properly hiding your yarn tails is the mark of a true master. In the Sprinkle the Octopus Crochet – Pattern, you should “bury” your ends by threading them through the body several times and then snipping the yarn close to the surface. The tail will snap back inside the stuffing, becoming invisible and secure. This ensures that your crochet octopus looks beautiful from every angle and won’t unravel over time.
If you are giving the Sprinkle the Octopus Crochet – Pattern as a gift, consider creating a “birth certificate” or a small care tag. Include instructions on how to wash the toy (usually a gentle hand wash and air dry) and the types of materials used. This adds a professional, “boutique” feel to your gift and shows the recipient the amount of care and artistic effort that went into making their new aquatic friend.
Ultimately, the Sprinkle the Octopus Crochet – Pattern is a celebration of color and joy. Don’t be afraid to break the rules—try neon colors, variegated yarns, or even “glow-in-the-dark” thread for the sprinkles. The goal of this creative project is to have fun and experiment with the endless possibilities of the crochet craft. Every octopus you make is a reflection of your own unique style and your passion for textile arts.
1. Is this pattern suitable for someone who has never done amigurumi before?
Yes! The Sprinkle the Octopus Crochet – Pattern is considered an “advanced beginner” project. While it requires knowledge of working in the round and making increases/decreases, the shapes are simple. If you can make a ball and a chain, you can make this octopus. There are many video tutorials available online to help you with the trickier parts like the magic ring.
2. How long does it take to finish one octopus?
Because of its small size, an experienced crocheter can finish a Sprinkle the Octopus Crochet – Pattern in about 2 to 4 hours. The head goes very quickly, while the tentacles take a bit more time due to the high number of stitches in each chain. It is a perfect “weekend project” or something to work on while watching your favorite show.
3. What is the best way to clean my crocheted octopus?
If you used cotton or acrylic yarn, the best method is to hand wash the octopus in cool water with a mild detergent. Gently squeeze out the excess water (don’t wring it!) and reshape the head and tentacles while damp. Let it air dry on a clean towel. This will preserve the shape of your Sprinkle the Octopus Crochet – Pattern for years.
4. Can I make this octopus in a larger size?
Absolutely! To make a “Giant Sprinkle,” simply use a bulky or chenille-style yarn and a much larger hook (like 6.0mm or 8.0mm). The pattern stays exactly the same; only the scale changes. Many people love using “blanket yarn” to create extra-soft, jumbo versions of the Sprinkle the Octopus Crochet – Pattern that act more like pillows.
5. Why are my tentacles not curling properly?
The “curl” comes from putting at least three stitches into every chain stitch. If they aren’t curling, you might only be putting one or two. Make sure you are consistent. Also, ensure your tension isn’t too tight, as the yarn needs a little room to twist around itself. The more stitches you add to each chain, the tighter the spiral will be.
6. Where can I find the best color inspiration for the sprinkles?
Look at photos of real “funfetti” cakes or donut shops! The Sprinkle the Octopus Crochet – Pattern looks best when you use high-contrast colors. A white or cream octopus with rainbow sprinkles is a classic choice, but a mint green octopus with chocolate brown and pink sprinkles can look like a scoop of “mint chip” ice cream.
In this detailed article, we have explored everything you need to know to successfully complete the Sprinkle the Octopus Crochet – Pattern. We discussed the importance of choosing the right mercerized cotton and safety eyes, the technical steps of creating a smooth head using invisible decreases, and the secret to those perfectly springy tentacles.
We also covered the “fun part”—adding the colorful sprinkles and rosy cheeks that give this amigurumi project its heart and soul. Whether you are making this for yourself or as a thoughtful gift, the process of bringing this little creature to life is as joyful as the finished product itself.


