
Crochet Flower - Tutorial

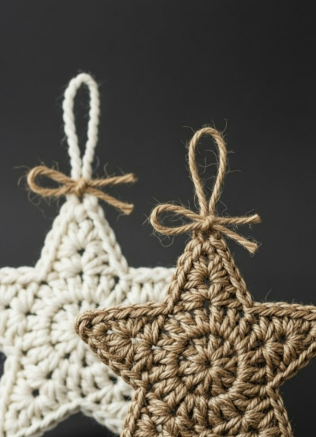
The Crochet Star Ornament- Pattern is a timeless favorite for crafters who wish to add a personalized, celestial touch to their holiday decor or home styling throughout the year. This specific project is celebrated for its simplicity and the speed at which it can be completed, making it an ideal choice for last-minute gifts or festive tree decorations. By following a well-structured Crochet Star Ornament- Pattern, even those relatively new to the world of fiber arts can produce professional-looking results that carry a much deeper sentimental value than any store-bought plastic ornament ever could.
Mastering the Crochet Star Ornament- Pattern requires an understanding of basic geometric construction in amigurumi or flat-lace styles. Most variations of this pattern start from a central ring and expand outward into five or six distinct points, utilizing a combination of basic crochet stitches like the single, double, and treble crochet. The beauty of the star shape is its versatility; depending on the yarn choice and the tension used, you can create anything from a rustic farmhouse star to a sophisticated, shimmering piece of holiday lace.
In this detailed guide, we will explore the essential materials, the technical stitch progression, and the finishing secrets that will make your Crochet Star Ornament- Pattern stand out. We will discuss how to choose the right yarn weight for structural integrity and how to use blocking techniques to ensure your star points are crisp and sharp. Whether you are looking to decorate a Christmas tree, create a nursery mobile, or embellish a gift package, this comprehensive look at the star crochet process will provide the inspiration and technical knowledge you need for success.
The first step in achieving a high-quality Crochet Star Ornament- Pattern is selecting a yarn that offers excellent stitch definition. For ornaments, mercerized cotton yarn is often the preferred choice because it is sturdy, has a slight sheen, and does not stretch as much as wool or acrylic. This structural stability is vital for ensuring that the five points of your star remain distinct and don’t curl or droop when hanging on a branch.
When it comes to the crochet hook size, it is usually best to use a hook slightly smaller than what is recommended on the yarn label for this Crochet Star Ornament- Pattern. Using a smaller hook creates tighter stitches, which helps the ornament hold its shape without the need for internal wire or heavy stiffeners. For a standard Size 10 crochet thread, a 1.5mm steel hook is ideal, while for worsted weight cotton, a 3.5mm or 4.0mm hook works beautifully.
Color selection is where your personal creative style truly shines through the Crochet Star Ornament- Pattern. Traditionalists often stick to “festive gold,” “creamy white,” or “classic red.” However, modern decor trends suggest that “muted sage,” “terracotta,” and even “mustard yellow” can create a stunning, boho-chic look. Using metallic embroidery thread held together with your main yarn can also add a subtle, sophisticated sparkle to the finished star.
Don’t forget the importance of your finishing tools, such as a tapestry needle and sharp embroidery scissors. Because the Crochet Star Ornament- Pattern is a small project, any loose yarn tails or messy joins will be very noticeable. A high-quality needle allows you to weave in your ends invisibly, ensuring the ornament looks just as good from the back as it does from the front—a hallmark of expert craftsmanship.
If you are planning to make a large batch of stars for a garland, consider buying your yarn in “value packs” or using high-quality acrylic blends that are machine washable. While cotton is great for stiff ornaments, acrylic provides a softer, “fuzzier” look that is perfect for a cozy, hygge-inspired winter theme. The versatility of the Crochet Star Ornament- Pattern means it adapts well to almost any fiber you have in your stash.
Lastly, have some stitch markers on hand, especially if the pattern involves working in continuous rounds. Even in a simple Crochet Star Ornament- Pattern, it is easy to lose track of where the first point begins. Markers help you maintain perfect symmetry, which is essential for a star to look balanced. Proper preparation of your quilting and crochet notions will make the actual making process much more relaxing and enjoyable.
The foundation of most Crochet Star Ornament- Pattern designs is a central circle, often started with the magic ring technique. This method is superior to a chain-loop start because it allows you to pull the center hole completely shut, creating a clean, professional focal point. From this center, you will typically work a round of stitches that is a multiple of five or six, depending on how many points you want your star to have.
The transition from a circle to a star in the Crochet Star Ornament- Pattern is achieved through strategic height increases. You will work from a “valley” (using a short stitch like a slip stitch or single crochet) up to a “peak” (using taller stitches like double or treble crochets). This change in stitch height is what naturally pulls the fabric into a pointed shape, creating the iconic star silhouette that we are aiming for in this project.
One secret to a sharp point in the Crochet Star Ornament- Pattern is the use of the picot stitch at the very tip of each arm. A picot is usually made by chaining two or three and then slip-stitching back into the first chain. This creates a tiny, decorative “nub” at the point, which mimics the crystalline look of a real star and provides a convenient place to attach a hanging loop later on.
Tension control is the most important skill to master while working on your Crochet Star Ornament- Pattern. If your tension is too loose, the “valleys” between the star points will look baggy and lose their definition. Try to keep your stitches consistent and firm. If you notice the star “cupping” or curling inward, you may need to add more increase stitches in the foundation round to allow the fabric to lay flat.
Many versions of the Crochet Star Ornament- Pattern are worked in just two or three rounds, making them incredibly fast to produce. This “instant gratification” is why so many crafters love this pattern for charity auctions or school craft fairs. Even with a short round count, the geometric complexity of the star provides a satisfying challenge that keeps the crochet process engaging and fun.
For those who want a 3D effect, you can make two identical stars using the Crochet Star Ornament- Pattern and sew them together around the edges. Before closing the final seam, add a small amount of polyester fiberfill to give the star a “puffy” look. This variation adds a tactile, plush quality to the ornament, making it feel more like a small toy or a premium decorative cushion.
When you first finish your Crochet Star Ornament- Pattern, the star might look a bit soft or the points might be slightly rounded. To fix this, you must use a technique called blocking. This involves wetting the star and pinning it out into its final shape on a foam mat. Blocking “sets” the stitches and ensures that the points are pulled out to their maximum sharpness, which is vital for the aesthetic appeal of the ornament.
For stars that need to hang perfectly straight, a fabric stiffener is a secret weapon. You can use a commercial stiffening spray or a homemade mixture of white glue and water (50/50 ratio). Dip your completed Crochet Star Ornament- Pattern into the solution, squeeze out the excess gently, and then pin it to your blocking board. As it dries, the fibers will harden, allowing the star to hold its shape indefinitely.
Using stainless steel pins is critical during the blocking phase of your Crochet Star Ornament- Pattern. Because the ornament will be wet for several hours, regular pins can rust and leave permanent orange stains on your beautiful yarn. For a five-pointed star, use one pin in the center and one at the very tip of each point, pulling them outward with equal tension to ensure geometric symmetry.
If you are using a delicate thread for your Crochet Star Ornament- Pattern, you might prefer “steam blocking.” Instead of soaking the star, you use a garment steamer or the steam setting on your iron to hover over the pinned star. The heat and moisture relax the fibers, allowing you to “nudge” them into the perfect position. This is a faster method but doesn’t provide the same rigidity as a liquid stiffener.
Wait until the stars are 100% dry before unpinning them from the board. If you remove them while they are even slightly damp, the yarn will “relax” back into a more rounded shape, undoing your hard work. Once dry, the Crochet Star Ornament- Pattern will feel crisp and durable, ready to withstand being packed away in a holiday decoration box and reused year after year without losing its charm.
For an extra touch of “magic,” you can add a light dusting of fine glitter while the stiffener is still wet. This makes the Crochet Star Ornament- Pattern sparkle beautifully when placed near fairy lights or candles. Alternatively, a coat of clear matte sealant can protect the yarn from dust and moisture, ensuring that your handmade ornaments remain pristine for many holiday seasons to come.
The most common way to use a finished Crochet Star Ornament- Pattern is as an individual ornament for a Christmas tree. By adding a simple loop of clear fishing line or a thin velvet ribbon through the top picot, the star appears to float among the branches. This creates a “ethereal” and light look that complements both traditional and modern tree decorating styles.
Beyond the tree, these stars are perfect for creating a star garland. Simply crochet a long chain and slip-stitch into the points of several stars as you go, or string them onto a piece of rustic hemp twine. A Crochet Star Ornament- Pattern garland looks stunning draped across a fireplace mantle, wrapped around a banister, or hung over a window to catch the winter sunlight.
If you enjoy gift wrapping, a small Crochet Star Ornament- Pattern makes an incredible “gift topper.” Instead of using a disposable plastic bow, tie a handmade star to your package with some baker’s twine. It adds a “boutique” feel to your gift and gives the recipient a bonus handmade keepsake they can keep long after the wrapping paper has been recycled.
For home decor enthusiasts, consider making a celestial mobile. Use a wooden hoop or a natural branch as a base and hang several stars of different sizes and colors at varying lengths. This application of the Crochet Star Ornament- Pattern is particularly popular for nurseries, as the soft textures and geometric shapes provide gentle visual stimulation for infants.
You can also use the Crochet Star Ornament- Pattern to create unique “place cards” for a dinner party. Lay a single star on each guest’s napkin and attach a small paper tag with their name on it. It’s a sophisticated and warm way to welcome friends to your table, and they get to take the crochet star home as a memento of the evening.
Finally, don’t be afraid to think big. You can use the Crochet Star Ornament- Pattern with bulky t-shirt yarn and a large 10mm hook to create giant stars. These can be used as decorative wall hangings or even floor cushions if you make the 3D stuffed version. The scalability of this design is what makes it one of the most amazing patterns in the crochet world, limited only by your imagination.
1. Is this pattern suitable for a total beginner?
Absolutely! The Crochet Star Ornament- Pattern is one of the best projects for beginners because it uses all the “foundation” stitches (chain, single, double). It’s small enough that you can finish it in under 20 minutes, giving you a quick sense of accomplishment. It’s a great way to practice working in the round.
2. What is the best yarn for a “crisp” star?
For the sharpest points and best durability, 100% mercerized cotton is the gold standard. It has very little “fuzz,” so your stitch work is very clear, and it responds the best to fabric stiffeners. However, if you want a softer, more rustic look, a wool or acrylic blend will work just as well.
3. How do I stop my star from curling?
Curling usually happens for two reasons: your tension is too tight, or you haven’t put enough stitches in the first round. If your Crochet Star Ornament- Pattern is “bowling,” try using a hook one size larger or ensure you are following the increase instructions exactly. Blocking the star at the end will also solve most minor curling issues.
4. Can I add beads to the star?
Yes! You can slide glass beads onto your yarn before you start. As you work the final round of the Crochet Star Ornament- Pattern, you can pull a bead up to the tip of each point before completing the picot stitch. This adds weight and a beautiful “jeweled” look to your handmade star.
5. How long does it take to make one star?
Depending on your speed and the complexity of the specific Crochet Star Ornament- Pattern you choose, it typically takes between 10 and 30 minutes. This makes it a fantastic “stash-buster” project for using up small scraps of yarn that are too short for a full scarf or blanket.
6. Do I have to use a magic ring?
While the magic ring is recommended for a gap-free center, you can also chain 4 and join with a slip stitch to form a ring. Just be aware that this might leave a tiny hole in the middle of your Crochet Star Ornament- Pattern, which some people actually prefer as it looks more like a traditional “lace” design.
In this article, we have thoroughly explored the world of the Crochet Star Ornament- Pattern, covering everything from the importance of choosing mercerized cotton and the correct hook size to the geometric logic of the star’s construction.
We discussed the transformative power of blocking and stiffening to ensure your points are sharp and professional, and we shared several creative ways to display your work, whether as tree ornaments, garlands, or gift toppers. This project is a perfect example of how a few simple stitches can create something deeply beautiful and meaningful. We hope this guide inspires you to grab your hook and start your own celestial creative journey.


