
Patchwork Bird Tutorial

The 3D Buildings Quilt Tutorial – Pattern is an innovative approach to modern quilting that allows creators to construct a miniature cityscape with breathtaking depth and architectural realism. By mastering the 3D Buildings Quilt Tutorial – Pattern, you transition from traditional flat patchwork into the realm of optical illusions, using clever color play and geometric precision to make skyscrapers and houses pop off the fabric. This specific 3D Buildings Quilt Tutorial – Pattern is designed to guide you through the complexities of “trompe l’oeil” quilting, ensuring that your finished project looks like a sprawling metropolis captured in three dimensions.
Working on a 3D Buildings Quilt Tutorial – Pattern provides a unique challenge for quilters who want to move beyond standard squares and triangles. The beauty of the 3D Buildings Quilt Tutorial – Pattern lies in its versatility, as it can be adapted to represent a cozy European village, a bustling Manhattan skyline, or even a colorful row of beach houses. Because the 3D Buildings Quilt Tutorial – Pattern relies heavily on the interaction between light and shadow, it encourages you to look at your fabric stash in a completely new way, focusing on tonal gradients rather than just pretty prints.
In this comprehensive guide, we will explore every facet of the 3D Buildings Quilt Tutorial – Pattern, from the initial fabric selection to the final binding. Using a high-quality 3D Buildings Quilt Tutorial – Pattern ensures that your angles are perfect, which is essential for maintaining the 3D effect across the entire surface of the quilt. We will delve into the technicalities of “fussy cutting” and “shadow play” to make sure your version of the 3D Buildings Quilt Tutorial – Pattern stands out as a masterpiece of modern textile art, whether you are hanging it on a wall or using it as a vibrant throw.
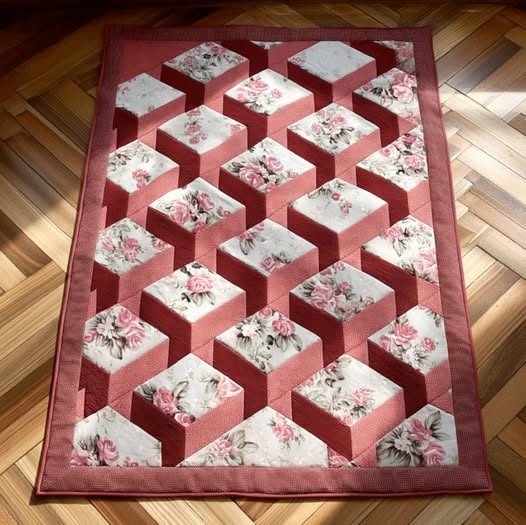
The success of your 3D Buildings Quilt Tutorial – Pattern depends almost entirely on your ability to create contrast through color value. To make the buildings appear three-dimensional, the 3D Buildings Quilt Tutorial – Pattern requires at least three distinct tones for each structure: a light side, a medium side, and a dark shadow side. Using this triad of tones within the 3D Buildings Quilt Tutorial – Pattern mimics how sunlight hits a physical building, creating the illusion of depth.
When choosing fabrics for the 3D Buildings Quilt Tutorial – Pattern, look for “reads like solid” prints or subtle textures that won’t distract from the geometric lines. High-contrast fabrics are the backbone of the 3D Buildings Quilt Tutorial – Pattern, as they help define the sharp corners and rooflines that make the city look real. If your colors are too similar in value, the 3D Buildings Quilt Tutorial – Pattern will lose its “pop” and revert to a flat, two-dimensional appearance.
Consider the “sky” fabric in your 3D Buildings Quilt Tutorial – Pattern as a crucial architectural element rather than just a background. A dark navy or a sunset gradient in the 3D Buildings Quilt Tutorial – Pattern can set a dramatic mood, while a crisp light blue creates a midday urban vibe. This choice frames the entire 3D Buildings Quilt Tutorial – Pattern and dictates where the “light source” is coming from for your shadow placement.
Don’t shy away from using metallics or small-scale geometric prints within your 3D Buildings Quilt Tutorial – Pattern to represent windows and doors. These tiny details in the 3D Buildings Quilt Tutorial – Pattern add layers of storytelling to your quilt, making it a piece that viewers want to examine closely. However, always ensure these accent fabrics align with the light-medium-dark rule established by your 3D Buildings Quilt Tutorial – Pattern instructions.
For a cohesive look, many quilters choose a limited color story for their 3D Buildings Quilt Tutorial – Pattern, such as shades of grey and industrial blue. Alternatively, a “rainbow city” version of the 3D Buildings Quilt Tutorial – Pattern can be incredibly striking if you maintain consistent shadow values across all the different colors. The flexibility of the 3D Buildings Quilt Tutorial – Pattern allows for infinite creative expression while maintaining structural integrity.
Lastly, make sure you have enough of your “shadow” fabric, as this is often the most used color in a 3D Buildings Quilt Tutorial – Pattern. This fabric acts as the anchor for the entire 3D Buildings Quilt Tutorial – Pattern, tying the various buildings together into a unified landscape. Pre-washing your fabrics is also recommended for the 3D Buildings Quilt Tutorial – Pattern to prevent any dark dyes from bleeding into your light-colored “sunlit” walls.
Precision is the most important skill you will develop while following the 3D Buildings Quilt Tutorial – Pattern. Because the 3D effect relies on perfect angles, even a quarter-inch discrepancy in the 3D Buildings Quilt Tutorial – Pattern can break the illusion of depth. Using a sharp rotary cutter and a specialized quilting ruler is highly recommended to ensure every piece of your 3D Buildings Quilt Tutorial – Pattern matches the template exactly.
The 3D Buildings Quilt Tutorial – Pattern often utilizes a technique called “foundation paper piecing” (FPP) to achieve the sharp points needed for rooftops and eaves. FPP is a game-changer for the 3D Buildings Quilt Tutorial – Pattern because it allows you to sew directly onto paper guides, ensuring perfect accuracy. If you are new to FPP, this 3D Buildings Quilt Tutorial – Pattern is an excellent project to practice on, as the shapes are primarily straight lines.
Labeling your cut pieces is a vital step in the 3D Buildings Quilt Tutorial – Pattern process to avoid confusion. With so many similar-sized rectangles and parallelograms in a 3D Buildings Quilt Tutorial – Pattern, it is easy to accidentally sew a “shadow” piece where a “light” piece should be. Taking an extra ten minutes to organize your 3D Buildings Quilt Tutorial – Pattern components will save hours of frustration with a seam ripper later on.
When sewing the blocks of your 3D Buildings Quilt Tutorial – Pattern, pay close attention to your seam allowance. The 3D Buildings Quilt Tutorial – Pattern is designed with a standard 1/4-inch seam, and consistency is key to making the building rows align. If your seams vary, the “streets” or “sidewalks” in your 3D Buildings Quilt Tutorial – Pattern will look jagged rather than straight and professional.
Pressing is another critical component of the 3D Buildings Quilt Tutorial – Pattern that should never be skipped. For a 3D Buildings Quilt Tutorial – Pattern, pressing seams to the side (usually toward the darker fabric) helps the blocks lay flat and prevents bulk at the intersections. A well-pressed 3D Buildings Quilt Tutorial – Pattern not only looks better but is also much easier to quilt once the top is finished.
As you assemble the various “neighborhoods” within your 3D Buildings Quilt Tutorial – Pattern, take time to step back and look at your work from a distance. The 3D effect of the 3D Buildings Quilt Tutorial – Pattern is often more apparent from several feet away, allowing you to see if the shadows are working correctly. This bird’s-eye view ensures that your 3D Buildings Quilt Tutorial – Pattern is coming together as a cohesive architectural marvel.
Designing the layout of your 3D Buildings Quilt Tutorial – Pattern is where you become an urban planner of your own fabric world. You can follow a standard grid for your 3D Buildings Quilt Tutorial – Pattern, or you can stagger the heights of the buildings to create a more organic skyline. The 3D Buildings Quilt Tutorial – Pattern encourages experimentation with negative space, allowing you to place buildings at different “distances” from the viewer.
To create a sense of atmospheric perspective in your 3D Buildings Quilt Tutorial – Pattern, consider using softer, lighter colors for buildings that are supposed to be further away. This advanced trick within the 3D Buildings Quilt Tutorial – Pattern adds a fourth dimension to your work, making the quilt feel like a vast window into another city. It requires careful planning during the fabric selection phase of the 3D Buildings Quilt Tutorial – Pattern.
Incorporating “landmarks” into your 3D Buildings Quilt Tutorial – Pattern can make the project even more personal. You might modify the 3D Buildings Quilt Tutorial – Pattern to include a clock tower, a church spire, or even a local shop that holds sentimental value. These modifications are easy to make once you understand the basic geometric principles taught in the 3D Buildings Quilt Tutorial – Pattern.
The “ground” or “foreground” of your 3D Buildings Quilt Tutorial – Pattern is just as important as the structures themselves. Adding a “pavement” or “park” section at the bottom of the 3D Buildings Quilt Tutorial – Pattern provides a solid base for your buildings to sit on. This grounding element in the 3D Buildings Quilt Tutorial – Pattern prevents the buildings from looking like they are floating aimlessly in space.
If you are making a larger version of the 3D Buildings Quilt Tutorial – Pattern, you can organize the blocks into “districts.” For example, one corner of your 3D Buildings Quilt Tutorial – Pattern could feature high-rise modern offices, while another section showcases quaint residential cottages. This storytelling aspect makes the 3D Buildings Quilt Tutorial – Pattern a favorite for gallery shows and quilt guild challenges.
Remember to consider the borders of your 3D Buildings Quilt Tutorial – Pattern, as they act as the frame for your city. A simple dark border can make the colors within the 3D Buildings Quilt Tutorial – Pattern look more vibrant and contained. Alternatively, an “infinity” border where the sky fabric extends to the edge can make your 3D Buildings Quilt Tutorial – Pattern feel like it goes on forever.
The quilting stage is where you can truly enhance the structural lines of your 3D Buildings Quilt Tutorial – Pattern. Straight-line quilting is often the most effective choice for a 3D Buildings Quilt Tutorial – Pattern, as it reinforces the architectural theme. By quilting parallel to the building edges, you add physical texture that complements the visual 3D effect of the 3D Buildings Quilt Tutorial – Pattern.
Using “matchstick quilting” in the shadow areas of your 3D Buildings Quilt Tutorial – Pattern can create a sense of density and weight. Conversely, more open quilting in the sky portions of the 3D Buildings Quilt Tutorial – Pattern allows that area to feel airy and light. This contrast in quilting density is a professional touch that elevates the 3D Buildings Quilt Tutorial – Pattern from a simple craft project to a high-end textile.
For the thread color in your 3D Buildings Quilt Tutorial – Pattern, you have two main options: matching or contrasting. Matching thread makes the quilting of the 3D Buildings Quilt Tutorial – Pattern blend in, focusing the eye on the fabric shapes. Contrasting thread, such as a bright neon against a grey building, can add a “cyberpunk” or modern artistic edge to your 3D Buildings Quilt Tutorial – Pattern.
Don’t forget the importance of a high-quality batting inside your 3D Buildings Quilt Tutorial – Pattern. A wool or high-loft polyester batting can make the “sunlit” sides of your buildings slightly puffier than the “shadow” sides, physically enhancing the 3D look of the 3D Buildings Quilt Tutorial – Pattern. This tactile depth is one of the most satisfying parts of finishing a 3D Buildings Quilt Tutorial – Pattern.
The binding of your 3D Buildings Quilt Tutorial – Pattern should be the final architectural detail, acting as the finishing touch on your construction site. Many quilters use a “scrappy binding” made from the leftovers of the 3D Buildings Quilt Tutorial – Pattern to tie all the colors together. Others prefer a solid black binding to provide a sharp, clean exit for the 3D Buildings Quilt Tutorial – Pattern design.
Finally, adding a label to the back of your 3D Buildings Quilt Tutorial – Pattern is essential for documenting your hard work. Include the date, the name of your “city,” and a note about the 3D Buildings Quilt Tutorial – Pattern you used. Your 3D Buildings Quilt Tutorial – Pattern quilt is now ready to be displayed, gifted, or snuggled under, standing as a testament to your skill and creativity.
Is the 3D Buildings Quilt Tutorial – Pattern suitable for beginners?
While it is an intermediate-level project due to the precision required, a determined beginner can definitely succeed. The 3D Buildings Quilt Tutorial – Pattern breaks down the steps into manageable blocks, and using foundation paper piecing can help ensure accuracy for those still mastering their seam allowance.
How much fabric do I need for a 3D Buildings Quilt Tutorial – Pattern?
The amount depends on the size of the quilt you are making. Generally, for a throw-sized 3D Buildings Quilt Tutorial – Pattern, you will need about 5-7 yards of assorted fabrics. It is highly recommended to use fat quarters so you have a wide variety of colors for the different building faces.
Can I use this pattern for a “Scrappy” quilt?
Yes! The 3D Buildings Quilt Tutorial – Pattern is actually perfect for scraps. As long as you organize your scraps by “value” (light, medium, and dark), you can create a stunningly eclectic city that still maintains its three-dimensional illusion.
What is the best way to wash a 3D Buildings Quilt Tutorial – Pattern?
Since these quilts often use high-contrast colors (like dark shadows next to light walls), always wash your 3D Buildings Quilt Tutorial – Pattern in cold water with a couple of “color catcher” sheets. Air drying or tumble drying on a very low heat setting will keep the fibers and the 3D structure in top condition.
Does the 3D Buildings Quilt Tutorial – Pattern include templates?
Most versions of the 3D Buildings Quilt Tutorial – Pattern include printable templates or paper piecing patterns. Always check the specific 3D Buildings Quilt Tutorial – Pattern you are using to ensure the templates are scaled to 100% when printing.
Mastering the 3D Buildings Quilt Tutorial – Pattern is a rewarding journey that blends the logic of architecture with the warmth of textile art. Throughout this article, we have explored how to select a palette that emphasizes light and shadow, the importance of precision piecing, and how to style your city layout to create a unique urban landscape. We also discussed how specific quilting techniques can enhance the physical depth of your project.
By following the 3D Buildings Quilt Tutorial – Pattern, you are not just making a blanket; you are building a world, one stitch at a time. This project challenges your perspective and refines your technical skills, resulting in a quilt that is truly a conversation piece.


