
Patchwork Bird Tutorial

The Leaf Block Tutorial – Pattern is an essential guide for quilters who wish to bring the organic beauty of the natural world into their textile art through structured geometric piecing. Creating a Leaf Block Tutorial – Pattern allows you to master the art of the “half-square triangle” and the “stitch-and-flip” technique, which are foundational skills for any serious quilter. This specific Leaf Block Tutorial – Pattern is designed to be versatile, serving as a building block for seasonal quilts that range from the vibrant greens of a spring forest to the deep oranges and burnt sienna tones of an autumn landscape.
Working through a Leaf Block Tutorial – Pattern offers a refreshing break from traditional abstract blocks, providing a recognizable and comforting motif that resonates with nature lovers. The beauty of the Leaf Block Tutorial – Pattern lies in its scalability; you can create a single large block for a decorative pillow or a series of smaller blocks to form a cascading vine across a full-sized bedspread. Because the Leaf Block Tutorial – Pattern relies on clean lines and smart color placement, it is a fantastic way to practice precision piecing while also experimenting with fabric textures that mimic the veins and surfaces of real leaves.
In this comprehensive guide, we will explore the technical nuances and creative possibilities of the Leaf Block Tutorial – Pattern, ensuring that your finished blocks are as crisp and professional as possible. We will delve into fabric selection, cutting accuracy, and assembly strategies that make the Leaf Block Tutorial – Pattern an enjoyable and low-stress project. By the end of this journey, the Leaf Block Tutorial – Pattern will become a staple in your quilting repertoire, allowing you to “plant” a garden of fabric that stays beautiful all year round, regardless of the season outside.
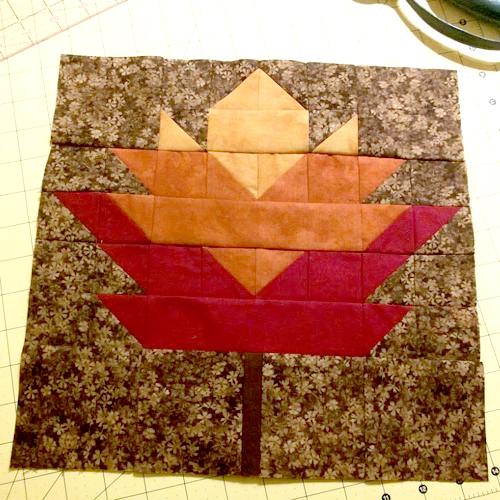
Selecting the right materials is the first and perhaps most important step in the Leaf Block Tutorial – Pattern, as color and texture define the realism of your project. For a Leaf Block Tutorial – Pattern, many quilters prefer using high-quality 100% cotton batiks because the mottled, hand-dyed appearance of batik fabric perfectly mimics the natural variations found in a real leaf. However, solid fabrics can also be used in a Leaf Block Tutorial – Pattern to create a modern, minimalist aesthetic that emphasizes the sharp geometric lines of the block.
When picking your palette for the Leaf Block Tutorial – Pattern, consider the background fabric just as much as the leaf itself to ensure there is enough contrast. A neutral background, such as cream, soft grey, or a low-volume print, allows the vibrant greens or reds of your Leaf Block Tutorial – Pattern to stand out and catch the eye. If your background is too busy, the intricate shape of the Leaf Block Tutorial – Pattern might get lost, muddying the visual impact of your hard work.
Tonal prints, which use different shades of the same color, are particularly effective in a Leaf Block Tutorial – Pattern for adding a sense of depth and dimension. By using a darker tone for one side of the leaf and a lighter tone for the other, you can make the Leaf Block Tutorial – Pattern appear as though it is catching the light, giving it a 3D effect. This advanced color play is one of the most rewarding aspects of mastering the Leaf Block Tutorial – Pattern, as it elevates the design from a simple craft to a piece of art.
Don’t forget the “stem” of your Leaf Block Tutorial – Pattern, which usually requires a contrasting brown or deep green fabric to ground the design. Even though the stem is a small part of the Leaf Block Tutorial – Pattern, choosing a fabric with a bit of “wood-grain” texture can add a delightful hidden detail that collectors and gift recipients will appreciate. Ensure that the stem fabric is sturdy and high-quality, as it often involves thinner strips in the Leaf Block Tutorial – Pattern assembly.
For those looking to create a “scrappy” version of the Leaf Block Tutorial – Pattern, this is the perfect opportunity to dive into your scrap bin for various green remnants. As long as you maintain a consistent background color, a Leaf Block Tutorial – Pattern quilt made from dozens of different green scraps can look incredibly cohesive and lush, much like a real canopy. This approach to the Leaf Block Tutorial – Pattern is not only environmentally friendly but also results in a unique, one-of-a-kind creation.
Finally, always pre-wash and starch your fabrics before beginning the Leaf Block Tutorial – Pattern to ensure they are easy to handle and won’t shrink. Starching is especially helpful for the Leaf Block Tutorial – Pattern because the design often involves diagonal seams that can stretch or distort if the fabric is too soft. Taking the time to prepare your materials according to these Leaf Block Tutorial – Pattern standards will lead to a much smoother sewing experience and a more polished final product.
The secret to a perfectly square and symmetrical Leaf Block Tutorial – Pattern lies in the accuracy of your initial cuts. Using a sharp rotary cutter and a specialized quilting ruler is mandatory for the Leaf Block Tutorial – Pattern to ensure every square and rectangle is exactly as specified in the instructions. Even a tiny deviation of an eighth of an inch in the Leaf Block Tutorial – Pattern can cause the points of the leaf to misalign, creating a frustrated quilter and a crooked block.
Most versions of the Leaf Block Tutorial – Pattern utilize standard sizes like 2.5-inch or 5-inch squares, making it easy to use pre-cut fabrics like Charm Squares or Jelly Rolls. If you are cutting from yardage for your Leaf Block Tutorial – Pattern, try to cut with the grain of the fabric to prevent the pieces from pulling out of shape. Organized labeling of your cut pieces is also a pro-tip for the Leaf Block Tutorial – Pattern, especially if you are making multiple blocks in different colorways.
Diagonal lines are a frequent feature in the Leaf Block Tutorial – Pattern, so having a fabric marking pen is highly beneficial for accuracy. By drawing a light diagonal line on the back of your smaller squares, you create a “sewing path” that ensures the Leaf Block Tutorial – Pattern points are sharp and precise. This extra step in the Leaf Block Tutorial – Pattern preparation might seem tedious, but it is the difference between a rounded leaf and a professional, crisp leaf point.
Once your pieces are cut, it is helpful to lay them out on a design board in the configuration of the Leaf Block Tutorial – Pattern before you sew a single stitch. This “dry run” for the Leaf Block Tutorial – Pattern allows you to check your color placement and ensure you haven’t accidentally swapped a background piece for a leaf piece. Visualizing the Leaf Block Tutorial – Pattern in this way helps catch errors early and ensures the final assembly is as efficient as possible.
If your Leaf Block Tutorial – Pattern involves mirrored leaves, pay close attention to the direction of your diagonal seams to ensure the blocks face the correct way. Many quilters find that sewing the Leaf Block Tutorial – Pattern in “batches” or chain-piecing helps maintain consistency across a large project. By following the cutting guide in the Leaf Block Tutorial – Pattern to the letter, you set yourself up for a satisfying and successful construction phase.
Lastly, keep your cutting mat and workspace clean of lint and scrap threads to avoid any interference with your measurements for the Leaf Block Tutorial – Pattern. A clean workspace reflects a clean design, and the Leaf Block Tutorial – Pattern is a design that truly rewards tidiness and attention to detail. With all your pieces perfectly cut and organized, you are ready to move to the sewing machine and watch your Leaf Block Tutorial – Pattern come to life.
The assembly of a Leaf Block Tutorial – Pattern usually begins with creating the corner units, which often use the “stitch-and-flip” method. This technique in the Leaf Block Tutorial – Pattern involves sewing a smaller square onto the corner of a larger rectangle and then flipping it back to create a triangle shape. It is a brilliant way to create the angled edges of a leaf in the Leaf Block Tutorial – Pattern without having to deal with tricky bias edges or pins.
Consistency in your seam allowance is the “golden rule” of the Leaf Block Tutorial – Pattern, as all the units must fit together perfectly in the final grid. Most Leaf Block Tutorial – Pattern designs are built on a 3×3 or 4×4 grid, meaning that if one unit is slightly off, the whole block will be uneven. Using a “scant” quarter-inch seam is a popular technique for the Leaf Block Tutorial – Pattern to account for the space taken up by the fold of the fabric.
Pressing your seams is a critical part of the Leaf Block Tutorial – Pattern that should be done after every single row of stitching. To keep the Leaf Block Tutorial – Pattern from becoming bulky, many experts recommend “pressing seams to the dark side” or “nesting” the seams so they lock together. A well-pressed Leaf Block Tutorial – Pattern will lay flat under your quilting foot and make the final quilting process much more enjoyable and successful.
As you assemble the rows of your Leaf Block Tutorial – Pattern, use fine silk pins to hold the intersections together and prevent shifting. The point where the stem meets the base of the leaf in the Leaf Block Tutorial – Pattern is often the most challenging part of the assembly. Taking your time with this specific junction in the Leaf Block Tutorial – Pattern will ensure the stem looks like it is naturally supporting the weight of the leaf.
If you find that your Leaf Block Tutorial – Pattern is slightly “wonky” after assembly, don’t panic; most blocks can be “squared up” with a ruler and a bit of steam. Squaring up the Leaf Block Tutorial – Pattern involves trimming the outer edges so the block is exactly the right size for joining with other blocks. This final touch in the Leaf Block Tutorial – Pattern construction ensures that your entire quilt top will stay straight and true.
The joy of seeing the Leaf Block Tutorial – Pattern fully assembled is a great motivator to keep going and create a full “garden” of blocks. Each finished Leaf Block Tutorial – Pattern is a testament to your patience and your ability to follow complex geometric instructions. Whether you are making one or one hundred, the process of stitching the Leaf Block Tutorial – Pattern is a meditative and rewarding practice for any level of quilter.
Once you have a collection of finished blocks from the Leaf Block Tutorial – Pattern, the fun of designing the final quilt layout begins. You can arrange your Leaf Block Tutorial – Pattern units in a “straight set” for a traditional look, or rotate them in different directions to mimic falling leaves. The Leaf Block Tutorial – Pattern is remarkably adaptable, allowing for “on-point” settings that create a more dynamic and modern visual movement across the quilt.
Adding “sashing” between your Leaf Block Tutorial – Pattern blocks can help give each leaf its own space to breathe and stand out. Sashing in a Leaf Block Tutorial – Pattern quilt is especially effective if you have used many different colors for the leaves, as it provides a neutral “frame” for the eyes to rest. You can even add small “cornerstones” to the sashing that coordinate with the stem colors used in your Leaf Block Tutorial – Pattern for a cohesive finish.
The quilting stage is where you can add the final realistic details to your Leaf Block Tutorial – Pattern by mimicking leaf veins with your stitches. Free-motion quilting “vein” lines through the center of the Leaf Block Tutorial – Pattern adds physical texture that makes the fabric feel more organic and alive. If you prefer straight-line quilting, following the diagonal lines of the Leaf Block Tutorial – Pattern can reinforce the geometric strength of the design.
For a seasonal touch, consider using the Leaf Block Tutorial – Pattern to make a festive table runner for Thanksgiving or a set of placemats for a summer garden party. The Leaf Block Tutorial – Pattern is small enough that it can be used for “quick gifts” that still have a high level of detail and craftsmanship. A single Leaf Block Tutorial – Pattern framed in a wooden hoop also makes a beautiful and thoughtful piece of wall decor for a nature lover.
If you want to take your Leaf Block Tutorial – Pattern to the next level, try incorporating “fussy cutting” in the centers of the leaves. This involves cutting a specific motif from your fabric, like a tiny bird or an insect, to appear as if it is sitting on the Leaf Block Tutorial – Pattern. This added layer of storytelling makes the Leaf Block Tutorial – Pattern incredibly engaging for viewers and adds a whimsical touch to your work.
Finally, remember that the Leaf Block Tutorial – Pattern is a foundation upon which you can build your own unique style. Don’t be afraid to change the proportions or add extra petals to the Leaf Block Tutorial – Pattern as you become more comfortable with the construction. The Leaf Block Tutorial – Pattern is a gateway to endless botanical creativity, proving that in quilting, as in nature, the leaf is just the beginning of the journey.
Is the Leaf Block Tutorial – Pattern suitable for absolute beginners?
Yes! The Leaf Block Tutorial – Pattern is one of the best projects for beginners because it focuses on straight lines and simple “stitch-and-flip” corners. It’s a great way to build confidence before moving on to more complex patterns that require curved piecing.
What is the best size for a Leaf Block Tutorial – Pattern?
While the size can vary, most quilters find that a 10-inch or 12-inch square for the Leaf Block Tutorial – Pattern is the most versatile. This size allows for enough detail to be visible while still being a manageable scale for a standard domestic sewing machine.
Can I use the Leaf Block Tutorial – Pattern for appliqué?
Absolutely! While this tutorial focuses on piecing, the shape of the leaf in the Leaf Block Tutorial – Pattern can easily be used as a template for raw-edge or turned-edge appliqué. This is a great alternative if you want a more rounded, less geometric look for your leaves.
How much fabric do I need for a single Leaf Block Tutorial – Pattern?
A single Leaf Block Tutorial – Pattern can usually be made from two 10-inch squares (one for the leaf and one for the background), plus a small scrap for the stem. This makes it a very “scrap-friendly” project that doesn’t require a large investment in new fabric.
Why are my leaf points getting cut off in the Leaf Block Tutorial – Pattern?
This usually happens due to a seam allowance that is too wide. In the Leaf Block Tutorial – Pattern, ensure you are leaving a full 1/4-inch space between the point of the leaf and the edge of the block so that when you sew the blocks together, the points remain perfectly visible.
In conclusion, the Leaf Block Tutorial – Pattern is a rewarding and versatile design that bridges the gap between structured geometry and organic natural beauty. Throughout this article, we have explored the essential steps for success, including selecting high-quality fabrics that mimic nature, the importance of precision cutting, and the technical assembly of the block using the stitch-and-flip method. We also discussed creative ways to layout and finish your Leaf Block Tutorial – Pattern projects, from table runners to full-sized quilts with custom vein quilting.
By mastering this Leaf Block Tutorial – Pattern, you gain a valuable skill that can be adapted for any season or style, providing endless opportunities for creative expression. Whether you are a beginner or an experienced quilter, the Leaf Block Tutorial – Pattern offers a satisfying “quick win” that results in a beautiful, timeless piece of handmade art.


