
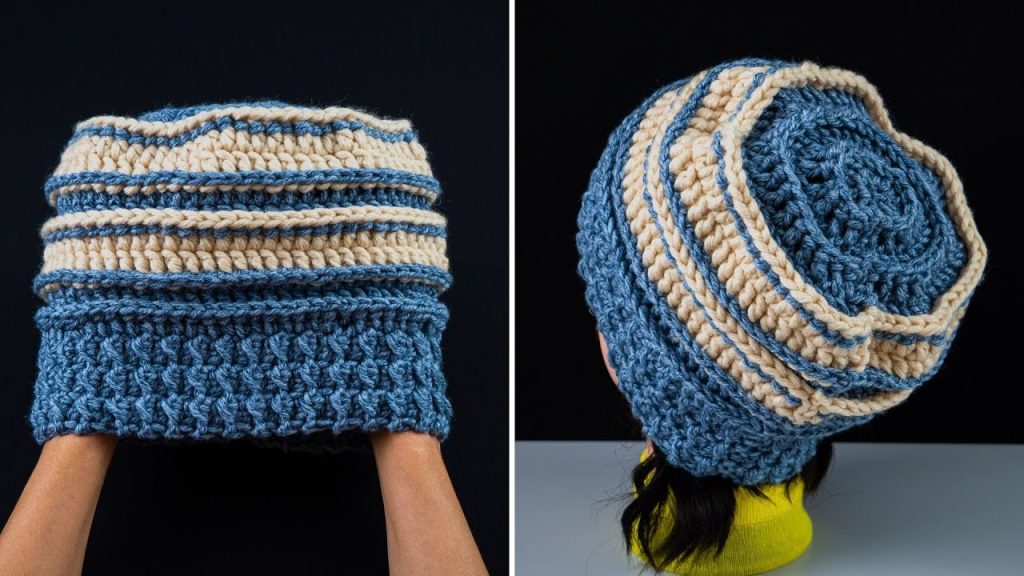
Crochet Flower - Tutorial

The Crocheted hat – Pattern is one of the most rewarding and practical projects any fiber artist can undertake, offering a perfect blend of style, warmth, and creative expression. Whether you are a beginner looking to master the basics of working in the round or an experienced crafter seeking to experiment with intricate textures, a high-quality Crocheted hat – Pattern serves as a foundational blueprint for success. Throughout the colder months, there is nothing quite like the comfort of a handmade accessory, and having the right Crocheted hat – Pattern allows you to tailor your headwear to fit any head size, from newborn infants to adults.
In the world of modern DIY fashion, the Crocheted hat – Pattern has evolved far beyond simple beanies, now encompassing a vast array of styles including slouchy hats, berets, and even elegant sun hats. By understanding the structural logic of a Crocheted hat – Pattern, you gain the ability to choose your own fibers, colors, and embellishments, ensuring that your finished piece is truly unique. Many enthusiasts find that working through a Crocheted hat – Pattern is a fantastic way to learn about gauge, yarn weight, and how different stitch heights affect the overall drape and insulation of the garment.
This comprehensive guide is designed to walk you through every nuance of selecting, executing, and finishing a Crocheted hat – Pattern. We will explore how to pick the ideal yarn for different seasons, the technical secrets to achieving a perfect fit, and how to troubleshoot common issues like “coning” or “waving” during the increase rounds. By the time you finish reading, the Crocheted hat – Pattern will no longer be a mystery, but a versatile tool in your crafting arsenal that you can return to time and again to create thoughtful gifts or stylish additions to your own winter wardrobe.
The foundation of a successful Crocheted hat – Pattern begins with the choice of materials, as the yarn’s fiber content determines both the warmth and the longevity of the hat. For a classic winter Crocheted hat – Pattern, wool or wool blends are highly recommended because of their natural elasticity and superior heat retention properties. If you are following a Crocheted hat – Pattern intended for sensitive skin or for chemotherapy patients, choosing a soft, breathable cotton or bamboo yarn is essential to avoid irritation while maintaining a beautiful aesthetic.
Acrylic yarns are also a popular choice for a Crocheted hat – Pattern because they are widely available, affordable, and incredibly easy to care for in the washing machine. When choosing an acrylic for your Crocheted hat – Pattern, look for “anti-pilling” varieties to ensure the hat stays looking fresh even after heavy use in harsh weather. The weight of the yarn—whether it be “worsted,” “bulky,” or “lightweight”—must match the specifications of your Crocheted hat – Pattern to ensure the final dimensions are accurate and comfortable.
The crochet hook is the partner to your yarn, and its size can completely change the outcome of your Crocheted hat – Pattern. Most patterns will suggest a specific millimeter size, but it is vital to check your gauge before diving into the full Crocheted hat – Pattern. If your stitches are too tight, your Crocheted hat – Pattern will be stiff and potentially too small; if they are too loose, the hat will have gaps that let in cold air, defeating its primary purpose.
Ergonomic hooks are a great investment when working on a Crocheted hat – Pattern, as they reduce hand fatigue during the repetitive motions of circular stitching. Because a Crocheted hat – Pattern often involves many rounds of single or double crochet, having a comfortable grip allows you to maintain consistent tension throughout the project. Always keep a set of hooks nearby so you can easily adjust if you find that your natural tension differs from what the Crocheted hat – Pattern requires.
Color selection for your Crocheted hat – Pattern is where you can truly let your personality shine, whether you prefer neutral tones or vibrant, variegated hues. Some Crocheted hat – Pattern designs look best in solid colors where the stitch texture is the star, while others are specifically designed to highlight color-work or stripes. Remember that darker yarns can sometimes make it harder to see your stitches while following a Crocheted hat – Pattern, so ensure you have good lighting when working with blacks or deep navies.
Lastly, always check the yardage requirements of your Crocheted hat – Pattern before you start to ensure you have enough yarn to finish the crown and the brim. There is nothing more frustrating than running out of yarn on the final round of a Crocheted hat – Pattern. By preparing your materials thoughtfully and respecting the guidelines of the Crocheted hat – Pattern, you set yourself up for a stress-free experience and a high-quality finished product that you can be proud to wear.
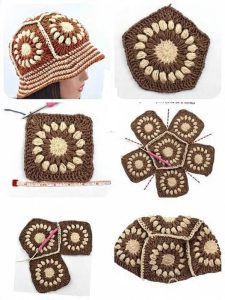
A standard top-down Crocheted hat – Pattern relies on the principles of circle geometry to create a dome that fits the human head perfectly. The process usually starts with a “magic ring” or a small loop of chains, followed by several rounds of “increases” as dictated by the Crocheted hat – Pattern. Learning how to space these increases evenly is the secret to a smooth, flat circle that will eventually turn into the walls of your Crocheted hat – Pattern.
The “crown diameter” is the most important measurement in any Crocheted hat – Pattern, as it determines the final circumference of the hat. A well-written Crocheted hat – Pattern will provide a formula or a measurement to reach before you stop increasing and begin the “straight” rounds. If you stop increasing too soon in the Crocheted hat – Pattern, the hat will be too tight; if you go too far, the hat will be overly slouchy or fall over the wearer’s eyes.
Once the crown is complete, the Crocheted hat – Pattern moves into the “body” rounds, where you simply work one stitch into each stitch from the previous row. This is the most meditative part of the Crocheted hat – Pattern, where the tube of the hat begins to grow downward toward the ears. It is during these rounds that the texture of the Crocheted hat – Pattern really begins to show, whether you are using simple double crochets or complex cables and bobbles.
Height is another variable you can adjust within a Crocheted hat – Pattern to suit different styles, such as a snug beanie versus a relaxed slouchy hat. If you want a hat that can be cuffed, you will need to add extra rounds to the bottom of the Crocheted hat – Pattern to allow for that fold-over. Most Crocheted hat – Pattern guides will give a standard height for adults, but it is always best to try the hat on as you go to ensure it hits exactly where you want.
The transition from the body of the hat to the brim is a critical moment in the Crocheted hat – Pattern for ensuring the hat stays securely on the head. Many patterns suggest switching to a slightly smaller hook or using a ribbed stitch (alternating front and back post stitches) for the brim. This technique in the Crocheted hat – Pattern provides the “snugness” needed so that the hat doesn’t slip off during activity or in high winds.
Understanding these geometric stages allows you to customize any Crocheted hat – Pattern to your specific needs. If you find a stitch you love, you can apply it to the “body” section of a basic Crocheted hat – Pattern to create something entirely new. The more you work with a Crocheted hat – Pattern, the more you will appreciate the math and art that go into creating a garment that is both functional and aesthetically pleasing.
While a basic Crocheted hat – Pattern might only use one or two stitches, advanced versions incorporate a variety of textures to create visual interest. The “Waistcoat Stitch” is a popular addition to a Crocheted hat – Pattern because it creates a fabric that looks almost exactly like knitting, offering a dense and warm finish. Incorporating post stitches into your Crocheted hat – Pattern can create beautiful “cabling” effects that look sophisticated and store-bought.
For those who enjoy a more airy and lightweight accessory, a Crocheted hat – Pattern featuring “V-stitches” or “Shell stitches” is a wonderful choice. These open-work patterns allow for more breathability, making them ideal for a Crocheted hat – Pattern designed for the spring or autumn seasons. Using these decorative stitches in your Crocheted hat – Pattern also uses less yarn, which can be helpful if you are working with a limited amount of a luxury fiber.
Color-work techniques like “Tapestry Crochet” can also be integrated into a Crocheted hat – Pattern to create intricate motifs, logos, or geometric shapes. This requires carrying a second color of yarn along the inside of your stitches as you follow the Crocheted hat – Pattern chart. While it takes a bit more concentration, a color-work Crocheted hat – Pattern is incredibly rewarding and results in a thick, extra-warm fabric due to the carried yarn.
The “Puff Stitch” and “Bean Stitch” are excellent for adding bulk and a “boho” feel to any Crocheted hat – Pattern. These stitches trap pockets of air, making the Crocheted hat – Pattern exceptionally warm even in freezing temperatures. Because these stitches are quite yarn-intensive, a Crocheted hat – Pattern using them will require more yardage than a flat-stitch design, so plan your yarn purchases accordingly.
Adding a “ribbed” brim to your Crocheted hat – Pattern using the “Slip Stitch” or “Single Crochet in Back Loops Only” creates a very stretchy finish that mimics a knit rib. This is a common feature in a professional Crocheted hat – Pattern because it allows the hat to stretch over various head sizes while maintaining its original shape. Mastery of this stretchiness is key to creating a Crocheted hat – Pattern that is comfortable for long-term wear.
Don’t be afraid to mix and match these techniques within a single Crocheted hat – Pattern once you are comfortable with the basics. You might start with a simple crown, add a row of puff stitches for texture, and finish with a high-contrast ribbed brim. The Crocheted hat – Pattern is merely a framework; your choice of stitches is what gives the hat its soul and makes the crafting process an adventure in design.
The final steps of a Crocheted hat – Pattern are what take it from “homemade” to “hand-crafted masterpiece.” Weaving in your ends securely is the most important part of finishing, as you don’t want your Crocheted hat – Pattern to unravel after its first wash. Use a sharp tapestry needle to weave the yarn tails back and forth through the densest part of the stitches to ensure they are completely invisible and locked in place.
Blocking your Crocheted hat – Pattern is a step that many beginners skip, but it makes a massive difference in the final fit and appearance. By dampening the hat and letting it dry over a “hat form” or a balloon, you can even out the stitches and set the shape of the Crocheted hat – Pattern. This process is especially helpful for a Crocheted hat – Pattern made with natural fibers like wool or cotton, which respond beautifully to moisture and shaping.
Embellishments like pom-poms, leather tags, or decorative buttons can add a professional “boutique” look to your Crocheted hat – Pattern. Many modern Crocheted hat – Pattern enthusiasts love adding a faux-fur pom-pom to the top of their beanies for a touch of luxury. When attaching these to your Crocheted hat – Pattern, consider using a snap or a bow so that the pom-pom can be removed before washing the hat.
Proper care will ensure that the effort you put into your Crocheted hat – Pattern lasts for many years. Always check the yarn label for washing instructions, but as a general rule, hand-washing in cool water with a gentle wool wash is the safest way to clean a Crocheted hat – Pattern. Never wring out your Crocheted hat – Pattern; instead, roll it in a dry towel to remove excess moisture and then lay it flat to dry away from direct sunlight.
If your Crocheted hat – Pattern begins to “pill” (develop small fuzzy balls) over time, you can gently remove them with a fabric shaver or a small pair of scissors. This simple maintenance keeps your Crocheted hat – Pattern looking brand new and prevents it from looking worn out. Storing your hats flat in a drawer rather than hanging them will also prevent the weight of the yarn from stretching the Crocheted hat – Pattern out of its intended shape.
Finally, the best way to celebrate finishing a Crocheted hat – Pattern is to share your work with others. Posting a photo of your completed Crocheted hat – Pattern in online communities or gifting it to a friend spreads the joy of handmade items. Every Crocheted hat – Pattern you complete is a testament to your patience and skill, providing a tangible way to stay warm and stylish throughout the winter months.
How long does it typically take to finish a Crocheted hat – Pattern?
For an intermediate crocheter using worsted weight yarn, a standard beanie can usually be completed in about 2 to 4 hours. If you are using bulky yarn and a simple Crocheted hat – Pattern, you might even finish it in under 90 minutes!
Is a Crocheted hat – Pattern suitable for absolute beginners?
Yes! A basic Crocheted hat – Pattern using double crochet is one of the best projects for beginners. It teaches you how to work in rounds, how to increase, and how to maintain consistent tension, all while creating a useful item.
How do I know what size to make the Crocheted hat – Pattern?
Most Crocheted hat – Pattern guides include a size chart. A general rule for an adult medium is a head circumference of 21–22 inches. You should make the hat about 1–2 inches smaller than the actual head size to allow for “negative ease,” which keeps the hat snug.
What should I do if my Crocheted hat – Pattern looks like a bowl?
If the hat is curving upward too quickly, it usually means you aren’t increasing enough in the early rounds. Check your Crocheted hat – Pattern to make sure you didn’t miss any increase stitches, as this “coning” effect happens when the circumference isn’t growing fast enough for the height.
Can I use any yarn for a Crocheted hat – Pattern?
While you can use almost any yarn, the results will vary. A very thin yarn will take a long time and might be too floppy for a hat, while a very stiff yarn might be uncomfortable. It is always best to stick to the yarn weight recommended in the Crocheted hat – Pattern.
In conclusion, the Crocheted hat – Pattern is a versatile and deeply satisfying project that combines mathematical precision with artistic freedom. We have explored the importance of choosing the right yarn and hook to achieve the desired warmth and fit, as well as the geometric principles of the crown and body that make a Crocheted hat – Pattern successful. From mastering textured stitches like ribbing and puffs to the essential finishing touches of blocking and weaving in ends, every step of the Crocheted hat – Pattern offers a chance to refine your skills and create something beautiful.
By following these guidelines, you can ensure that every hat you make is durable, comfortable, and stylish. Whether you are making a simple beanie for charity or an intricate cabled hat for yourself, the journey through a Crocheted hat – Pattern is a wonderful way to engage with the timeless art of crochet.


