
Crochet Flower - Tutorial

Finding the perfect Crocheted hat – Pattern is more than just a search for a craft project; it is the beginning of a creative journey that combines warmth, style, and the meditative rhythm of fiber arts. Whether you are a seasoned maker or a curious beginner, understanding the mechanics of a high-quality Crocheted hat – Pattern allows you to transform a simple skein of yarn into a personalized accessory that can last a lifetime. The beauty of this specific craft is its portability and versatility, making it one of the most popular items to create in the modern crochet community.
When you dive into a Crocheted hat – Pattern, you are engaging in a tradition that spans generations, yet remains incredibly trendy in today’s fashion world. From cozy beanies and slouchy hats to elegant berets, the right Crocheted hat – Pattern serves as a blueprint for success, guiding you through the technicalities of increases, decreases, and texture. Mastering this skill not only provides you with a wardrobe of unique headwear but also offers a profound sense of accomplishment as you see the three-dimensional shape take form under your hook.
In this comprehensive guide, we will explore the essential elements of a successful Crocheted hat – Pattern, including how to choose the right materials and how to master the fundamental stitches required for a professional finish. We will break down the terminology often found in a Crocheted hat – Pattern and provide tips for ensuring your final product fits perfectly every time. By focusing on both the technical and artistic sides of the craft, you can elevate your hobby and create hats that are both functional and fashion-forward.
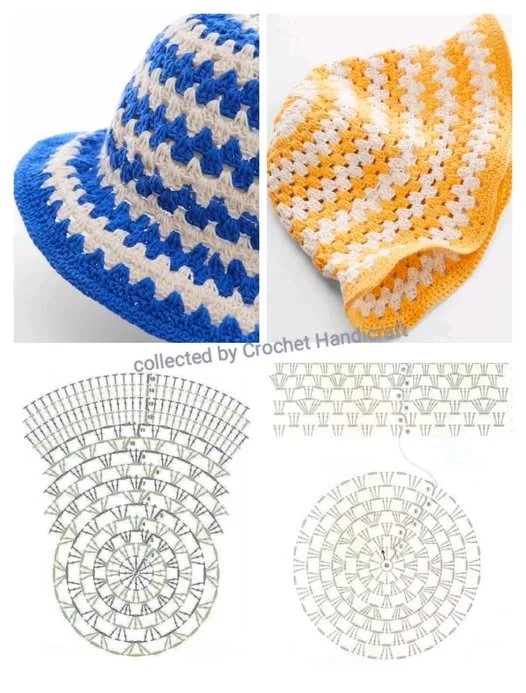
The success of any Crocheted hat – Pattern begins with the “Magic Ring” or “Magic Circle” technique. This is the gold standard for starting hats worked from the top down, as it allows you to pull the center tight, eliminating any unsightly holes at the crown. Most modern Crocheted hat – Pattern instructions will prioritize this method because it creates a seamless, professional look that is much cleaner than the traditional chain-and-join method.
Once the center is established, the Crocheted hat – Pattern will move into the “Increase Rounds.” This is where the mathematical precision of the Pattern comes into play, as you must systematically add stitches to ensure the hat lies flat at the top before it begins to curve downward. If the increases are too frequent, the hat will wave; if they are too few, the Crocheted hat – Pattern will result in a cone shape rather than a rounded dome.
The choice of yarn weight is a critical component of the Crocheted hat – Pattern. For a thick, winter-ready beanie, a “Bulky” or “Chunky” weight yarn is often recommended, as it works up quickly and provides excellent insulation. Conversely, a Crocheted hat – Pattern designed for springtime might suggest a “Sport” or “DK” weight cotton, which offers more breathability and a lighter drape for warmer weather.
Stitch definition is another vital factor to consider when following a Crocheted hat – Pattern. Using a Crocheted hat – Pattern that features “Post Stitches” or “Bobbles” can add incredible texture, but these designs often require a solid-colored yarn to really shine. Variegated or busy yarns can sometimes hide the intricate details of a complex Crocheted hat – Pattern, so matching your yarn choice to the stitch style is key to a beautiful result.
The term Pattern also implies a specific set of abbreviations that you must be comfortable with, such as “sc” for single crochet or “dc” for double crochet. A well-written Crocheted hat – Pattern will include a legend or a glossary to help you navigate these terms. Understanding the difference between US and UK terminology is also essential, as a “double crochet” in one Crocheted hat – Pattern might mean something entirely different in another.
Finally, tension and “gauge” are the secret ingredients to a successful Crocheted hat – Pattern. Before starting the actual hat, it is always wise to crochet a small test swatch to see if your stitches match the size intended by the Pattern designer. If your swatch is too small, you may need a larger hook; if it is too large, a smaller hook will help you achieve the correct dimensions for your Crocheted hat – Pattern.
One of the most common challenges with a Crocheted hat – Pattern is achieving the perfect fit for different age groups. A standard Crocheted hat – Pattern can usually be scaled up or down by simply adding or removing increase rounds. For example, a baby hat might stop increasing at 48 stitches, while an adult version of the same Crocheted hat – Pattern might continue until it reaches 72 or 80 stitches in the round.
The “Crown Diameter” is the most reliable measurement to follow when working on a Crocheted hat – Pattern. To find the correct size, you divide the desired head circumference by 3.14 (pi). If an adult head is 22 inches, the flat circle of your Crocheted hat – Pattern should measure roughly 7 inches across before you stop increasing and begin working the “Sides” of the hat.
Working the “Body” of the hat is the most relaxing part of any Crocheted hat – Pattern. Once the crown is finished, you simply work one stitch into each stitch of the previous round. This is where the Crocheted hat – Pattern begins to take on its vertical height. You can use this section to experiment with color changes or stripes, making the Crocheted hat – Pattern uniquely your own without changing the structural integrity of the design.
For a “Slouchy” style Crocheted hat – Pattern, you will continue working the body rounds for a longer duration than a standard beanie. This extra length creates the “slouch” or drape at the back of the head. When following a Crocheted hat – Pattern for a slouchy hat, it is important to use a yarn with a soft drape, such as an acrylic-wool blend, so the fabric doesn’t stand up stiffly like a chef’s hat.
The “Brim” or “Ribbing” is the final structural element of the Crocheted hat – Pattern. This section is often worked using “Front Post” and “Back Post” stitches to create a stretchy, ribbed texture that grips the head securely. A high-quality Crocheted hat – Pattern will often suggest switching to a slightly smaller hook size for the brim to ensure it remains snug over time and doesn’t stretch out too much with wear.
Finally, adding a pom-pom can change the entire vibe of your Crocheted hat – Pattern. Whether you choose a large, fluffy faux-fur pom-pom or a handmade yarn version, this finishing touch adds weight and style. Many designers include instructions within the Crocheted hat – Pattern on how to securely attach these accessories so they don’t wobble or fall off during daily use.
The hook you choose for your Crocheted hat – Pattern can significantly impact your comfort and the final look of the stitches. Ergonomic hooks are highly recommended if you plan on making multiple hats, as they reduce strain on the wrist. When working on a Crocheted hat – Pattern, a smooth hook made of aluminum or high-quality plastic ensures that the yarn glides effortlessly, allowing for a more consistent stitch tension.
Yarn fiber is just as important as the Crocheted hat – Pattern itself. For winter gear, merino wool is a fantastic choice because it is incredibly soft and warm. If you are making a hat for someone with sensitive skin, an “Anti-Pilling Acrylic” is a great alternative found in many Crocheted hat – Pattern recommendations because it is soft, durable, and machine washable, which is a major plus for everyday accessories.
A tapestry needle is an indispensable tool for finishing your Crocheted hat – Pattern. After you fasten off the yarn, you will have a few “tails” that need to be woven into the fabric. Properly hiding these ends ensures that your Crocheted hat – Pattern looks professional and won’t unravel. A blunt-tipped needle is best because it slides between the fibers without splitting the yarn.
Stitch markers are small but mighty aids when following a Crocheted hat – Pattern. Because crochet is often worked in continuous spirals, it is very easy to lose track of where a round begins. Placing a marker in the first stitch of each round of your Crocheted hat – Pattern prevents errors in stitch count, which is the most common reason for a lopsided or incorrectly sized hat.
Don’t forget the importance of a measuring tape when working through your Crocheted hat – Pattern. Checking the height of the hat as you go ensures that you don’t make it too short (exposing the ears) or too long. A standard adult beanie is usually about 8 to 9 inches long, but your Crocheted hat – Pattern may vary depending on the style and the intended recipient.
Lastly, consider the “Color Palette” of your Crocheted hat – Pattern. Using a variegated or “cake” yarn can create beautiful color transitions without the need for manual yarn changes. This is a popular choice for many modern Crocheted hat – Pattern designs because it creates a complex, high-end look with very little extra effort on the part of the maker.
Once you have completed your Crocheted hat – Pattern, proper care is essential to maintain its shape. Most handmade items should be hand-washed in cool water with a gentle detergent. Avoid wringing the hat; instead, roll it in a towel to remove excess moisture and lay it flat to dry. This prevents the Crocheted hat – Pattern from stretching out of shape and keeps the fibers looking fresh.
If you find that your finished Crocheted hat – Pattern is a little bit too snug, you can “Block” it. Blocking involves dampening the hat and stretching it over a balloon or a hat form until it dries. This can help “set” the stitches and give the Crocheted hat – Pattern a more polished, store-bought appearance by evening out any slight irregularities in your tension.
Creative variations of the Crocheted hat – Pattern are endless. You can add “Animal Ears” to a child’s hat or incorporate “Reflective Thread” for a hat intended for nighttime runners. Once you understand the basic geometry of a Crocheted hat – Pattern, you can use it as a canvas for embroidery, beads, or even surface crochet details that add a personal signature to your work.
Another popular variation is the “Messy Bun” or “Ponytail” hat. This version of the Crocheted hat – Pattern leaves a hole at the top (usually by crocheting around an elastic hair tie) to allow hair to pass through. It is a functional and trendy adaptation of the classic Crocheted hat – Pattern that is perfect for active individuals who want to stay warm without sacrificing their hairstyle.
Seasonal adjustments to your Crocheted hat – Pattern can also be made. In autumn, you might use harvest tones and a thicker stitch, while in spring, a lacy, “openwork” Crocheted hat – Pattern using linen yarn creates a fashionable sun hat. The versatility of the Pattern means it is never out of season; you simply adapt the materials to fit the weather.
Finally, remember that every Crocheted hat – Pattern you complete is a learning experience. With each hat, your speed and consistency will improve. Many crafters keep a “Project Journal” where they note which Crocheted hat – Pattern worked best for them, the yarn they used, and any modifications they made. This record-keeping makes it much easier to replicate your success for future gifts or sales.
1. How much yarn do I need for a standard Crocheted hat – Pattern?
Most adult-sized hats require between 150 to 200 yards of worsted weight yarn. If you are using a bulkier yarn for your Crocheted hat – Pattern, you might need less yardage, but more total weight.
2. Is a Crocheted hat – Pattern suitable for an absolute beginner?
Yes! A simple beanie using basic stitches like the half-double crochet is an excellent first project. Many beginners find that a Crocheted hat – Pattern is more rewarding than a scarf because it is finished much faster.
3. Why is my crocheted hat too pointy at the top?
This usually happens if you stop the increase rounds too early or if you increase too sharply. A good Crocheted hat – Pattern will gradually transition from the flat crown to the sides to create a smooth, rounded shape.
4. Can I use a knitting pattern for crochet?
No, crochet and knitting have different stitch structures and densities. You must use a dedicated Crocheted hat – Pattern to achieve the correct results, as crochet stitches are generally taller and thicker than knit stitches.
5. How do I make my Crocheted hat – Pattern more stretchy?
Using a larger hook or choosing a stitch like the “Ribbed Stitch” (front and back post) will significantly increase the elasticity of your Crocheted hat – Pattern, allowing it to fit a wider range of head sizes.
6. What is the best yarn for a baby’s Crocheted hat – Pattern?
Choose a soft, hypoallergenic yarn such as organic cotton or “Baby-Safe” acrylic. Avoid mohair or yarns with long fibers that could shed and be inhaled by the infant.
In this article, we have journeyed through the essential steps of mastering a Crocheted hat – Pattern, from the initial Magic Ring and the mathematics of the Increase Rounds to the final decorative touches like ribbing and pompoms. We discussed the vital importance of gauge, the choice of yarn weight, and the tools needed to ensure a professional finish.
We also explored how to care for your finished projects and how to adapt a basic Crocheted hat – Pattern into creative variations like messy bun hats or animal-themed designs. Whether you are crafting for yourself, for charity, or as a thoughtful gift, the Crocheted hat – Pattern is a fundamental skill that brings warmth and joy to both the maker and the wearer.


