
Patchwork Bird Tutorial

This Ribbon Star Block Tutorial – Pattern is a fantastic way for quilters of all skill levels to explore the elegance of geometric design combined with the charm of traditional patchwork. There is something truly captivating about a star that appears to be woven from delicate ribbons, creating a sense of movement and depth on a flat surface. By following a well-structured Ribbon Star Block Tutorial – Pattern, you can master the art of color placement and precision piecing, which are the hallmarks of a professional-grade quilt.
The beauty of the Ribbon Star Block Tutorial – Pattern lies in its clever use of high-contrast fabrics to simulate the look of overlapping strands. Unlike more complex stars that require difficult Y-seams, this Ribbon Star Block Tutorial – Pattern utilizes standard squares and triangles, making it accessible even for those who are relatively new to the craft. Whether you are aiming to create a bold, modern wall hanging or a soft, vintage-style throw, this versatile design serves as the perfect foundation for your creative expression.
In this detailed guide, we will break down the entire process of the Ribbon Star Block Tutorial – Pattern, from selecting the ideal fabric prints to the final pressing of the seams. We will focus on the technical nuances that make this Pattern unique, such as the “ribbon” effect created by the specific arrangement of half-square triangles. By the end of this journey, you will have the confidence to incorporate the Ribbon Star Block Tutorial – Pattern into your future quilting projects, ensuring each block you sew is crisp, symmetrical, and visually stunning.
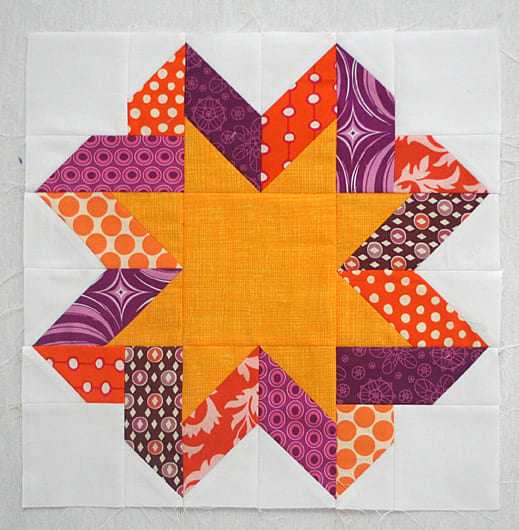
The first and most crucial step in any Ribbon Star Block Tutorial – Pattern is choosing fabrics that allow the “ribbon” to stand out clearly against the background. To achieve the best results, you should select three distinct types of fabric: a neutral background, a primary ribbon color, and a secondary shadow color. This tonal variation is what gives the Ribbon Star Block Tutorial – Pattern its signature three-dimensional appearance, making the star look like it is floating on the fabric.
When selecting materials for your Ribbon Star Block Tutorial – Pattern, 100% quilting cotton is the industry standard for a reason. Its stable weave prevents the fabric from stretching out of shape as you sew the bias edges of the triangles. Before you begin cutting for the Ribbon Star Block Tutorial – Pattern, it is highly recommended to starch your fabric; this extra stiffness helps maintain the crisp points that make star blocks so impressive.
The “Pattern” aspect of this project requires careful attention to the “value” of your colors—which refers to how light or dark a color is. For the Ribbon Star Block Tutorial – Pattern to be successful, your “ribbon” fabric should be significantly darker or brighter than your background. If the colors are too similar in value, the star shape will be lost, and the intricate weaving effect of the Ribbon Star Block Tutorial – Pattern will blend into a confusing mess of shapes.
Preparation also involves accurate cutting using a rotary cutter and a high-quality acrylic ruler. In this Ribbon Star Block Tutorial – Pattern, even a tiny 1/8-inch error in cutting can lead to points that don’t meet or blocks that won’t lay flat. Many quilters find it helpful to cut all their pieces for several blocks at once, keeping them organized in labeled trays to ensure the assembly phase of the Ribbon Star Block Tutorial – Pattern goes smoothly.
Don’t forget to consider the scale of your prints when following this Ribbon Star Block Tutorial – Pattern. Large-scale floral prints can sometimes obscure the lines of the star, so “blender” fabrics or small geometric prints often work best. By choosing the right prints, you ensure that the geometry of the Ribbon Star Block Tutorial – Pattern remains the star of the show, literally and figuratively.
Lastly, ensure your sewing machine is equipped with a fresh size 80/12 needle and a high-quality polyester or cotton thread. The durability of your Ribbon Star Block Tutorial – Pattern depends on the strength of your seams. Once your fabrics are chosen, starched, and cut, you are ready to begin the transformation of simple cloth into the elegant geometry of the Ribbon Star Block Tutorial – Pattern.
The core building block of the Ribbon Star Block Tutorial – Pattern is the Half-Square Triangle (HST). These are essentially squares made up of two equal right-angled triangles joined by a diagonal seam. To create the points of the star in this Ribbon Star Block Tutorial – Pattern, you will need to master the “two-at-a-time” method, which is the most efficient way to produce accurate HSTs without stretching the fabric’s grain.
In the Ribbon Star Block Tutorial – Pattern, the alignment of these HSTs is what creates the “ribbon” effect. You will be pairing your ribbon fabric with both the background fabric and the shadow fabric. Marking a diagonal line on the back of the lighter square serves as your guide, ensuring that every HST in your Ribbon Star Block Tutorial – Pattern is perfectly symmetrical and ready to be trimmed to the exact size.
Trimming is a non-negotiable step in a professional Ribbon Star Block Tutorial – Pattern. Even if you sew perfectly, the process of flipping and pressing can cause minor distortions. Using a specialized HST ruler to “square up” your units ensures that when you go to assemble the full Ribbon Star Block Tutorial – Pattern, the edges will align perfectly, preventing the dreaded “wavy” quilt top.
Pressing is the next vital skill in this Ribbon Star Block Tutorial – Pattern. For a star block, many experts recommend pressing your seams “open” rather than to one side. This reduces the bulk at the center point where many seams meet. In a complex Ribbon Star Block Tutorial – Pattern, keeping the block as flat as possible is the secret to making the quilting process much easier later on.
The term Pattern refers to the mathematical layout of these HSTs. In a Ribbon Star, the HSTs are oriented so that the “ribbon” colors flow into one another, creating a circular or woven movement. It is often helpful to keep a printed copy of the Ribbon Star Block Tutorial – Pattern next to your sewing machine as a visual reference, so you don’t accidentally rotate a triangle the wrong way.
Once all your HST units are sewn, trimmed, and pressed, lay them out on a flat surface to verify the design. This “dry run” of the Ribbon Star Block Tutorial – Pattern allows you to see the star emerge before you commit to the final seams. It’s the moment where the colors finally start to look like a ribbon, providing a satisfying glimpse of the finished Ribbon Star Block Tutorial – Pattern.
Assembling the Ribbon Star Block Tutorial – Pattern is usually done in rows, typically a 4×4 or 3×3 grid depending on the specific variation you are following. The key to a beautiful Ribbon Star Block Tutorial – Pattern is “pinning for precision.” Use fine pins to match the intersections of the triangles, ensuring that the points of your star don’t get “chopped off” by your seam allowance.
A quarter-inch seam allowance is the standard for the Ribbon Star Block Tutorial – Pattern. If your seam is even slightly too wide, the points of your star will disappear into the next row. Most experienced quilters use a specialized 1/4″ presser foot to maintain a consistent distance throughout the entire Ribbon Star Block Tutorial – Pattern assembly, ensuring the geometry remains intact.
“Nesting seams” is another technique used in the Ribbon Star Block Tutorial – Pattern to achieve perfect corners. If you chose to press your seams to the side, you should alternate the direction for each row. When you join the rows of the Ribbon Star Block Tutorial – Pattern together, the seams will “lock” into place, preventing the fabric from shifting and resulting in perfectly matched intersections.
The center of the Ribbon Star Block Tutorial – Pattern is often the most difficult part because of the number of fabric layers meeting at one point. To handle this, sew slowly and use a “stilettos” or a long pin to guide the fabric under the needle. A successful Ribbon Star Block Tutorial – Pattern has a center that lays perfectly flat, which is achieved through careful pinning and consistent tension.
After sewing each row of the Ribbon Star Block Tutorial – Pattern, give it a good press with the iron. Avoid “scooting” the iron back and forth, as this can stretch the block. Instead, lift and press the iron straight down. This preserves the squareness of your Ribbon Star Block Tutorial – Pattern and ensures the final block measures exactly what the instructions intended.
Finally, measure your completed Ribbon Star Block Tutorial – Pattern. If the block is supposed to be 12.5 inches and yours is 12.25, you know your seam allowance was a bit too large. Learning from these small discrepancies is part of the journey of mastering the Ribbon Star Block Tutorial – Pattern. With practice, your points will become sharper and your blocks more consistent.
One of the best things about the Ribbon Star Block Tutorial – Pattern is its scalability. You can easily adjust the size of the initial squares to create tiny 6-inch blocks for a pillow or massive 18-inch blocks for a modern “big block” quilt. The geometric logic of the Ribbon Star Block Tutorial – Pattern remains the same regardless of size, making it a versatile tool in your design kit.
You can also play with the “Secondary Pattern” created when you join multiple Ribbon Star blocks together. If you alternate the orientation of the blocks, the “ribbons” can appear to link up across the entire quilt top, creating a complex Celtic knot effect. This transformation is one of the most rewarding parts of working with a Ribbon Star Block Tutorial – Pattern.
For a contemporary look, try a “monochromatic” Ribbon Star Block Tutorial – Pattern. Use different shades of a single color—like navy, sky blue, and ice blue—against a crisp white background. This gives the Ribbon Star Block Tutorial – Pattern a very clean, architectural feel that is perfect for modern home decor or nursery projects.
If you enjoy “scrappy” quilting, the Ribbon Star Block Tutorial – Pattern is an excellent way to use up your bin of leftover fabrics. As long as you keep your background fabric consistent, the “ribbon” parts of the Ribbon Star Block Tutorial – Pattern can be made from dozens of different prints, resulting in a vibrant, eclectic quilt that still feels organized.
The Ribbon Star Block Tutorial – Pattern can also be adapted into smaller items like quilted coasters, pot holders, or tote bag panels. Because the star is so visually striking, a single Ribbon Star Block Tutorial – Pattern can serve as the focal point for an entire accessory. It is a great way to practice the technique before committing to the hundreds of hours required for a full king-sized quilt.
Lastly, consider the quilting design you will use over your finished block. Simple straight-line quilting that follows the lines of the “ribbons” can emphasize the woven effect of the Ribbon Star Block Tutorial – Pattern. Alternatively, free-motion quilting with swirls or feathers in the background areas will make the star pop even more, bringing your Ribbon Star Block Tutorial – Pattern to a professional, museum-quality finish.
1. Is the Ribbon Star Block Tutorial – Pattern beginner-friendly?
Yes, it is considered an intermediate-beginner project. While it requires precision in cutting and sewing 1/4″ seams, it only uses basic units like squares and half-square triangles, making it a great “step-up” project for those who have mastered basic patchwork.
2. How much fabric do I need for one Ribbon Star Block?
For a 12-inch finished block, you typically need about 1/4 yard of background fabric and two “fat eighths” (or large scraps) of your ribbon and shadow fabrics. It is a very economical Pattern for using up your stash.
3. Why do my points keep disappearing in the seams?
This usually happens because the seam allowance is wider than a 1/4 inch. When you sew the rows together, you should aim to sew just a hair’s breadth outside the “V” where the triangle seams meet to keep your points sharp in the Ribbon Star Block Tutorial – Pattern.
4. Can I make this Ribbon Star Block Tutorial – Pattern without a rotary cutter?
While possible with scissors and a template, a rotary cutter and ruler are highly recommended for this specific Pattern. Precision is key to the “ribbon” look, and manual cutting often introduces small errors that accumulate.
5. What is the best background color for this star?
A high-contrast neutral like white, cream, or charcoal gray works best. The goal of the Ribbon Star Block Tutorial – Pattern is to make the star stand out, so a busy background fabric is generally avoided.
6. How do I make the ribbon look like it’s actually glowing?
To achieve a “glow,” use a gradient of colors—a very dark shadow, a medium-bright ribbon, and a very light “highlight” fabric at the points. This mimics how light hits a real ribbon, adding to the 3D effect of the Ribbon Star Block Tutorial – Pattern.
In this comprehensive guide, we have explored the intricate and rewarding process of the Ribbon Star Block Tutorial – Pattern, highlighting the importance of fabric value, precise cutting, and the mastery of half-square triangles. We discussed how the clever arrangement of “ribbon” and “shadow” fabrics creates a stunning three-dimensional effect that breathes life into traditional quilting.
From the initial preparation of 100% quilting cotton to the final assembly of rows and the importance of a perfect quarter-inch seam, every step in this Ribbon Star Block Tutorial – Pattern is designed to help you achieve professional results. Whether you choose to create a single decorative block or a full-sized quilt, the Ribbon Star remains a timeless design that showcases both skill and creativity.


