
Crochet Flower - Tutorial

Finding the perfect Crochet Top – Pattern is often the first step in a rewarding journey toward creating a unique, handmade wardrobe that reflects your personal style. Whether you are looking for a breezy summer garment or a sophisticated layering piece, a well-designed Crochet Top – Pattern provides the essential roadmap needed to turn simple yarn into a functional work of art. In today’s world of slow fashion, choosing to work on a Crochet Top – Pattern is not just about the final product; it is about the meditative process of crafting something with your own two hands, ensuring that every stitch carries a sense of purpose and care.
The versatility of a Crochet Top – Pattern is truly unmatched, as it allows for endless customization through yarn choice, color palettes, and stitch variations. From delicate lace designs that require a steady hand to chunky, modern silhouettes that work up in a weekend, the right Crochet Top – Pattern can cater to any skill level. For beginners, a simple crochet pattern focuses on basic stitches like the double crochet or the half-double crochet, while advanced makers might seek out a Crochet Top – Pattern that incorporates complex textures, intricate ribbing, or innovative construction methods like top-down or seamless designs.
As you explore the various options available, it becomes clear that a Crochet Top – Pattern is more than just instructions; it is an invitation to experiment with geometry and drape. Understanding how different fibers, such as breathable cotton, luxurious bamboo, or soft wool blends, interact with your chosen Crochet Top – Pattern is key to achieving a professional-looking garment. In this comprehensive guide, we will delve into the essential elements of selecting, starting, and perfecting your next project, ensuring that your experience with a Crochet Top – Pattern is both successful and deeply satisfying for your creative soul.
When you begin working on a Crochet Top – Pattern, the yarn you choose will dictate the entire feel and longevity of the garment. For most summer-themed Crochet Top – Pattern designs, 100% cotton or cotton-linen blends are the gold standard because they offer excellent breathability and “memory,” meaning the top won’t lose its shape easily. Selecting a lightweight yarn ensures that your finished project is comfortable to wear in warm weather and has a beautiful, fluid drape that moves naturally with your body.
The weight of the yarn is another critical factor that must align perfectly with your Crochet Top – Pattern. Most modern patterns specify a “Category 2 (Sport)” or “Category 3 (DK)” weight to keep the fabric from becoming too thick or heavy. If you substitute yarn, always check the yarn weight symbol on the label to ensure it matches the requirements of the Crochet Top – Pattern, otherwise, the sizing of your garment might be significantly altered, leading to a fit that is either too tight or overly baggy.
Color choice plays a massive role in how the details of your Crochet Top – Pattern are perceived by the eye. Solid, lighter colors are often better for showing off intricate stitch work, such as shells or cables, within a detailed crochet design. Conversely, variegated or “self-striping” yarns can add a fun, eclectic vibe to a simple Crochet Top – Pattern, though they may sometimes hide the complexity of more difficult stitches, so choose your palette based on what feature you want to highlight most.
Fiber elasticity is a hidden secret to a great fit when following a Crochet Top – Pattern. While cotton is popular, it lacks the “spring” of animal fibers, which is why many designers recommend a cotton-acrylic blend for beginners. This blend provides the coolness of cotton but adds enough stretch to make the tension easier to manage, ensuring that your Crochet Top – Pattern blocks look uniform and neat throughout the entire construction process without straining your hands.
Don’t forget to consider the “drape” of the yarn, which refers to how the fabric hangs once it is finished. A Crochet Top – Pattern designed for a flowing, bohemian look will require a yarn with high drape, like bamboo or silk. If the pattern calls for a more structured, boxy silhouette, a sturdier mercerized cotton might be the better choice. Testing a small sample or “swatch” before starting the full Crochet Top – Pattern is the best way to see how the yarn will behave in reality.
Lastly, always check the yardage requirements listed in your Crochet Top – Pattern and purchase an extra skein from the same dye lot. Nothing is more frustrating than running out of yarn a few rows before finishing a beautiful handmade crochet top and finding that the new yarn has a slightly different shade. Consistency in your materials is the foundation of a high-quality finish, allowing the beauty of the Crochet Top – Pattern to truly take center stage without visual interruptions.
One of the most overlooked aspects of starting a Crochet Top – Pattern is the “gauge swatch,” which is a small square of fabric used to measure your tension. Gauge is simply the number of stitches and rows per inch, and it is vital because every person crochets with a different level of tightness. If your gauge doesn’t match the Crochet Top – Pattern specifications, your garment could end up several sizes too large or too small, wasting hours of your hard work and effort.
To achieve the perfect gauge for your Crochet Top – Pattern, you may need to adjust your hook size. If you have fewer stitches than the pattern requires, your stitches are too loose, and you should switch to a smaller crochet hook. If you have more stitches, your tension is too tight, and a larger crochet hook will help you match the designer’s intent. This small adjustment is the difference between a Crochet Top – Pattern that fits like a glove and one that stays hidden in the closet.
Tension consistency is also paramount when working through a long Crochet Top – Pattern. Your mood and energy levels can actually affect how tightly you hold the yarn, so try to work on your crochet project when you are relaxed. Inconsistent tension can lead to uneven edges or a lopsided garment, which can be difficult to fix later. Practicing a rhythmic crochet motion helps maintain a steady flow, ensuring that every row of your Crochet Top – Pattern looks identical to the one before it.
When reading a Crochet Top – Pattern, pay close attention to whether the gauge is measured “blocked” or “unblocked.” Blocking is the process of wetting the finished fabric and pinning it to shape. Many designers provide the blocked gauge because the fabric usually relaxes and expands after washing. Knowing this detail in your Crochet Top – Pattern prevents surprises and ensures that your finished crochet garment maintains its intended dimensions after its first cleaning.
If you find that your row height is off but your stitch width is correct, you may need to adjust your “golden loop” technique. This refers to how high you pull up the first loop of a stitch. Adjusting this height allows you to customize the Crochet Top – Pattern to your specific body proportions, especially if you have a long torso. Mastering this level of control gives you the confidence to tackle any complex crochet pattern with ease and professional precision.
Finally, remember that the type of hook material can also influence your tension in a Crochet Top – Pattern. Metal hooks are slippery and fast, while wooden or bamboo hooks provide more “grip” on the yarn. If you are struggling with a slippery yarn like silk or bamboo while following a Crochet Top – Pattern, switching to a wooden hook can give you more control over your stitches, resulting in a much more even fabric texture.
Most Crochet Top – Pattern designs are built upon a foundation of “basic stitches” like the chain (ch), single crochet (sc), and double crochet (dc). Understanding how to manipulate these stitches is the core of garment construction. For example, many patterns use a “foundation single crochet” instead of a traditional chain to start the project, as this provides a stretchier edge that is much more comfortable for the neckline or waist of a well-fitted crochet top.
Increasing and decreasing are the “shaping” tools of any Crochet Top – Pattern. These techniques allow the fabric to curve around the bust, waist, and armholes. A high-quality Crochet Top – Pattern will clearly explain where these changes occur, often using terms like “2 dc in next st” for an increase or “dc2tog” for a decrease. Mastering these shaping techniques is essential for creating a silhouette that is flattering and follows the natural contours of the human body.
The “Turning Chain” is another technical detail that can make or break the edges of your Crochet Top – Pattern. Depending on the stitch used, the turning chain might count as the first stitch of the row or simply as a way to gain height. Following the stitch count at the end of each row in your Crochet Top – Pattern is the only way to ensure you haven’t accidentally added or lost stitches, which would cause the edges of your top to look jagged or slanted.
Advanced Crochet Top – Pattern designs often feature “Post Stitches” to create ribbing at the hem or cuffs. Front-post and back-post stitches create a stretchy, raised texture that mimics the look of knitted ribbing. This detail adds a professional “store-bought” finish to your handmade crochet top, giving it a structured look that holds up well over time. Incorporating these textured crochet elements elevates a simple design into something truly special and stylish.
Joining techniques are just as important as the stitches themselves in a Crochet Top – Pattern. Whether the pattern uses the “mattress stitch,” “slip stitch join,” or “whip stitch,” the goal is to create a seam that is nearly invisible. A bulky seam can be uncomfortable against the skin and ruin the lines of a delicate crochet top. Take your time with the assembly phase of your Crochet Top – Pattern to ensure your garment looks as good on the inside as it does on the outside.
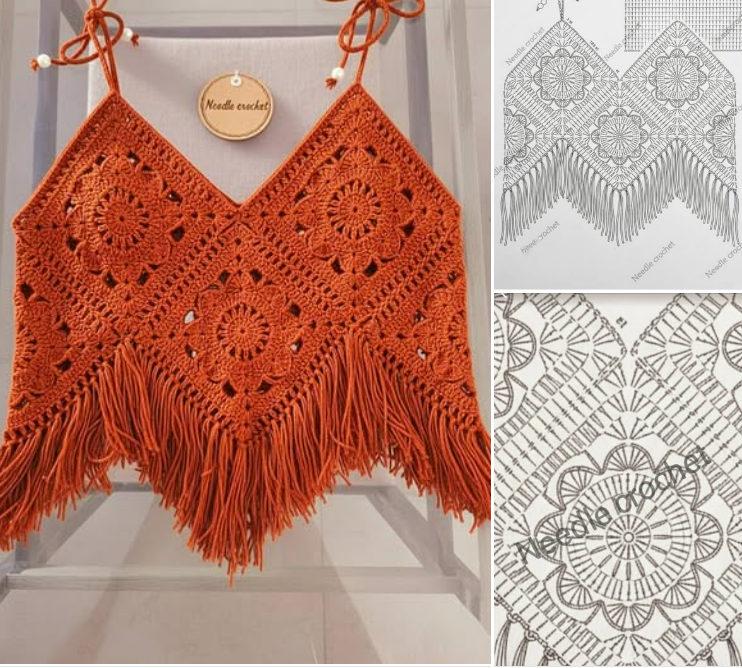
Finally, learning how to read “stitch diagrams” or charts can be a game-changer when working on a Crochet Top – Pattern. While written instructions are standard, a visual chart can help you understand the geometric flow of the pattern, especially during complex lace sections. Many modern makers prefer a Crochet Top – Pattern that includes both written steps and visual aids to ensure total clarity throughout the creative process.
Once the last stitch of your Crochet Top – Pattern is complete, the “finishing” stage begins, which is where the magic truly happens. Weaving in your ends securely is the first priority. Use a darning needle to weave the yarn tails in multiple directions through the densest part of the stitches. This prevents the ends from popping out during wear and ensures your crochet masterpiece doesn’t unravel during its first trip through the laundry.
“Blocking” is the secret weapon of professional crocheters and is highly recommended for any Crochet Top – Pattern. By soaking the garment in lukewarm water with a bit of wool wash and then laying it flat to dry on blocking mats, you can even out the stitches and open up the design. This process is especially transformative for a Crochet Top – Pattern featuring lace or openwork, as it allows the patterns to “bloom” and settle into their final, beautiful shape.
Edging and borders are often the final step in a Crochet Top – Pattern to give the garment a polished look. A simple row of single crochet or a decorative “crab stitch” around the neckline and armholes can hide minor imperfections and provide extra stability. These finishing touches prevent the edges of your Crochet Top – Pattern from stretching out over time, ensuring that the garment retains its intended fit and professional appearance for years to come.
Understanding how to care for the specific fiber used in your Crochet Top – Pattern is vital for its longevity. Most handmade items should be hand-washed in cool water and laid flat to dry. Never hang a crochet garment on a hanger, as the weight of the fabric will cause it to stretch downward, permanently distorting the shape of the Crochet Top – Pattern. Instead, fold it neatly and store it in a cool, dry place to keep the stitches looking fresh and vibrant.
If you find that your Crochet Top – Pattern has become a bit “fuzzy” or developed pills over time, you can use a fabric shaver or a “pill comb” to gently remove them. This is common with natural fibers and doesn’t mean your work was poor. Regular maintenance of your handmade crochet wardrobe ensures that the time you invested in following the Crochet Top – Pattern continues to pay off as you wear the garment season after season.
Finally, consider adding a personalized touch like a “handmade” label or a unique set of buttons if your Crochet Top – Pattern allows for it. These small details turn a generic project into a signature piece. Sharing your finished Crochet Top – Pattern project on social media or within crafting communities not only celebrates your achievement but also inspires other makers to pick up their hooks and begin their own creative crochet journey.
How long does it take to complete a Crochet Top – Pattern?
The time required depends on the complexity of the design and your skill level. A simple, “bulky weight” Crochet Top – Pattern can be finished in 5 to 10 hours, while a fine, “lace-weight” project might take 30 to 50 hours of dedicated work.
Can I make a Crochet Top – Pattern if I only know basic stitches?
Yes! Many designs are specifically labeled as “beginner-friendly” and use only the chain and single crochet. Look for a Crochet Top – Pattern that consists of two simple rectangles, as these are the easiest to assemble.
How do I choose the right size in a Crochet Top – Pattern?
Always look at the “finished bust measurement” provided in the Crochet Top – Pattern. Compare this measurement to a top you already own that fits you well, rather than relying on standard S/M/L labels, which vary by designer.
What is “positive ease” in a Crochet Top – Pattern?
“Ease” refers to how much larger or smaller the garment is compared to your actual body measurements. “Positive ease” means the Crochet Top – Pattern will fit loosely, while “negative ease” means the garment will stretch to fit tightly.
Is it better to use a plastic or metal hook for a Crochet Top – Pattern?
This is a personal preference. Metal hooks are generally preferred for cotton yarn because they allow the yarn to slide easily, whereas plastic hooks might “drag,” making the Crochet Top – Pattern harder to work through quickly.
Why does my crochet top look different from the picture?
This is usually due to “yarn substitution” or a difference in “gauge.” If you use a different fiber or have a different tension than the designer, the Crochet Top – Pattern will look slightly different. Blocking the garment usually solves most visual discrepancies.
In this article, we have explored the essential steps to successfully creating a beautiful garment using a Crochet Top – Pattern. We discussed the importance of selecting the right yarn fibers for breathability and drape, the critical role of matching gauge to ensure a perfect fit, and the various stitches and techniques that give a Crochet Top – Pattern its unique character.
We also covered the vital finishing processes like blocking and weaving in ends, which elevate a project from a simple craft to a high-quality piece of wearable art. By mastering these elements, you can confidently approach any Crochet Top – Pattern and produce results that are both durable and fashionable.


