
Patchwork Bird Tutorial

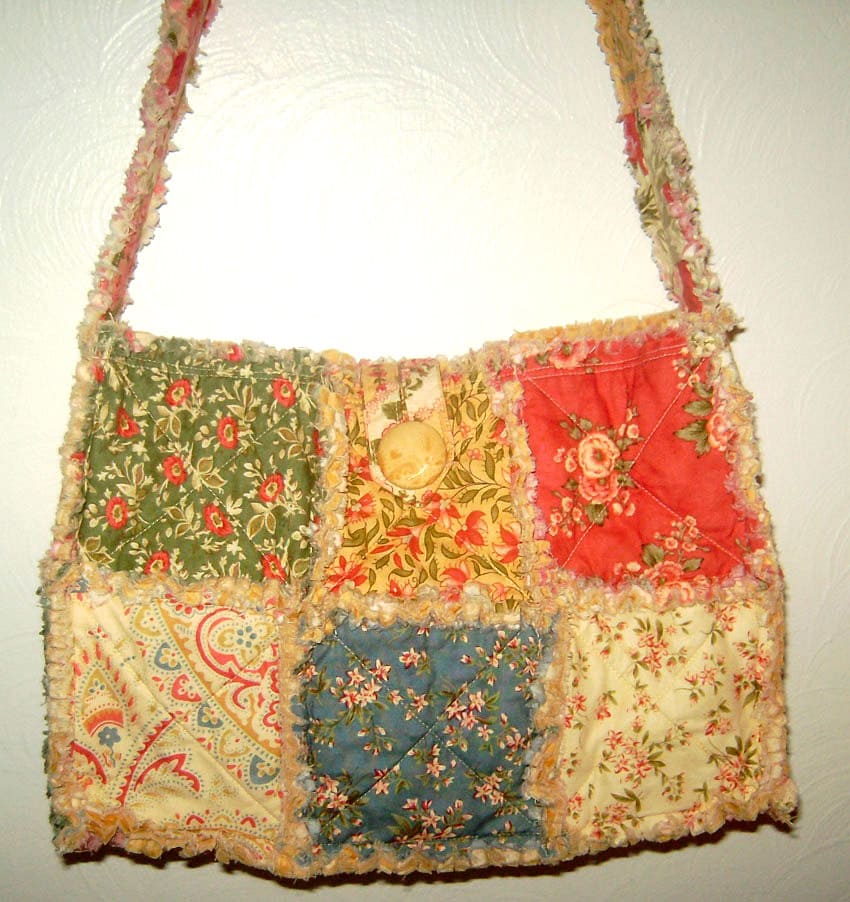
The Rag Quilt Purse – Pattern is an exceptional way to combine the rustic charm of traditional quilting with the practical needs of modern accessory design. If you are looking for a project that celebrates texture, color, and a bit of a “shabby chic” aesthetic, mastering the Rag Quilt Purse – Pattern is a perfect choice for your next sewing adventure. Unlike traditional quilts where seams are hidden, this specific style thrives on exposed, frayed edges, giving your bag a unique, cozy personality that stands out from factory-made alternatives.
Choosing to work with a Rag Quilt Purse – Pattern offers a wonderful opportunity to upcycle fabrics or use up those beautiful cotton scraps you have been saving for a special occasion. The construction process is famously forgiving, making it an ideal entry point for beginners who might be intimidated by the precision required in standard garment sewing. Because the Rag Quilt Purse – Pattern relies on the fraying effect, you don’t have to worry about perfectly hidden seams; in fact, the more the edges “bloom,” the better the finished purse looks.
In the following guide, we will explore the essential steps, materials, and specialized techniques required to transform a simple Rag Quilt Purse – Pattern into a durable, stylish accessory. From selecting the right flannel to the final washing process that brings the fringe to life, every stage of creating your Rag Quilt Purse – Pattern is filled with creative potential. Whether you want a large tote for beach days or a small crossbody for daily errands, this versatile design can be adapted to fit any size, style, or functional requirement you have in mind.
The most critical factor in the success of your Rag Quilt Purse – Pattern is the type of fabric you choose. For the best “fraying” results, 100% cotton flannel is the top recommendation because the loose weave allows the edges to bloom beautifully after washing. Many crafters like to mix flannel with standard quilting cotton prints to add variety, but ensure that at least the middle or back layers are flannel to guarantee that signature rugged look that defines the Rag Quilt Purse – Pattern.
When you are planning the layout of your Rag Quilt Purse – Pattern, consider using high-contrast colors to make the “ragged” seams pop. Since each square in the Rag Quilt Purse – Pattern consists of a front, a middle, and a back layer, you can play with different colors on the inside and outside of the bag. This multi-layered quilting technique not only adds visual depth but also provides the structural integrity needed for a bag that will carry weight.
Avoid using synthetic fabrics like polyester or tightly woven silks for the main body of your Rag Quilt Purse – Pattern. These materials do not fray well and can result in a messy, stringy appearance rather than the soft, fluffy fringe that a proper Rag Quilt Purse – Pattern should have. Stick to natural fibers like cotton, linen, or even recycled denim for a more heavy-duty version of the shabby chic purse that remains durable over years of use.
The “filling” of your Rag Quilt Purse – Pattern can vary depending on how much structure you want. Some patterns suggest using low-loft cotton batting for a traditional quilt feel, while others recommend a third layer of flannel for a lighter, more flexible bag. If you want your Rag Quilt Purse – Pattern to stand up on its own, using a slightly stiffer batting or an extra layer of fabric will provide the necessary support for the bag’s walls.
Don’t forget to consider the “wrong side” of the fabric. Because the Rag Quilt Purse – Pattern features exposed seams, the back layer of your squares will be visible on the inside of the purse. Choosing a coordinating backing fabric ensures that the interior of your bag looks just as professional and well-thought-out as the exterior. This attention to detail is what separates a basic hobby project from a high-quality handmade accessory.
Lastly, always pre-wash your fabrics—not for shrinkage, but to remove excess dyes. However, some quilters prefer not to pre-wash for a Rag Quilt Purse – Pattern to keep the fabric stiff during the cutting and sewing process. If you choose not to pre-wash, just be prepared for a significant amount of lint in your dryer during the first “fringing” wash of your completed Rag Quilt Purse – Pattern.
To achieve clean results with your Rag Quilt Purse – Pattern, you will need a few specialized tools beyond a standard sewing machine. A rotary cutter and a self-healing mat are essential for cutting perfectly square units. In a Rag Quilt Purse – Pattern, consistency in size is vital because the squares are sewn with the wrong sides together, and any misalignment will be very obvious at the exposed seam junctions.
The most important tool for any Rag Quilt Purse – Pattern enthusiast is a pair of spring-loaded rag quilt snips. These shears are designed to cut through multiple layers of fabric without straining your hand. Because you will be making small snips every 1/4 inch along all the exposed seams of your Rag Quilt Purse – Pattern, having the right scissors is a lifesaver that prevents fatigue and ensures even fringing.
When cutting your squares for the Rag Quilt Purse – Pattern, remember to account for a larger-than-usual seam allowance. Most traditional quilts use a 1/4 inch seam, but a Rag Quilt Purse – Pattern typically requires a 1/2 inch to 1 inch seam allowance. This extra width is necessary to create the “rag” effect; without enough fabric outside the seam line, the fringe will be too short to bloom properly.
Marking your squares can also help maintain accuracy. You can use a water-soluble fabric pen to draw an “X” across each square. This “X” serves a dual purpose: it holds the three layers of the Rag Quilt Purse – Pattern together and provides a decorative quilted look. Following this straight-line quilting method ensures that the batting or middle layer doesn’t shift during the assembly of the purse.
Organization is key when working with a Rag Quilt Purse – Pattern. It is helpful to stack your “sandwiches” (front, middle, back layers) in the order they will be sewn. Labeling your stacks for the “front panel,” “back panel,” and “bottom” of the Rag Quilt Purse – Pattern will prevent mistakes and keep the sewing process moving quickly. This quilt project management is especially useful if you are using a complex color gradient.
Finally, ensure your sewing machine is fitted with a heavy-duty needle, such as a size 90/14 or 100/16. Since you will be sewing through six or more layers of fabric at the intersections of your Rag Quilt Purse – Pattern, a strong needle is required to prevent breakage. Using a walking foot is also highly recommended, as it helps feed all the layers through the machine at the same speed.
The assembly of a Rag Quilt Purse – Pattern is unique because you sew the pieces with the wrong sides together. This is the opposite of traditional sewing, and it is what allows the seams to face outward. As you join the squares for your Rag Quilt Purse – Pattern, you will start to see the fringe-to-be sticking up. It is important to backstitch at the beginning and end of every row to ensure the bag is strong enough for daily use.
Once you have created the main panels, the next step in the Rag Quilt Purse – Pattern is joining the sides and the bottom. This creates the 3D shape of the purse. Many people choose to “box the corners” of their Rag Quilt Purse – Pattern to give it a flat bottom. This bag-making technique allows the purse to sit upright on a table and increases the internal capacity of the bag significantly.
Adding handles is a crucial part of the Rag Quilt Purse – Pattern construction. You can make “ragged” handles by sewing long strips of fabric using the same layered technique, or you can use cotton webbing for a more utilitarian look. If you choose fabric handles, make sure they are reinforced with several rows of stitching, as the handles of a Rag Quilt Purse – Pattern bear the most stress during use.
The closure of your Rag Quilt Purse – Pattern can be a simple magnetic snap, a zipper, or a large decorative button. If you are a beginner, a magnetic sew-in snap is the easiest option and fits the rustic aesthetic of the pattern perfectly. For those who want more security, adding a recessed zipper to the Rag Quilt Purse – Pattern provides a professional finish that keeps your belongings safe while you are on the go.
Inner pockets are a fantastic addition to any Rag Quilt Purse – Pattern. You can sew a simple patch pocket onto the backing fabric of one of the interior squares before you assemble the layers. This provides a dedicated space for your phone or keys, making your handmade rag quilt bag as functional as any high-end designer purse you would find in a retail store.
Before the final step of snipping, check all your seam intersections. In a Rag Quilt Purse – Pattern, the points where four squares meet can be quite bulky. It is a good idea to sew over these “intersections” twice for extra durability. This reinforced sewing approach ensures that your Rag Quilt Purse – Pattern can handle the weight of books, tablets, or heavy groceries without any risk of the seams splitting.
The most satisfying part of completing a Rag Quilt Purse – Pattern is the snipping process. Using your rag snips, cut into the seam allowance every 1/4 to 1/2 inch. Be extremely careful not to cut into the actual seam line! This fringe cutting technique is what releases the fibers so they can fluff up. It takes some time, but it is the defining characteristic that makes the Rag Quilt Purse – Pattern so charming.
After all the seams of your Rag Quilt Purse – Pattern are snipped, including the top edge and the handles, it is time for the “magic wash.” Put the purse in the washing machine on a regular cycle with cold water. The agitation of the machine causes the cut edges of the flannel and cotton to fray and bloom. This is where the Rag Quilt Purse – Pattern truly transforms from a pile of sewn squares into a soft, textured masterpiece.
Warning: Your first wash will produce a massive amount of lint! It is highly recommended to take your Rag Quilt Purse – Pattern to a laundromat for the first wash to avoid clogging your home plumbing or dryer vents. If you do wash at home, check your lint trap halfway through the drying cycle. The drying process is just as important as the washing for achieving the maximum “fluff” on your Rag Quilt Purse – Pattern.
Once dry, you might see some long, stray threads hanging from the seams of your Rag Quilt Purse – Pattern. You can simply trim these with scissors. Do not pull them, as they are part of the fringe. Over time, with more washes, the fringe on your Rag Quilt Purse – Pattern will become even softer and more beautiful, much like a favorite pair of well-worn jeans.
To keep your Rag Quilt Purse – Pattern looking its best, avoid washing it with items that have zippers or hooks that could snag the fringe. Treat it like any other handmade quilt item; gentle care will ensure it lasts for years. If the bag gets heavily soiled, a spot clean is often better than a full machine wash once the initial fringe has been established.
Finally, take a moment to admire the texture and weight of your completed project. The Rag Quilt Purse – Pattern is more than just a bag; it is a piece of wearable art that carries the history of quilting into the modern day. Whether you use it as your “everyday bag” or give it as a gift, your Rag Quilt Purse – Pattern is a testament to your creativity and patience in the craft of sewing.
Can I use denim for a Rag Quilt Purse – Pattern?
Yes, denim is excellent for a Rag Quilt Purse – Pattern because it frays very well. However, because it is much thicker than flannel, you will need to use a very sharp needle and perhaps only two layers instead of three to prevent the seams from becoming too bulky for your machine to handle.
How many squares do I need for a medium-sized purse?
For a standard tote-sized Rag Quilt Purse – Pattern, you will typically need about 24 to 30 squares (6-inch size). This allows for two main panels and a bottom. Always check the specific dimensions of your purse pattern before you start cutting your fabric.
Why isn’t my Rag Quilt Purse – Pattern fraying enough?
The most common reason is using fabric with a very tight weave or not washing the bag on a long enough cycle. Also, ensure you have snipped close enough to the seam (about 1/8 inch away). The more you wash and dry the Rag Quilt Purse – Pattern, the more the fringe will develop.
Can I make this pattern without a sewing machine?
While technically possible, a Rag Quilt Purse – Pattern involves sewing through many thick layers. Hand-sewing would be extremely difficult and might not provide the strength needed for a bag. A machine is highly recommended for this specific quilting project.
What is the best way to clean my purse after the first wash?
After the initial “bloom” wash, you can wash your Rag Quilt Purse – Pattern on a gentle cycle. Always air dry or tumble dry on low heat. Avoid high heat, as it can make the cotton fibers of your handmade purse feel stiff or brittle.
Do I have to use batting?
No, batting is optional. If you want a softer, more “slouchy” Rag Quilt Purse – Pattern, you can use a layer of flannel in the middle instead. Batting is only necessary if you want that classic “puffy” quilt look or extra insulation for the bag’s contents.
Creating a Rag Quilt Purse – Pattern is a rewarding experience that results in a one-of-a-kind accessory full of texture and character. In this article, we have covered the essential steps to success: from selecting the right 100% cotton flannel and tools like rag quilt snips, to the unique construction method of sewing wrong sides together.
We explored how to reinforce the handles, add functional pockets, and the critical washing process that brings the “rag” effect to life. By following these guidelines, you can master the Rag Quilt Purse – Pattern and create a durable, stylish bag that reflects your personal craft style.


