
Patchwork Bird Tutorial

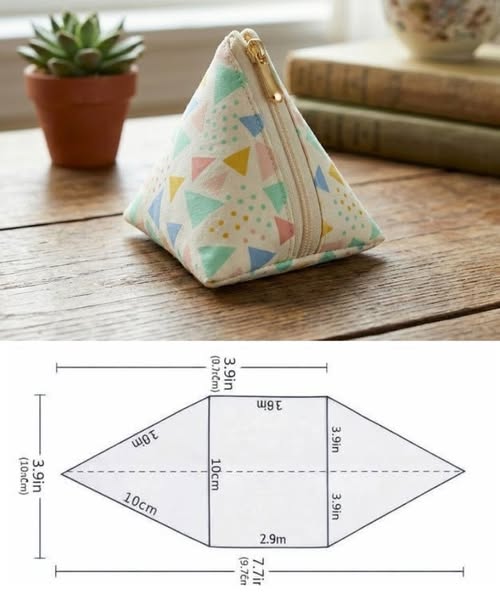
The Triangular zippered fabric case – Pattern offers a refreshing twist on the standard rectangular pencil pouch, providing a sculptural and highly functional solution for organizing your essentials. Whether you are looking for a stylish way to store your favorite pens, makeup brushes, or small tech cables, a well-drafted Triangular zippered fabric case – Pattern combines the art of geometric sewing with the practicality of everyday use. This specific design is favored by crafters because it stands upright on a desk, making it easier to access items compared to flat pouches that tend to collapse or roll over.
Developing or following a Triangular zippered fabric case – Pattern is an excellent project for intermediate sewists who want to practice their zipper installation skills and 3D construction techniques. The unique “tetrahedron” or prism shape is achieved through clever folding and specific seam placements that might seem like a puzzle at first but result in a very sturdy structure once completed. Because the Triangular zippered fabric case – Pattern uses relatively small amounts of fabric, it is also a fantastic “scrap buster,” allowing you to use those high-end designer remnants that are too small for a garment but too beautiful to throw away.
In this guide, we will explore the nuances of creating your own Triangular zippered fabric case – Pattern, focusing on fabric selection, structural integrity, and the hardware needed for a professional finish. We will look at how to optimize the zipper placement and why the “boxing” of corners is the secret to that perfect triangular silhouette. By mastering this sewing template, you can create customized gifts that look like they came straight from a boutique, all while honing your precision cutting and assembly skills in a way that is both enjoyable and deeply satisfying.
When you decide to start a Triangular zippered fabric case – Pattern, the weight of the fabric is your most important consideration. For a case that maintains its geometric edges, heavyweight cotton canvas or duck cloth is ideal because it has the natural stiffness required to hold a 3D shape. If you prefer using lighter quilting cottons for their beautiful prints, you must pair them with a high-quality fusible interfacing to provide the necessary body and prevent the case from looking limp or saggy.
The choice of lining fabric for your Triangular zippered fabric case – Pattern can also enhance its utility. Many makers choose a light-colored lining to make it easier to see small items at the bottom of the pouch. Using a wipeable nylon fabric or a laminated cotton for the interior is a great idea if the case will be used for makeup or art supplies that might leak. This attention to internal detail ensures that your handmade fabric case is as practical as it is aesthetically pleasing.
Zippers are the heart of the Triangular zippered fabric case – Pattern, and choosing the right one is paramount. A nylon coil zipper is usually preferred because it is easy to sew over and can be trimmed to the exact length required by your specific pattern. If you want a more “industrial” or premium look, a metal teeth zipper adds weight and a high-end feel, though it requires more caution when sewing near the metal stops to avoid breaking your machine needle.
Interfacing is the “invisible hero” of the Triangular zippered fabric case – Pattern. Without it, the triangular peaks may collapse under the weight of the contents. A firm fusible fleece provides a soft, padded feel while maintaining the shape, which is excellent if the case is meant to protect fragile items like eyewear. For a more rigid, architectural look, a woven sew-in stabilizer can be used to reinforce the side panels, ensuring the triangles remain sharp and well-defined.
Thread choice should not be overlooked when working on your Triangular zippered fabric case – Pattern. Since the corners and zipper ends will be under a fair amount of tension, using a poly-wrapped cotton thread provides the perfect balance of strength and flexibility. Matching your thread color to the zipper tape creates a seamless, professional appearance, while choosing a topstitching thread in a contrasting color can highlight the unique geometric lines of the triangular design.
Lastly, consider adding a small pull-tab or “grab loop” to the end of your Triangular zippered fabric case – Pattern. A small piece of leather cord or a folded fabric strip makes it much easier to hold the case while pulling the zipper open. These small hardware and trim additions are what elevate a simple DIY sewing project into a functional accessory that feels complete and well-engineered for daily use.
The “magic” of the Triangular zippered fabric case – Pattern lies in the initial cutting phase, which usually involves a single rectangular piece of fabric that is folded in an unconventional way. To ensure your case doesn’t end up lopsided, using a rotary cutter and a large acrylic ruler is highly recommended over standard fabric scissors. Precision in the initial rectangle dimensions is what ensures that all the sides of the triangle meet perfectly at the apex during final assembly.
Before you begin sewing your Triangular zippered fabric case – Pattern, it is essential to mark your “pivot points.” These are the specific spots where the zipper ends and the fabric folds to create the base. Using a tailor’s chalk or a heat-erasable pen allows you to see these marks clearly without permanently staining your fabric. Accurate marking is the key to achieving the symmetrical proportions that make this specific case design so visually striking and stable.
One of the unique aspects of a Triangular zippered fabric case – Pattern is how the zipper is installed relative to the seams. Unlike a flat pouch, one side of the triangle is actually formed by the zipper itself. This means you must be very careful with your seam allowance; even a 1/8 inch deviation can throw off the entire alignment of the triangle. Most patterns recommend a standard 3/8 inch or 1/2 inch allowance to provide enough “room to breathe” near the zipper teeth.
If you are designing your own Triangular zippered fabric case – Pattern, remember that the width of the rectangle determines the height of the triangle, while the length of the rectangle determines the length of the case. Understanding this geometric relationship allows you to customize the size for specific items, such as extra-long knitting needles or short, bulky charger blocks. Playing with these ratios is a great way to experiment with spatial design in sewing.
Cutting the lining and the outer fabric simultaneously is a great time-saving tip for the Triangular zippered fabric case – Pattern. By layering the outer fabric, the interfacing, and the lining together before cutting, you ensure that every piece is identical. This bulk cutting technique minimizes the risk of the lining being slightly larger than the exterior, which often causes frustrating “bunching” or “bubbles” inside the finished zippered pouch.
Finally, don’t forget to notch your centers. Making a tiny snip (less than 1/8 inch) at the midpoint of each side of your fabric pieces helps you align the zipper perfectly. In a Triangular zippered fabric case – Pattern, alignment is everything. These small notches act as your North Star, guiding you through the assembly process and ensuring that the “peak” of your triangle is centered exactly where it should be for a balanced final result.
The most intimidating part of the Triangular zippered fabric case – Pattern for many is the zipper installation. To make it easier, use wash-away quilting tape or a glue stick to hold the zipper in place instead of pins. This prevents the zipper from shifting as you sew, which is a common cause of “zipper wave” in handmade fabric cases. Sewing slowly with a dedicated zipper foot will allow you to get close to the teeth for a clean, professional look.
Once the zipper is attached to both sides of the fabric, you essentially have a tube. The transformation into the Triangular zippered fabric case – Pattern happens during the side seam construction. One end of the tube is sewn flat, while the other end is rotated 90 degrees before being sewn. This rotational sewing technique is the “secret sauce” that pulls the flat fabric into a three-dimensional triangular prism, creating the unique shape that gives the case its name.
When sewing the ends of your Triangular zippered fabric case – Pattern, it is crucial to leave the zipper partially open. If you sew the ends shut with the zipper fully closed, you will have no way to turn the case right-side out! This is a classic “sewing fail” that is easily avoided by simply sliding the zipper pull to the center of the case before you finish the final side seams of your triangular pattern.
For a truly high-end Triangular zippered fabric case – Pattern, consider using “zipper tabs.” These are small squares of fabric sewn over the ends of the zipper tape. Zipper tabs eliminate the bulk that often occurs at the corners of a pouch, allowing your sewing machine to glide over the layers more easily. This technique results in “clean corners” that are much easier to poke out and shape once the project is finished.
Inside the Triangular zippered fabric case – Pattern, the raw seams can be finished in several ways. If you want a quick project, you can use pinking shears to trim the edges, or a zigzag stitch to prevent fraying. However, for a truly professional interior, “binding” the seams with bias tape is the gold standard. This covers the raw edges completely, making the inside of your triangular fabric pouch look as beautiful as the outside.
As you reach the final steps of assembly, “clipping your corners” is essential. By cutting away a small triangle of fabric from the seam allowance at the corners (being careful not to cut the stitches), you remove the bulk that prevents the corners from being sharp. Using a point turner or a blunt chopstick to gently push out the corners of your Triangular zippered fabric case – Pattern will give it those crisp, clean lines that define the design.
The final press is what truly “sets” the shape of your Triangular zippered fabric case – Pattern. Using a hot iron and a tailor’s ham (or a rolled-up towel) inside the case allows you to steam the seams into their final triangular position. This step is non-negotiable if you want your handmade case to have that crisp, “store-bought” quality. The steam helps the interfacing bond permanently and smooths out any minor wrinkles from the turning process.
Customization is where the Triangular zippered fabric case – Pattern really becomes fun. You can add “fussy cut” details, where you center a specific motif from your fabric (like a flower or an animal) right on the main triangular panel. This fabric placement strategy makes your case look custom-designed and high-end. It’s a great way to showcase a favorite print that might otherwise get lost in a larger project.
Adding a wristlet strap or a carabiner loop to your Triangular zippered fabric case – Pattern increases its portability. You can sew a D-ring into one of the side seams during assembly. This allows the case to be clipped onto the outside of a backpack or used as a “clutch” for a quick trip to the store. Small utilitarian modifications like this can make the pattern much more useful for people with active, on-go-lifestyles.
If you are making the Triangular zippered fabric case – Pattern for tech accessories, consider adding an internal elastic loop. This can be sewn into the lining to hold a USB drive or a stylus in place so it doesn’t rattle around. This type of internal organization is highly valued in modern accessory design and turns a simple pouch into a sophisticated tech organizer that people will use every single day.
Personalization through embroidery or heat-transfer vinyl (HTV) is another great way to enhance the Triangular zippered fabric case – Pattern. Adding a name or a monogram to the side panel before assembly makes it a perfect personalized gift. Since the panels are flat before you do the final “rotational” sew, it is very easy to add decorative stitching or embellishments to the fabric at the beginning of the project.
Finally, think about the “presentation” of your finished Triangular zippered fabric case – Pattern. If you are selling these at craft fairs or giving them as gifts, stuffing them with a bit of tissue paper helps them hold their shape while on display. The sculptural appeal of the triangular design is its biggest selling point, and showing off that 3D silhouette is the best way to highlight the unique charm of this creative sewing pattern.
Is the Triangular zippered fabric case – Pattern difficult for beginners?
It is considered an “advanced beginner” project. While the sewing itself is straightforward, the 3D construction and the 90-degree rotation at the end can be a bit confusing the first time. However, once you understand the logic of the folds, it becomes a very fast and easy sewing project.
What size zipper do I need for this pattern?
Most standard Triangular zippered fabric case – Pattern designs use a zipper between 8 and 10 inches. It is usually better to use a longer zipper and trim it down, as this allows you to move the zipper pull out of the way while you are sewing the side seams.
Can I use leather or vinyl for this case?
Yes! Leather and vinyl are excellent because they have a lot of “body” and hold the triangular shape beautifully without needing interfacing. However, you will need a non-stick (Teflon) foot and a leather needle on your sewing machine to handle these thicker, stickier materials.
How do I clean my fabric case?
If you used quilting cotton and a washable interfacing, you can hand wash the case in cool water and air dry it. For cases made with canvas or vinyl, spot cleaning with a damp cloth is usually best to maintain the structural integrity and the sharpness of the triangular points.
Why does my triangle look lopsided?
This usually happens if the “rotation” at the end wasn’t exactly 90 degrees or if the zipper wasn’t centered. Using notches and marking tools to find the exact center of your fabric rectangle before you start sewing is the best way to prevent a lopsided triangular pouch.
Can I scale this pattern up to make a larger bag?
Absolutely! You can use the same triangular logic to make a large toiletry bag or even a yoga mat bag. Just remember that as you scale up, you will need even sturdier interfacing or a layer of foam stabilizer to help the larger panels support their own weight.
The Triangular zippered fabric case – Pattern is a brilliant example of how simple geometry can be used to create something both beautiful and highly functional. Throughout this article, we’ve explored the importance of selecting the right materials—like heavyweight canvas and nylon coil zippers—to ensure a professional and durable finish.
We delved into the “secret” of the 90-degree rotational seam that transforms a flat rectangle into a 3D prism, and we discussed the technical nuances of zipper tabs and bias-bound seams for a high-end interior. Whether you are using this pattern to organize your own life or to create unique, handmade gifts, the skills you gain in precision cutting and spatial assembly will undoubtedly enhance your overall sewing repertoire.


