
Crochet Flower - Tutorial

Crochet a Star – Pattern is a versatile and enchanting project that allows crafters of all levels to create celestial decorations that last a lifetime. Whether you are looking to create festive holiday ornaments, a mobile for a nursery, or simply a collection of “wish stars” to give to friends, a well-structured Crochet a Star – Pattern provides the perfect foundation for artistic expression. The beauty of the star shape is its universal appeal, and by using your crochet hook, you can turn a simple strand of yarn into a three-dimensional symbol of hope and light that carries a unique handmade charm.
Learning how to Crochet a Star – Pattern is often considered a rite of passage for many beginners because it introduces the concept of working in rounds while simultaneously teaching how to create sharp geometric points. This specific Pattern relies on the balance of stitch heights—moving from short stitches like the single crochet to taller ones like the triple crochet—to achieve that iconic five-pointed silhouette. Because stars are relatively small projects, they offer instant gratification and a low-pressure way to practice new techniques without the commitment required for a full blanket or garment.
In this comprehensive guide, we will explore the technical and creative aspects of the Crochet a Star – Pattern, ensuring that your finished stars are symmetrical, crisp, and beautiful. We will discuss the best fiber choices to maintain structural integrity, the mathematical logic behind the star’s points, and various ways to display your finished pieces. By mastering the Crochet a Star – Pattern, you open up a world of decorative possibilities, allowing you to sprinkle a little bit of stardust over your home decor or handmade gift collections.
Selecting the right yarn is the first step toward a successful Crochet a Star – Pattern, as the fiber content determines how well the points will hold their shape. Mercerized cotton yarn is widely regarded as the best choice for stars because of its strength, lack of “fuzz,” and slight sheen, which makes the finished star look more like a polished ornament. Unlike acrylic, which can be somewhat soft and “squishy,” cotton provides the stitch definition needed for the geometric edges of a Crochet a Star – Pattern to appear sharp and distinct.
The size of your crochet hook should be chosen carefully to ensure a tight, dense fabric that prevents the star from drooping. Most experts suggest using a hook that is slightly smaller than what is recommended on the yarn label for this specific Crochet a Star – Pattern. A smaller hook size creates a stiffer fabric, which is essential if you want your star to stand upright or hang without curling. For standard worsted weight cotton, a 3.5mm or 4.0mm hook is usually the ideal tool for achieving a professional finish.
Stiffness is a common concern when you Crochet a Star – Pattern, especially for larger designs. If you want your stars to be extra rigid for use as Christmas tree toppers or wall art, you might consider using fabric stiffener or a mixture of water and white craft glue once the project is finished. This finishing technique allows the star to maintain its points even when subjected to gravity or handling. It turns a soft crochet project into a durable, wood-like decoration that can be used year after year.
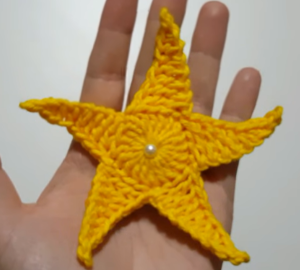
Color selection plays a massive role in the mood of your Crochet a Star – Pattern. Traditional yellow and gold are perennial favorites, but a “galaxy” palette featuring deep purples, blues, and blacks with flecks of silver can be breathtakingly modern. If you are making a Crochet a Star – Pattern for a baby, soft pastels like mint or blush can create a soothing atmosphere. Don’t be afraid to experiment with metallic yarns or threads, as they add a literal sparkle to your celestial creations.
In addition to yarn and hooks, you will need a few basic notions like a tapestry needle and sharp scissors. The needle is particularly important for weaving in the center tail of your Crochet a Star – Pattern, as a tight center is what makes the star look symmetrical. Many crafters also like to have stitch markers nearby to help count the initial stitches in the foundation ring. Accuracy in the first round is vital, as an extra stitch can lead to a star with six points instead of five.
Finally, consider the scale of your Crochet a Star – Pattern based on your intended use. If you use a thin crochet thread, you can create tiny stars that work perfectly as earrings or delicate appliqués for clothing. If you use bulky t-shirt yarn, you can create a large star-shaped cushion or a floor mat. The mathematical logic of the Crochet a Star – Pattern remains the same regardless of the size; you simply change the “yarn-and-hook combo” to achieve the desired dimensions for your project.
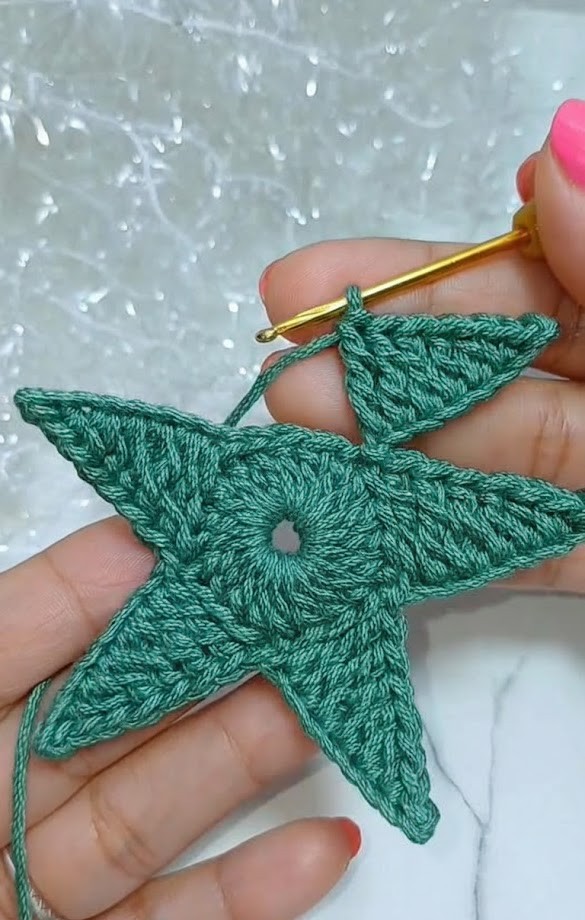
The foundation of most Crochet a Star – Pattern designs is a central circle, often started with a “Magic Ring.” This technique is superior to the “chain-three” method because it allows you to pull the center hole completely shut, creating a solid middle for your star. A high-quality Crochet a Star – Pattern will begin with a specific number of stitches—usually 10 or 15—that are divisible by the number of points you want to create. This mathematical foundation ensures that each ray of the star is exactly the same size and shape.
To create the points of the Crochet a Star – Pattern, you will use a sequence of stitches that grow in height. Typically, you will start with a chain that extends outward from the center circle. As you work your way back down that chain toward the center, you might use a slip stitch, then a single crochet, followed by a half-double crochet and a double crochet. This graduated stitch height is what creates the “triangle” shape of the star’s rays, turning a flat circle into a radiant star.
Maintaining a sharp point at the tip of each ray is a common challenge when you Crochet a Star – Pattern. To achieve a “crisp” tip, many patterns suggest adding a “picot stitch” or a small chain-one at the very peak of the point. This creates a tiny, pointed “v” shape that defines the star’s silhouette. Without this tip-definition technique, the rays might look more like rounded petals, which is lovely for a flower but less effective for a star-themed project.
The “valleys” between the points—the internal angles—are just as important as the peaks in a Crochet a Star – Pattern. To make these valleys sharp, you will often use a “slip stitch” or a “single crochet decrease” to pull the fabric tight between the rays. This contrast between the tall peaks and the deep valleys is what gives the Crochet a Star – Pattern its iconic geometric look. Keeping your tension consistent in these valleys prevents the star from looking “wavy” or loose at the center.
“Blocking” is the secret weapon of professional crocheters when completing a Crochet a Star – Pattern. Even if your stitches are perfect, the star might look a bit crumpled right off the hook. By pinning the points of the star to a foam blocking mat and lightly steaming them, you set the fibers in their ideal position. This fiber-setting process ensures that your Crochet a Star – Pattern looks exactly like the photos in a magazine, with perfectly straight edges and sharp, symmetrical points.
If you want to create a 3D effect for your Crochet a Star – Pattern, you can crochet two identical stars and sew them together around the edges, adding a small amount of polyester fiberfill before closing the final seam. This turns a flat motif into a “puffy star” that is incredibly satisfying to touch. This dimensional crochet technique is perfect for creating plush toys or ornaments that have a bit more presence and weight, making your Crochet a Star – Pattern even more versatile.
Once you have mastered the Crochet a Star – Pattern, the next step is deciding how to display your creations. One of the most popular ways is to create a “Star Garland” by stringing several stars together along a long crochet chain or a piece of twine. This decorative garland can be draped across a fireplace mantel, a bookshelf, or a window frame. Because the Crochet a Star – Pattern is so lightweight, you can use simple clear adhesive hooks to hang them without damaging your walls.
For a nursery or a child’s bedroom, you can use a Crochet a Star – Pattern to create a personalized mobile. By hanging stars of different sizes and colors from a wooden hoop or a set of crossed dowels, you create a soothing, celestial environment for a baby. You can even incorporate a “Crochet Moon” to complete the theme. This nursery decor project is a favorite among parents because it is soft, safe, and can be customized to match any color scheme perfectly.
Small stars created from a Crochet a Star – Pattern make excellent “Appliqués.” You can sew them onto the corners of a plain blanket, the pocket of a denim jacket, or even onto a winter beanie. This is a great way to “upcycle” existing clothing and give it a handmade touch. Using a contrasting yarn color for the appliqué makes the star stand out, turning a basic garment into a custom piece of art that showcases your Crochet a Star – Pattern skills.
Holiday ornaments are perhaps the most common use for a Crochet a Star – Pattern. By adding a simple loop of gold thread to the top point, you create a timeless Christmas tree decoration. You can also use them as “gift toppers” instead of traditional plastic bows. A handmade star ornament attached to a wrapped present is a gift in itself, and the recipient can hang it on their tree for years to come as a memory of your friendship and crafting talent.
In the kitchen or dining room, large stars made from a Crochet a Star – Pattern using thick cotton yarn can function as “Trivets” or “Coasters.” Cotton is naturally heat-resistant, so a star-shaped trivet is perfect for protecting your table from hot pots and pans. This application combines beauty with extreme utility. When following a Pattern for a trivet, make sure to use a very dense stitch pattern so there are no large gaps that heat can pass through.
Finally, consider using your Crochet a Star – Pattern to make “Prayer Stars” or “Comfort Stars.” These are small stars that people carry in their pockets as a reminder of hope or a specific intention. Giving someone a small, hand-crocheted star is a powerful gesture of support. Because they are so quick to make, you can keep a bowl of these stars by your front door to give to guests, spreading the joy and warmth of your Crochet a Star – Pattern hobby with everyone you meet.
Once you are comfortable with a basic five-pointed star, you can explore advanced variations of the Crochet a Star – Pattern. A “Six-Pointed Star” (often called a Star of David) or an “Eight-Pointed Star” (a Bethlehem star) uses different mathematical increments in the foundation round. Learning how to adjust stitch counts allows you to create a wide variety of celestial shapes. Each variation of the Crochet a Star – Pattern offers a different visual rhythm and challenges your understanding of crochet geometry.
“Overlay Crochet” is a technique that can take your Crochet a Star – Pattern to the next level of complexity. This involves working stitches into the “front loops” of previous rounds to create a raised, 3D texture on the surface of the star. An overlay star often looks like a piece of jewelry or an architectural carving. While it takes more time and concentration, the resulting intricate star design is a stunning masterpiece that showcases your advanced technical proficiency in the craft.
Using “Beads” within your Crochet a Star – Pattern can add a sophisticated sparkle that is perfect for formal occasions. You can pre-string beads onto your yarn and slide them into place as you crochet the points of the star. Placing a single bead at each tip or a cluster in the center turns a simple Crochet a Star – Pattern into a shimmering jewel. This beaded crochet technique is particularly popular for wedding favors or high-end holiday decorations.
“Color-Work” is another way to transform a standard Crochet a Star – Pattern. You can change colors for each round to create a “rainbow star,” or use a technique called “tapestry crochet” to create patterns inside the star itself. A multi-colored star has a much more playful and vibrant energy than a solid-colored one. This is a fantastic way to use up scrap yarn while experimenting with how different colors interact within the geometric frame of the star.
For a vintage look, you can follow a Crochet a Star – Pattern using fine thread and a tiny hook to create “Crochet Lace Stars.” These delicate pieces look like snowflakes and are often used to create doilies or tablecloth inserts. The delicacy of lace crochet requires a steady hand and good lighting, but the resulting stars are incredibly elegant. They represent the height of traditional fiber art and are often passed down as family heirlooms.
Finally, consider the “Interlocking Star” technique, where you crochet two stars of different colors and weave them together before finishing. This creates a complex, “Celtic knot” style appearance that is visually fascinating. Mastering the interlocking crochet method allows you to create patterns that look impossible to the untrained eye. It is the ultimate evolution of the Crochet a Star – Pattern, proving that even a simple shape can become a complex work of art with the right creative approach.
Is it hard to Crochet a Star – Pattern for a beginner?
Not at all! Many beginners find that a Crochet a Star – Pattern is one of the easiest ways to learn how to increase and decrease. The most important part is counting your stitches in the first round. If you can count to 10 or 15 and know how to do basic stitches, you can successfully Crochet a Star – Pattern on your very first try.
What is the best way to keep the points from curling?
Curling usually happens if your tension is too tight or if you are using a very soft yarn. The best solution is to block your star using steam and pins. If that doesn’t work, try using a slightly larger hook or a stiffer fiber like 100% cotton. Applying a bit of starch can also help the points stay flat and sharp.
How long does it take to finish one star?
Depending on the size and complexity of the Crochet a Star – Pattern, it usually takes between 15 and 30 minutes to complete a single star. This makes it an ideal “in-between” project or something you can do while watching a movie. You can easily finish a whole star garland in a single weekend.
Can I use any yarn for a Crochet a Star – Pattern?
While you can use any yarn, non-fuzzy yarns like cotton or bamboo are best for showing off the star’s shape. If you use a very fuzzy or “mohair” yarn, the points of the star might become blurred and look more like a round blob. For the best results, stick to yarns with good stitch definition.
How do I make a star with more than five points?
To change the number of points in a Crochet a Star – Pattern, you must change the number of stitches in your starting circle. For a 6-pointed star, you usually start with 12 or 18 stitches. The math is simple: the number of stitches in your base should be a multiple of the number of points you want to create.
Why is my star “puckering” in the middle?
Puckering usually means you have too many stitches in your center ring, causing the fabric to “ruffle.” Double-check your Crochet a Star – Pattern to ensure you haven’t accidentally added an extra stitch. Using the Magic Ring technique and pulling it tight after the first round will also help the center lie perfectly flat.
In this guide, we have explored the celestial and technical wonders of the Crochet a Star – Pattern, a project that brings a touch of the night sky into the palm of your hand. We discussed the critical importance of choosing mercerized cotton yarn and the right hook size to achieve a stiff, professional finish. We delved into the geometry of the star, explaining how graduated stitch heights create the rays and how the “Magic Ring” ensures a perfect center.
We also looked at the many ways to use your stars, from nursery mobiles and holiday ornaments to practical kitchen trivets and decorative garlands. Furthermore, we touched on advanced techniques like beaded crochet, overlay textures, and interlocking designs that allow you to push the boundaries of a simple Crochet a Star – Pattern. Whether you are a beginner looking for a quick win or an expert seeking a new challenge, the star is a timeless motif that rewards every stitch with a sense of wonder and accomplishment.


